This guide covers everything you need to get the best results from Ayna - from preparing your garments and setting up your shoot, to uploading, generating, and downloading your final images. We’ve organized the workflow into 4 stages:Documentation Index
Fetch the complete documentation index at: https://docs.getayna.com/llms.txt
Use this file to discover all available pages before exploring further.
- Preparation Stage
- Input & Upload Guidelines
- Using Ayna Studio
- Post-Production & Download
1. Preparation Stage
Before you start generating on Ayna, there are a few things to get right. This section covers which garment categories Ayna supports and how to set up your camera for clear, high-quality inputs.1.1 What You Can Shoot on Ayna
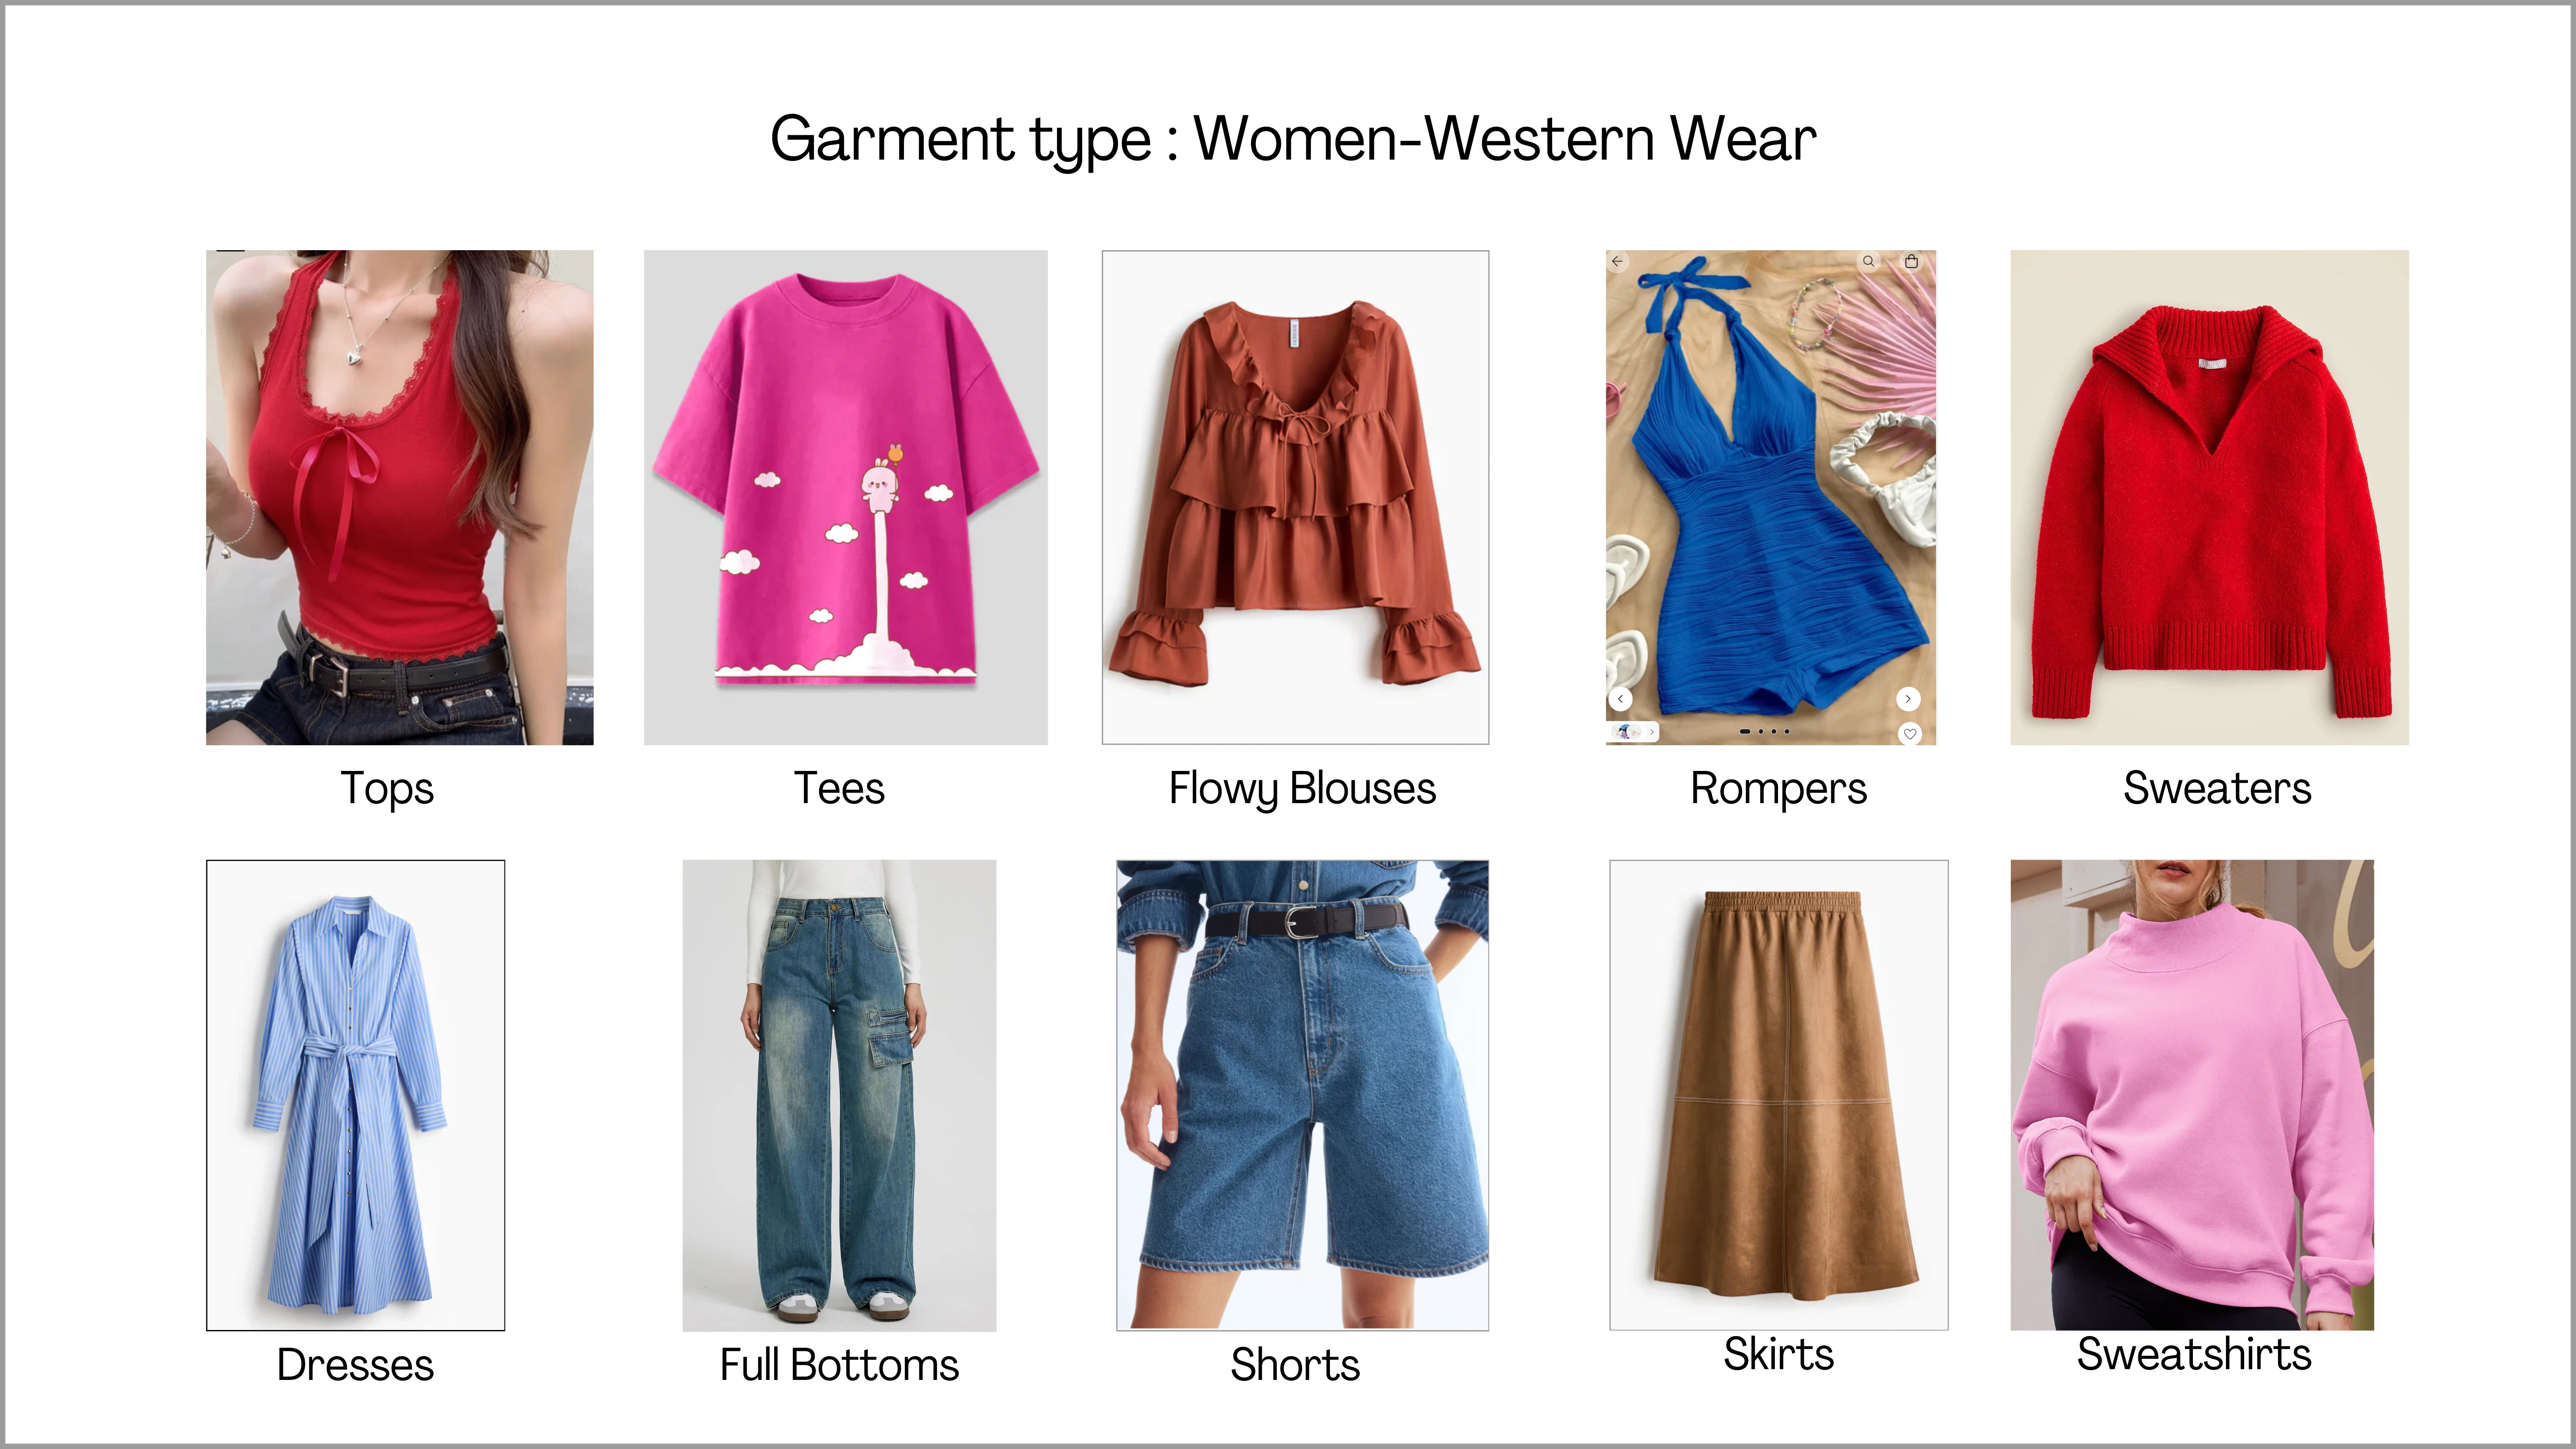
Ayna supports a wide range of garment categories. You can shoot and generate outfits for multiple segments, including Men’s wear, Women’s wear, and Kids wear, in both ethnic and western styles. This makes it easy for brands to use Ayna for different product categories under one platform.Women: Western Wear
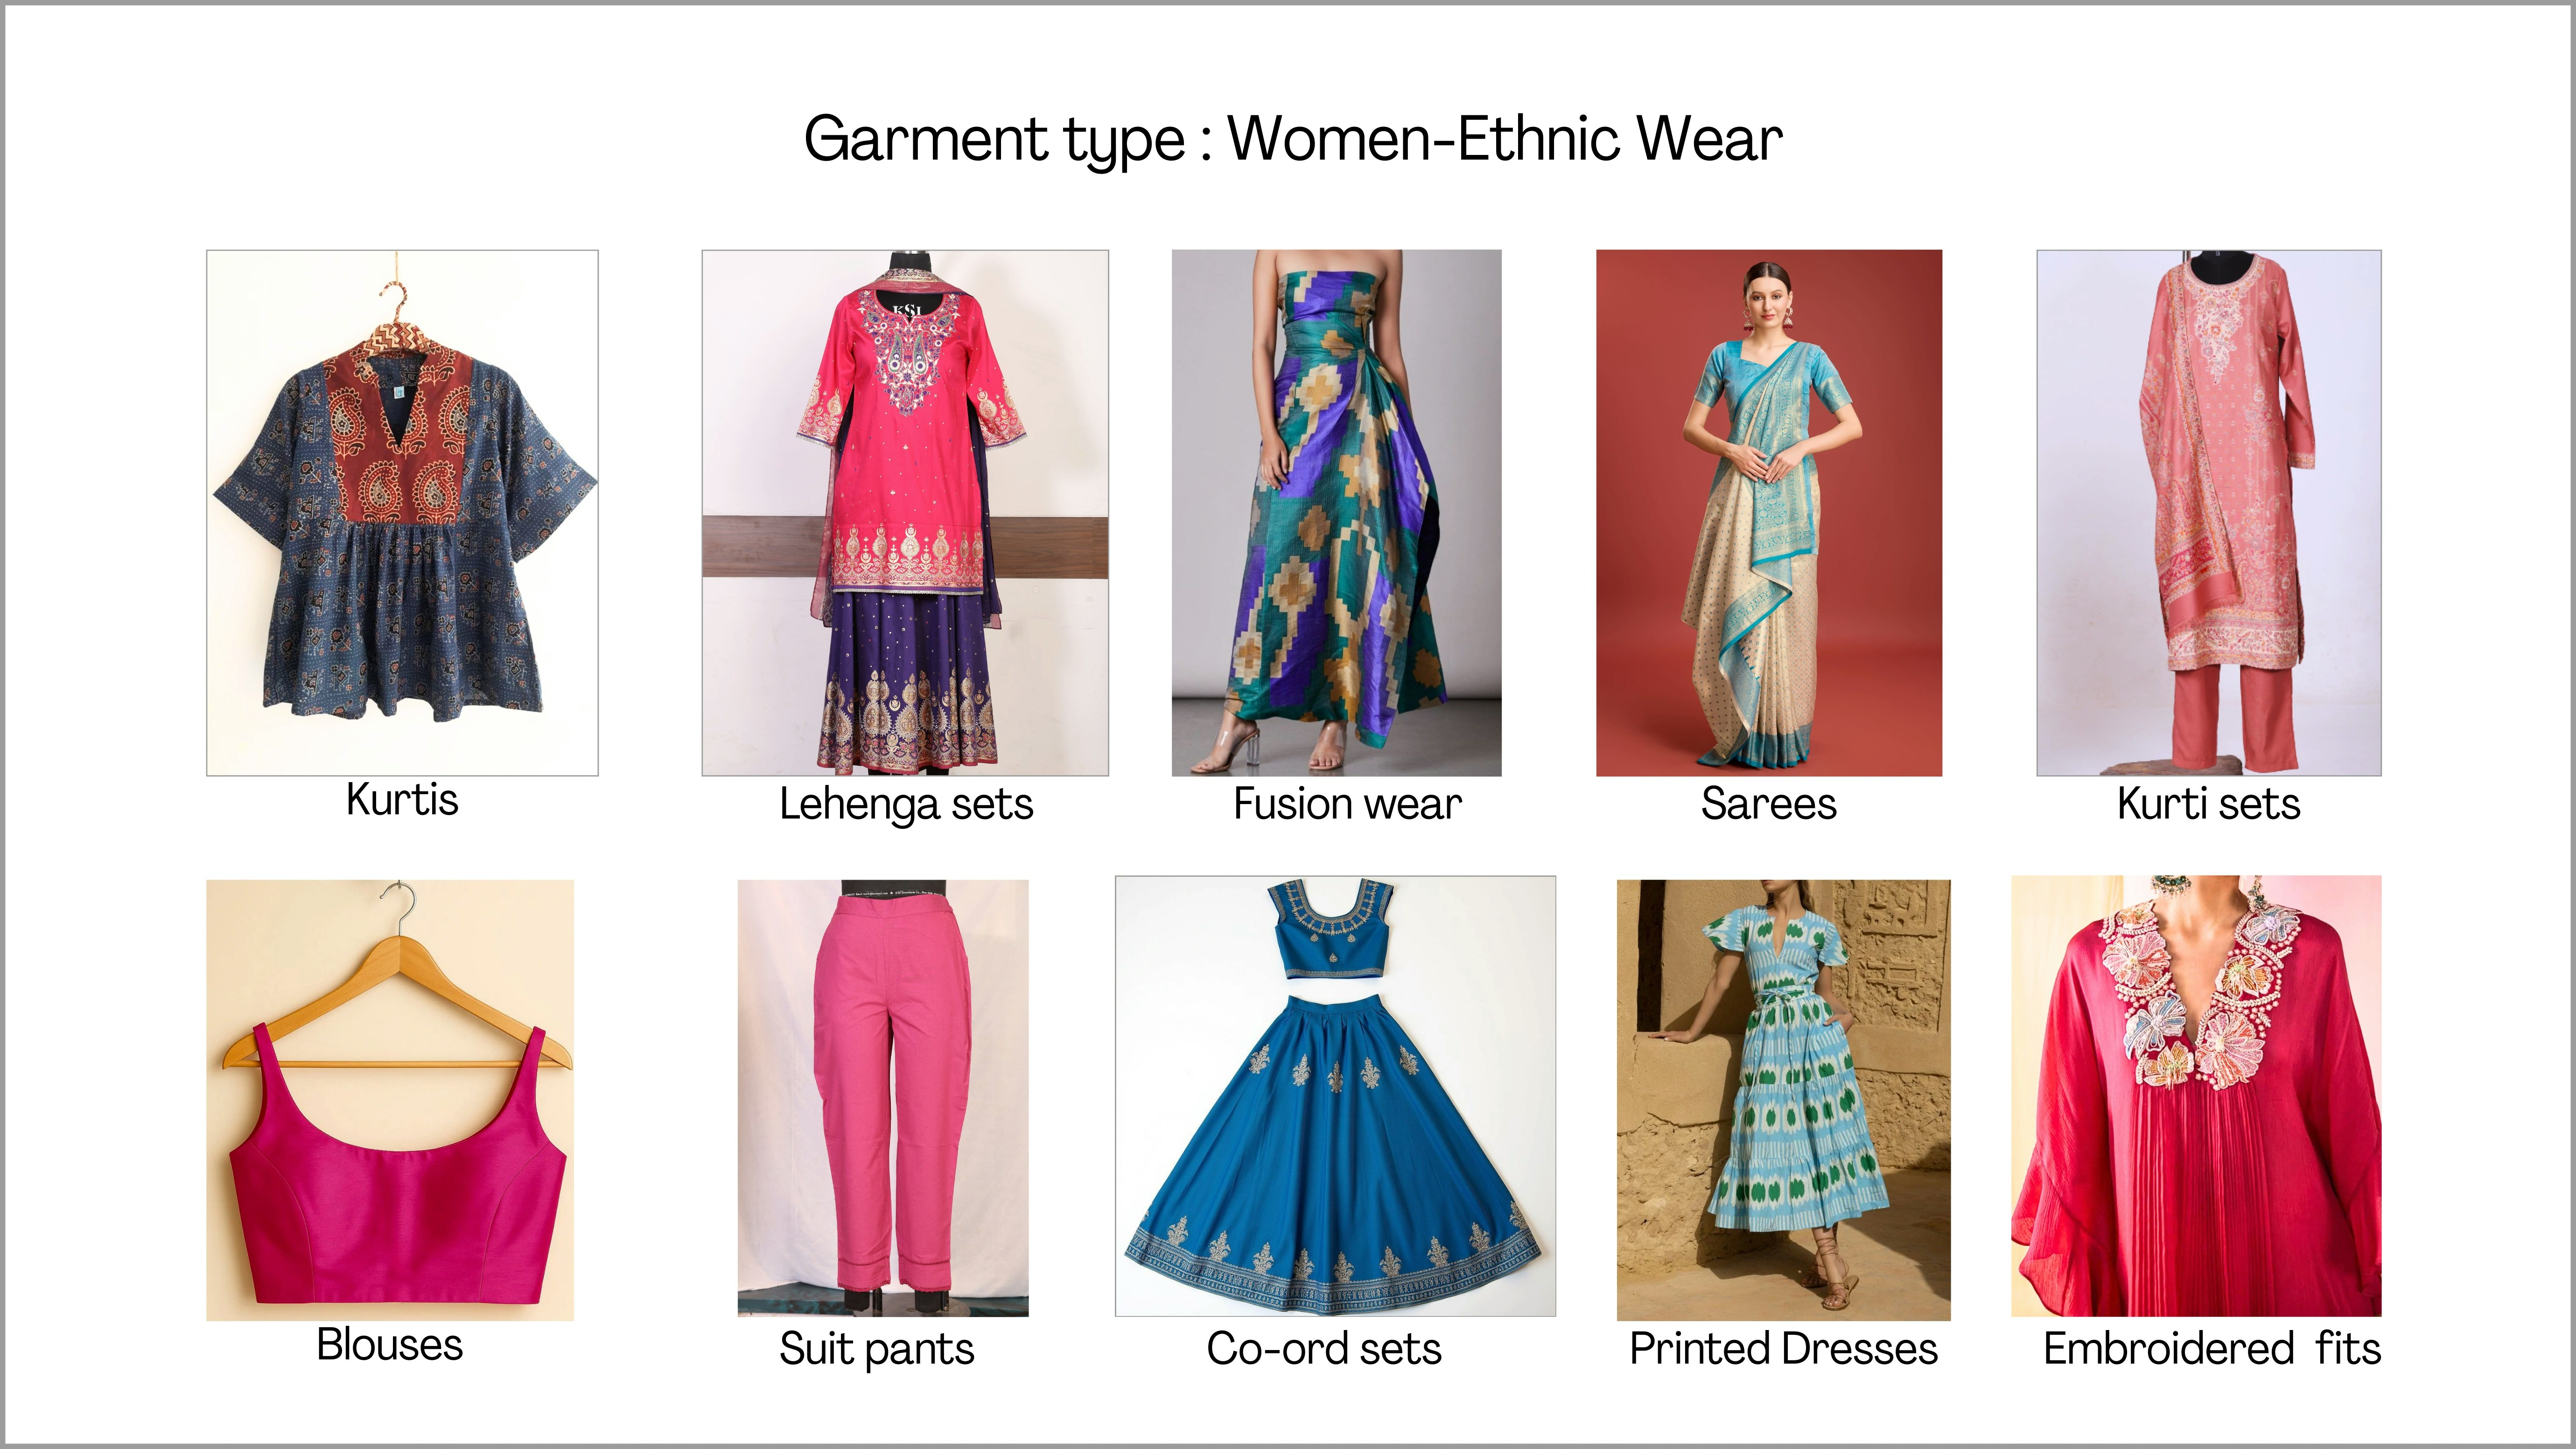
Women: Ethnic Wear
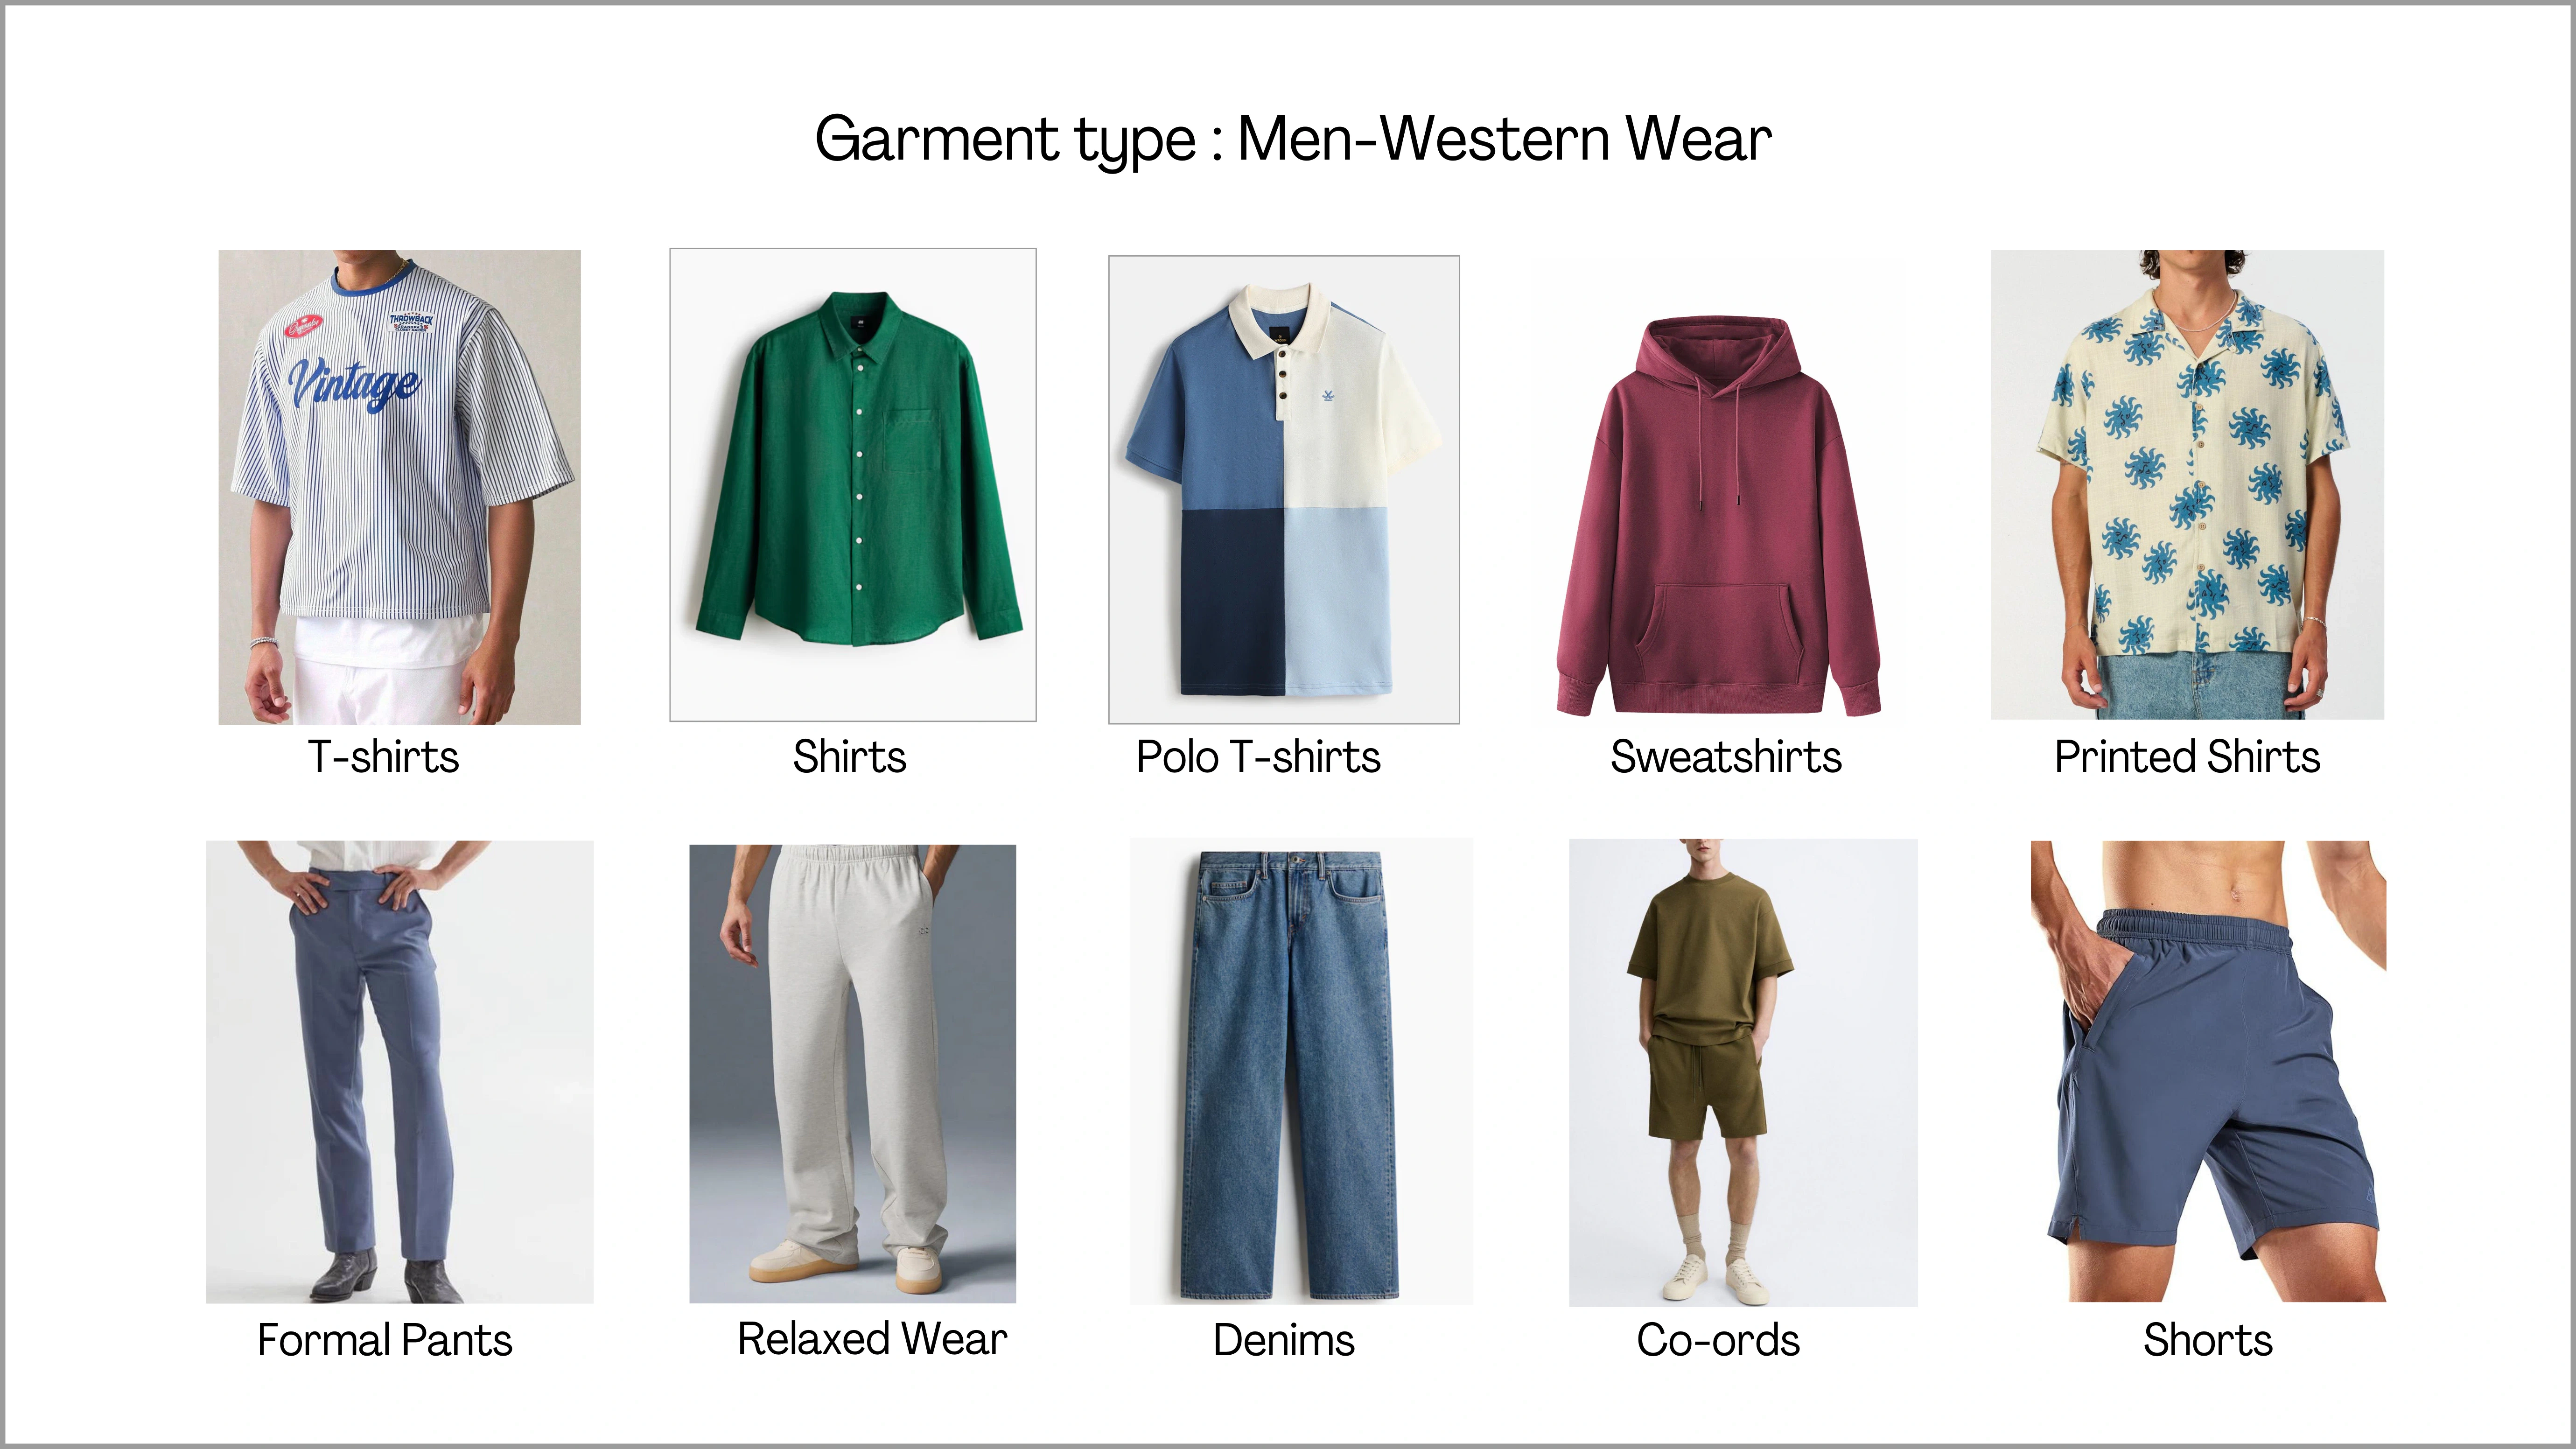
Men: Western Wear
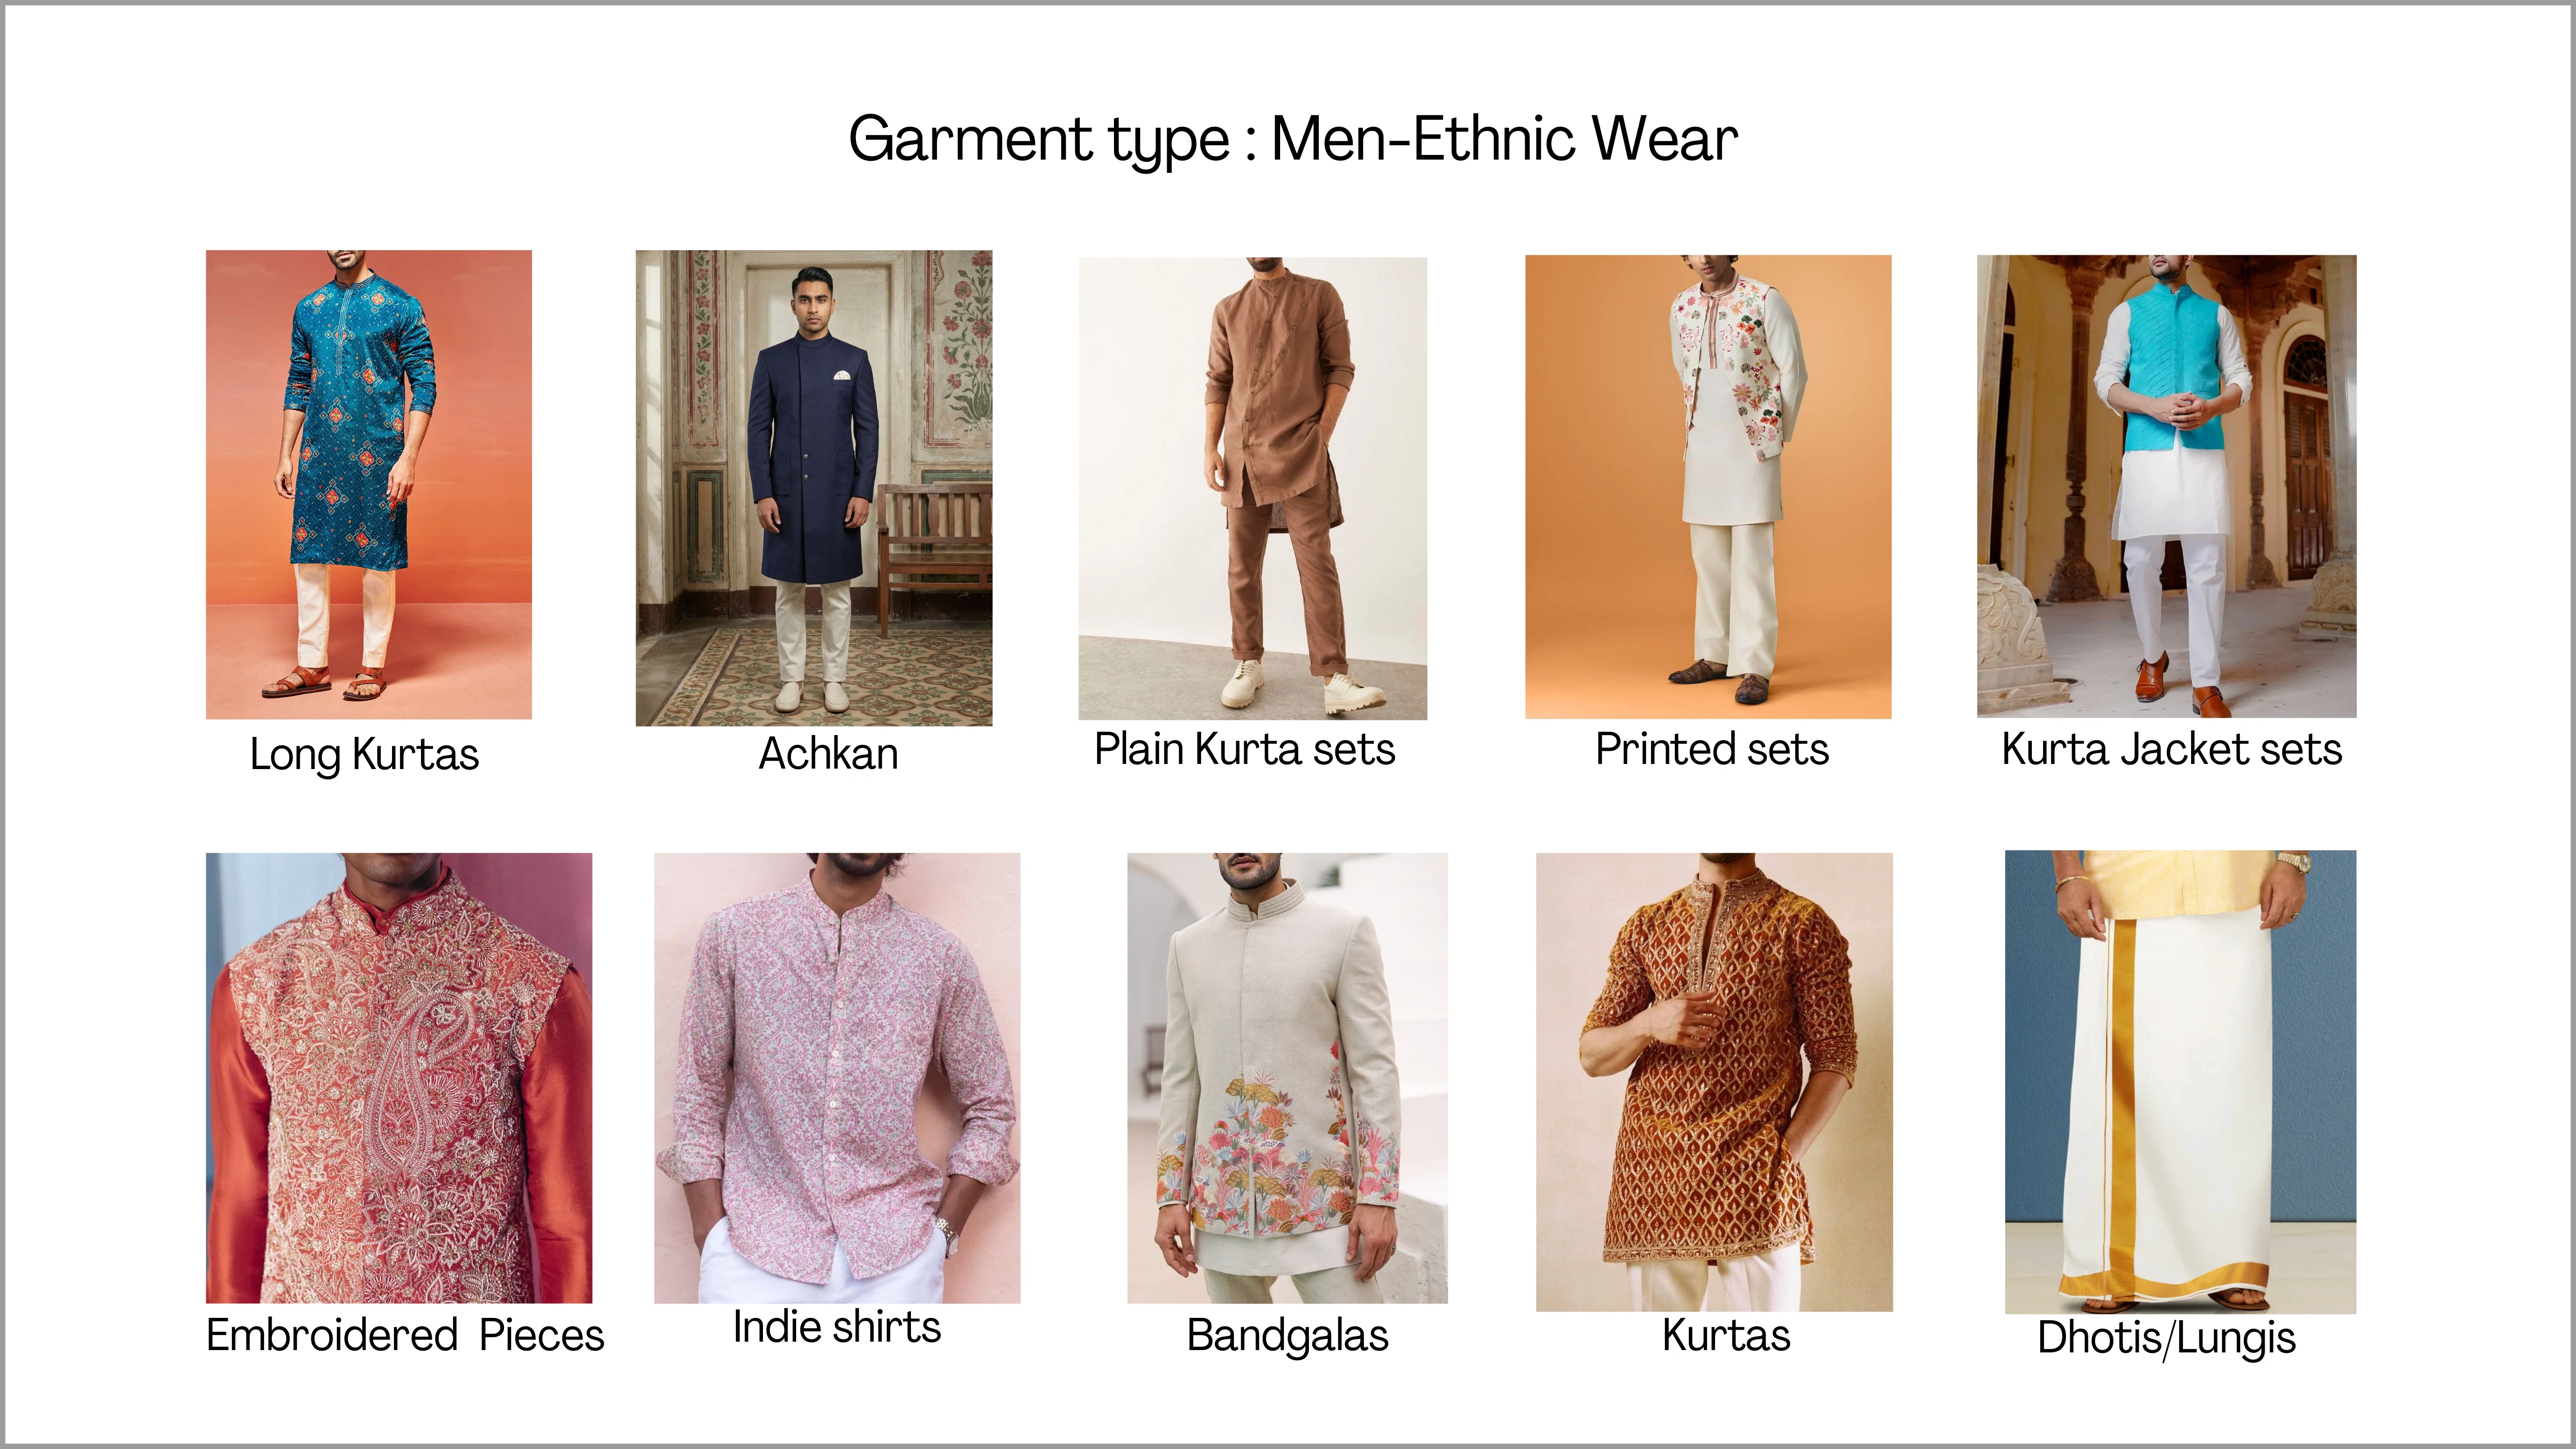
Men: Ethnic Wear
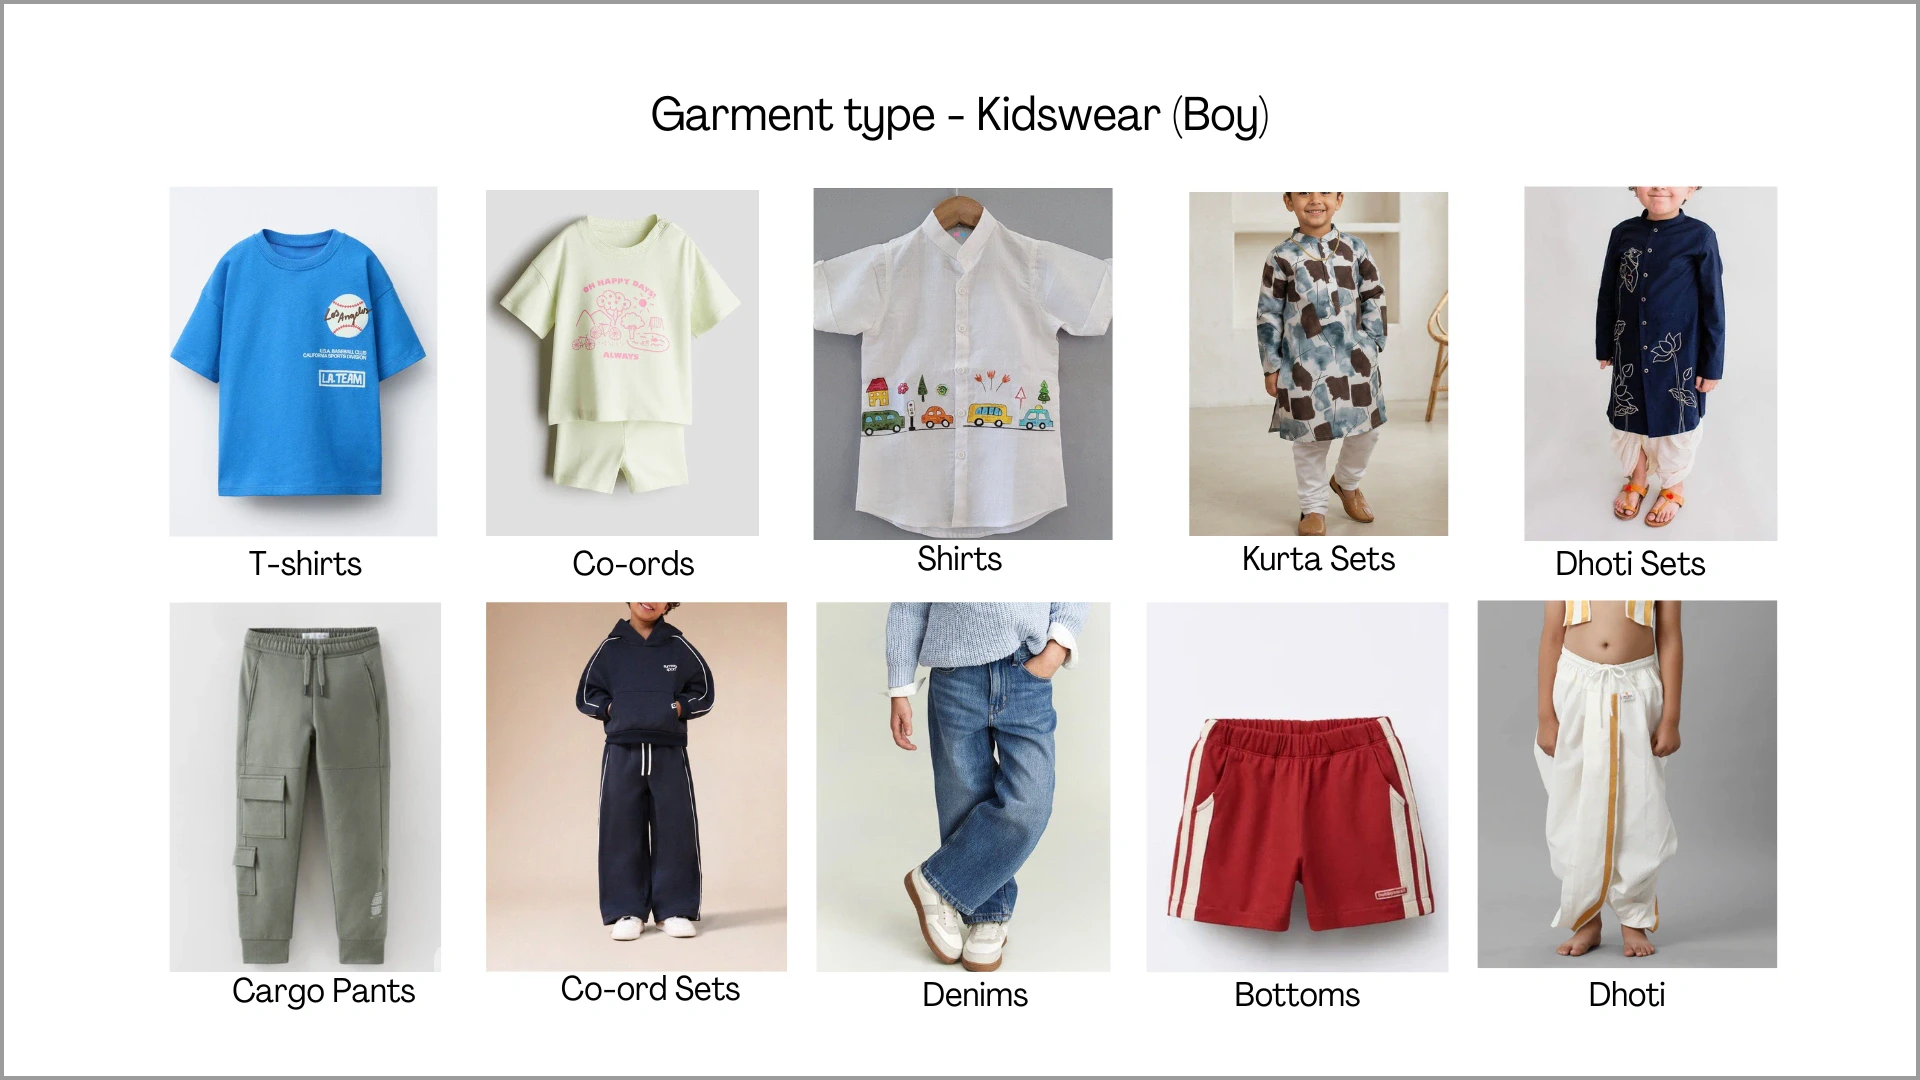
Kidswear: Girl
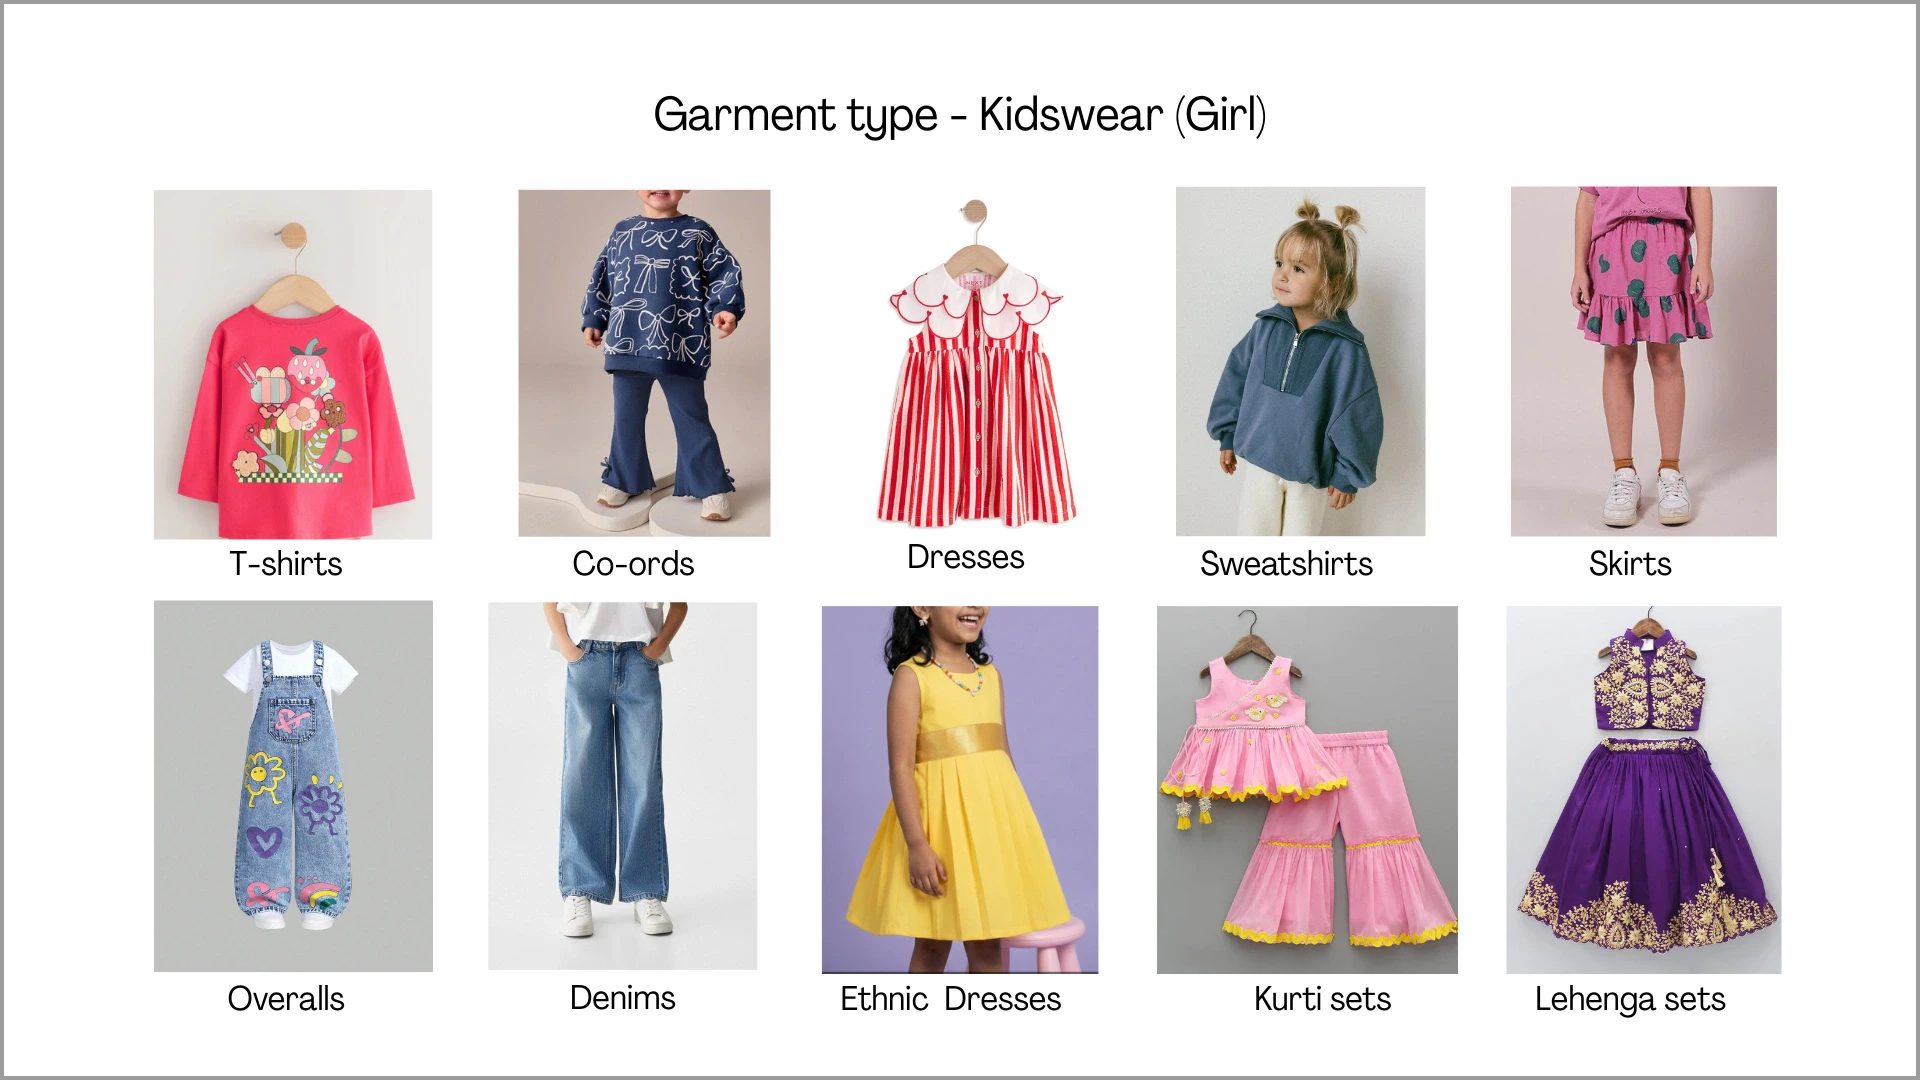
Kidswear: Boy
1.2 Recommended Clicking Methods
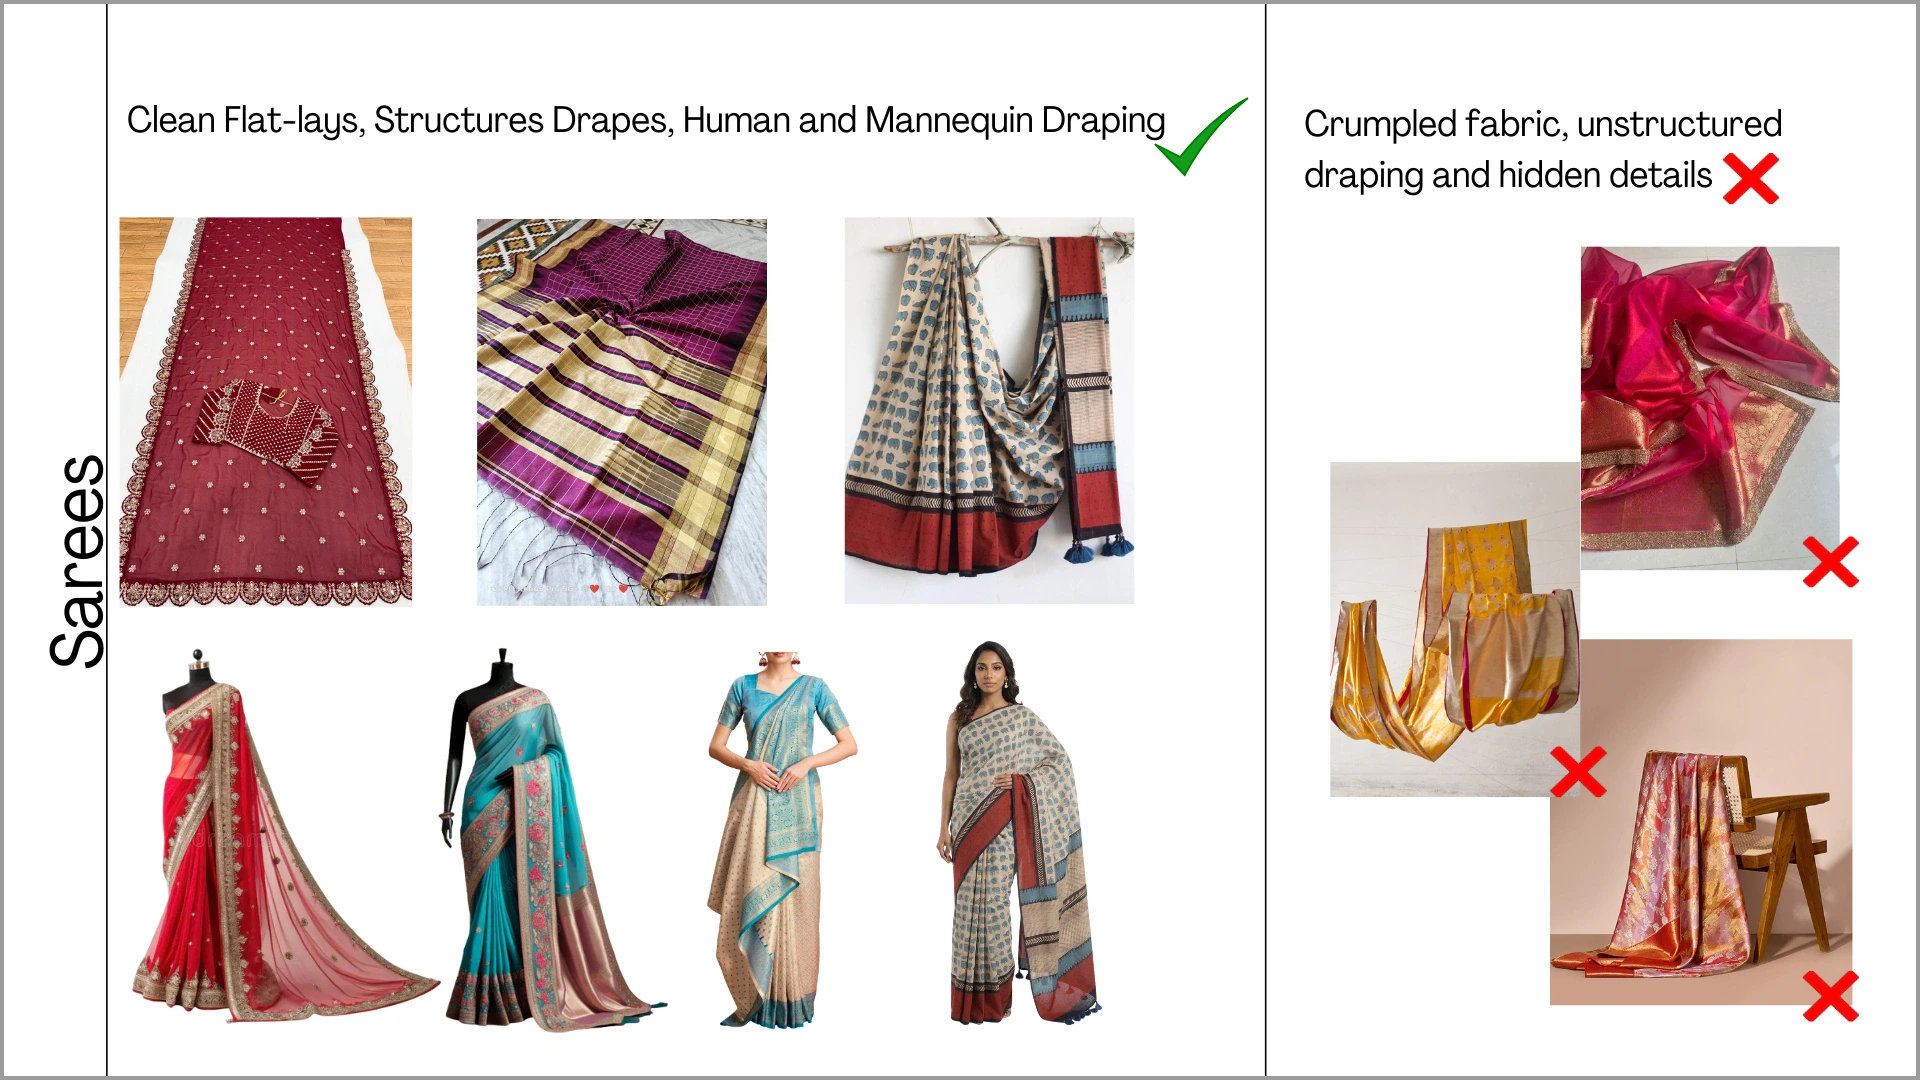
While Ayna supports a wide range of garment categories, the quality of the final AI output depends heavily on how the garment is prepared and photographed before upload. Certain garment types like sarees or heavy detailing, require specific input formats to achieve the best results. Refer to the guidelines below before proceeding with your shoot. 1. Sarees: To achieve accurate drape and full prints in AI results, the input image must clearly show the full drape, pleats, borders, and fall in a well-arranged format.DOs and DON'Ts for Sarees
DOs and DON'Ts for Sarees
DOs
- Upload sarees properly draped on a mannequin or worn by a model
- Ensure pleats, pallu, and borders are clearly visible
- Keep the fabric neatly arranged and wrinkle-free
- Avoid crumpled or folded fabric shots
- Do not upload small or incomplete flatlays
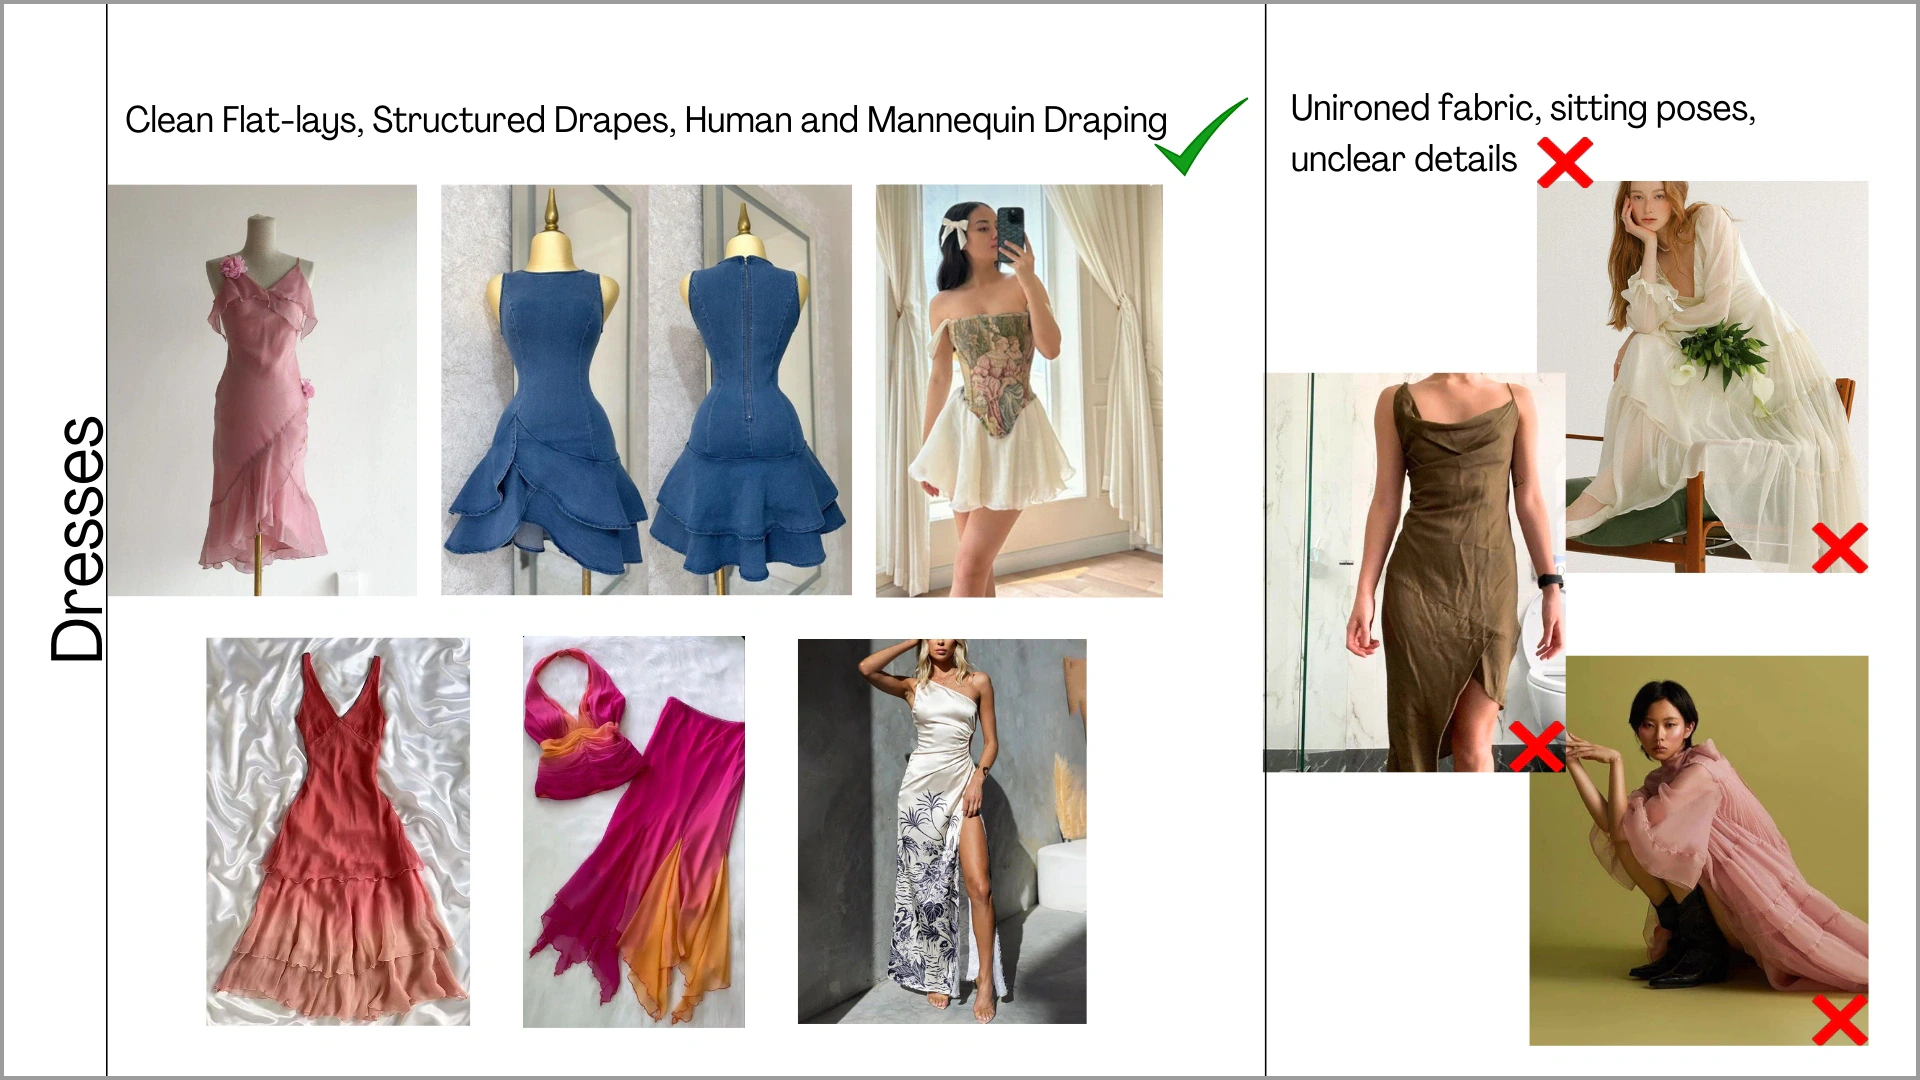
DOs and DON'Ts for Flowy Garments
DOs and DON'Ts for Flowy Garments
DOs
- Use neatly draped mannequin or on-human images
- Ensure the full flare, sleeves and tie-up details are visible (spread properly in flatlay if needed)
- Upload ironed, wrinkle-free garments
- Avoid crumpled or unironed fabrics
- Do not upload incomplete or cropped views
- Avoid poses where sleeves or important details are hidden
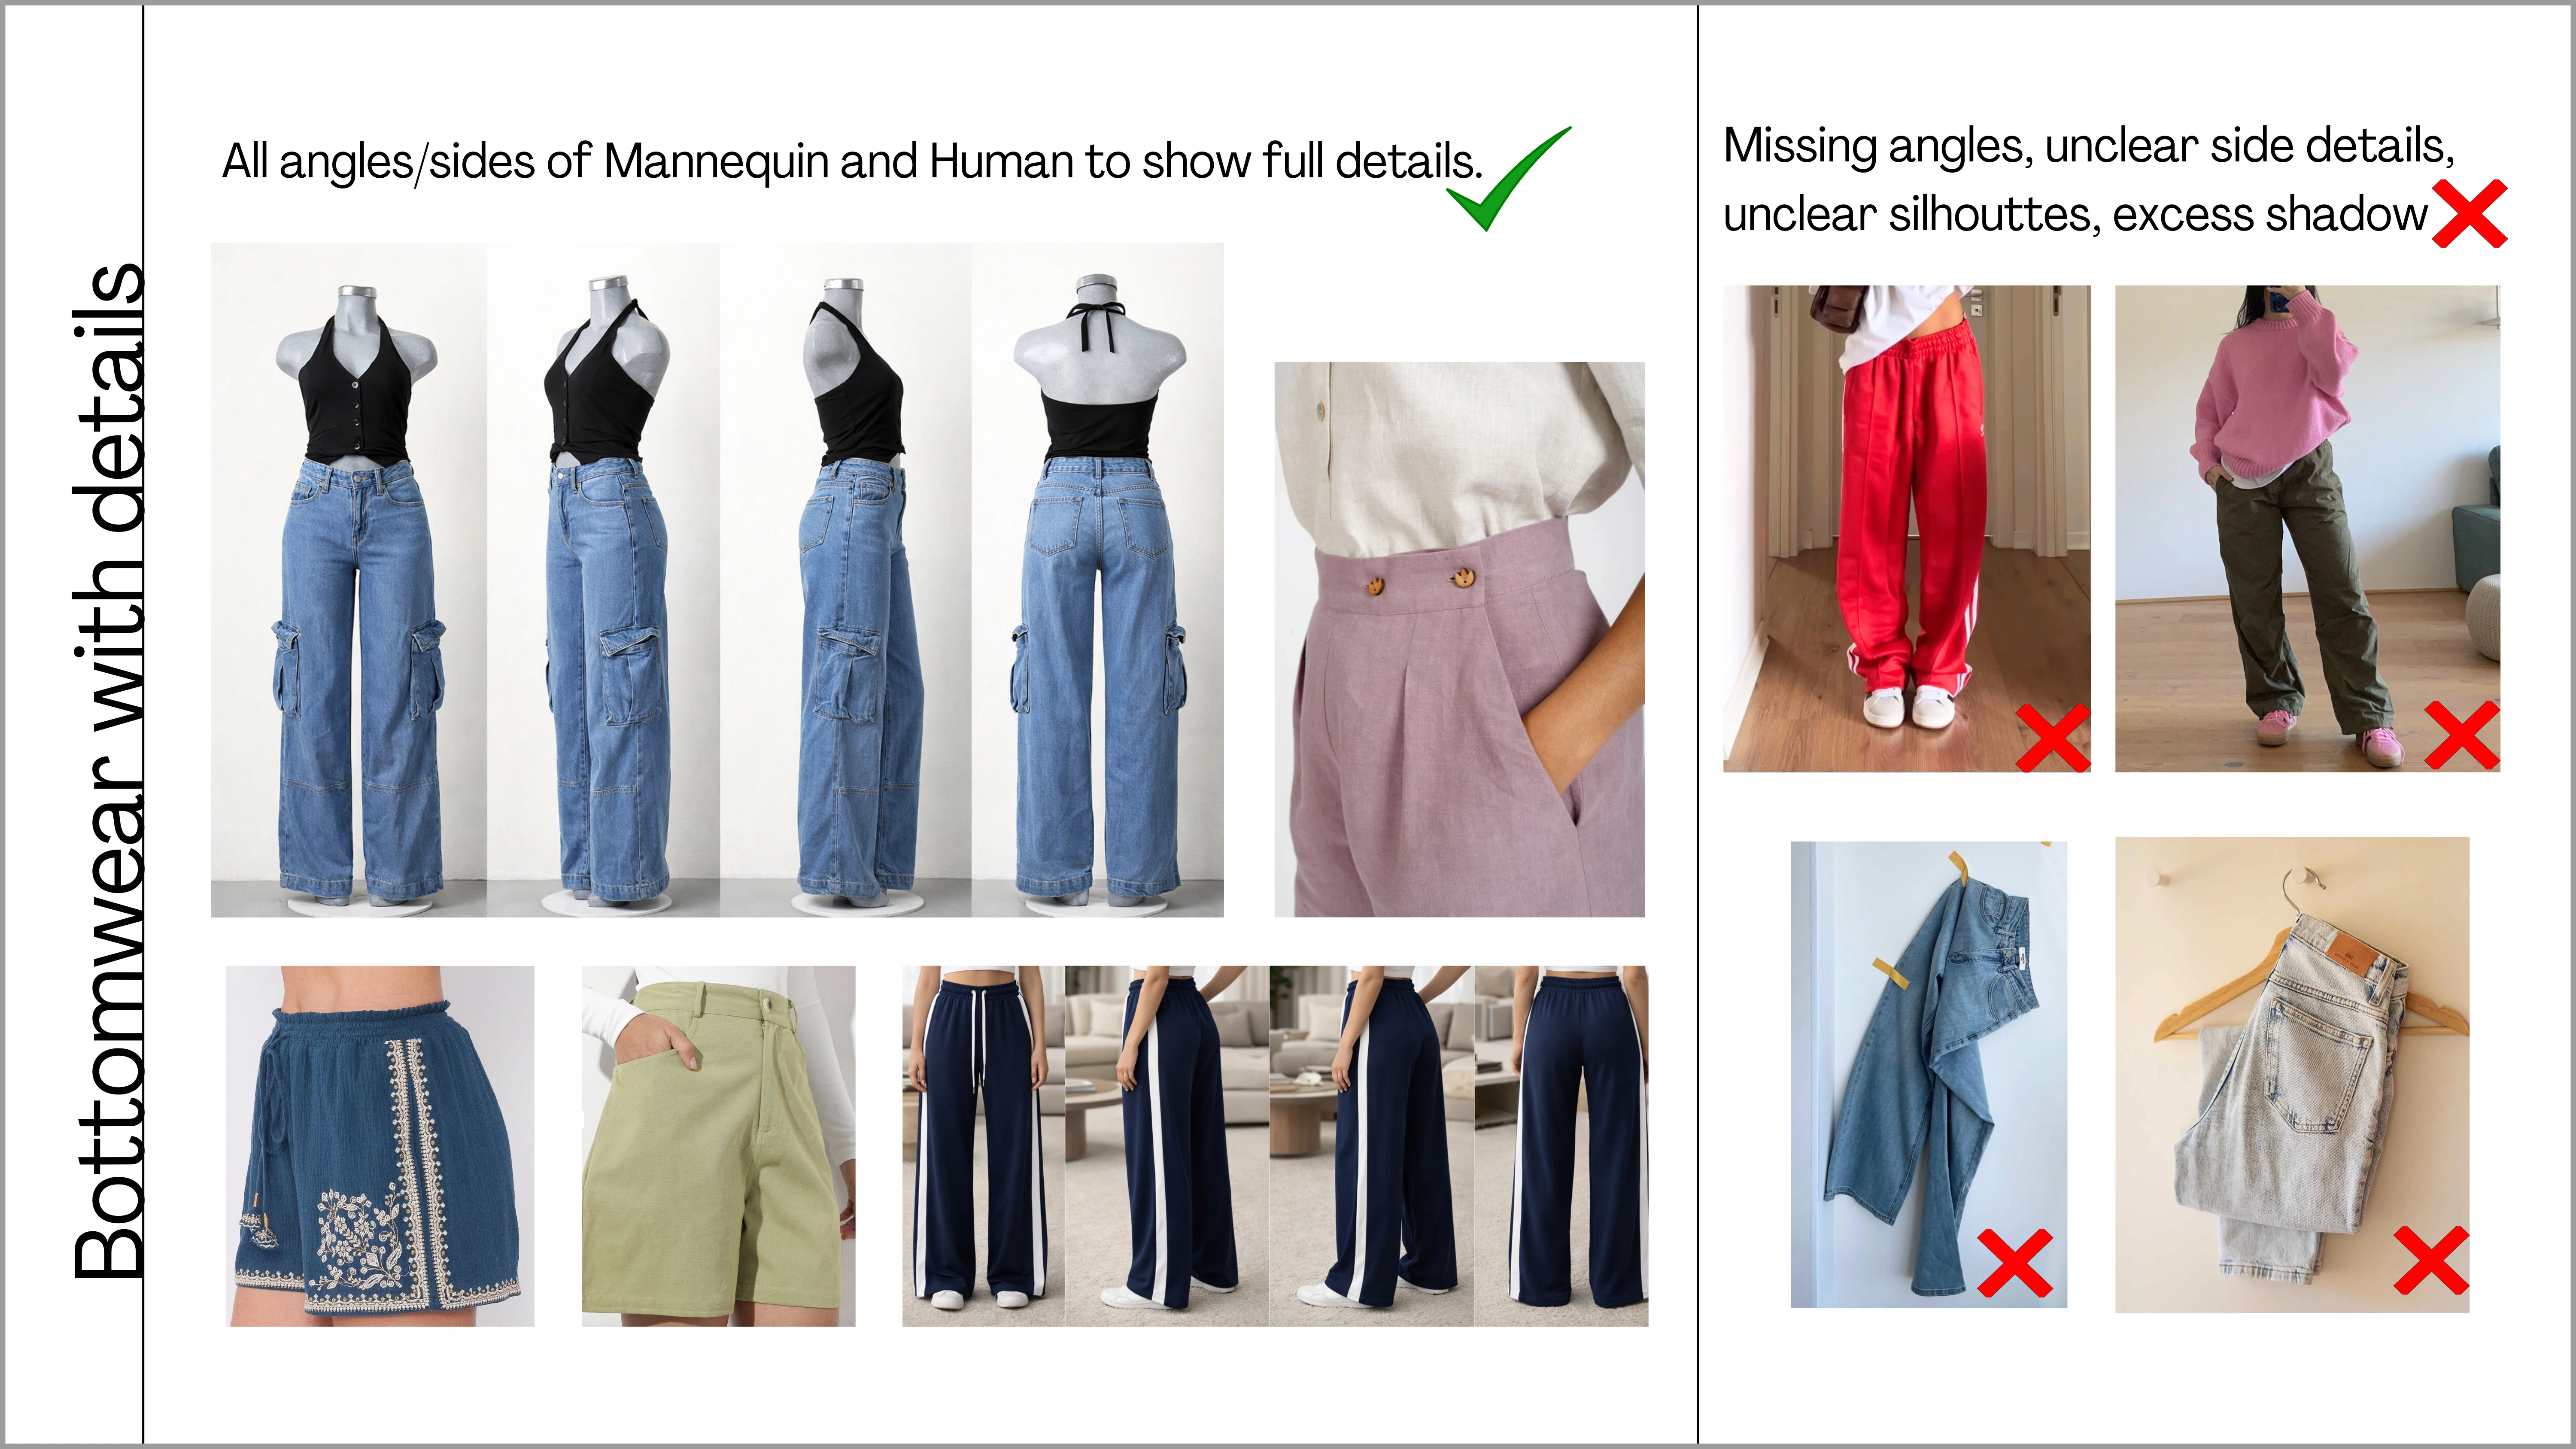
DOs and DON'Ts for Heavy Detailing
DOs and DON'Ts for Heavy Detailing
DOs
- Upload mannequin or on-human images with all visible side angles to show pockets, and other side/back details
- Keep the garment properly shaped and wrinkle-free
- Avoid single flatlay images that hide side detailing
- Do not crop out pockets or side seams
- Avoid unclear or shadow-heavy images
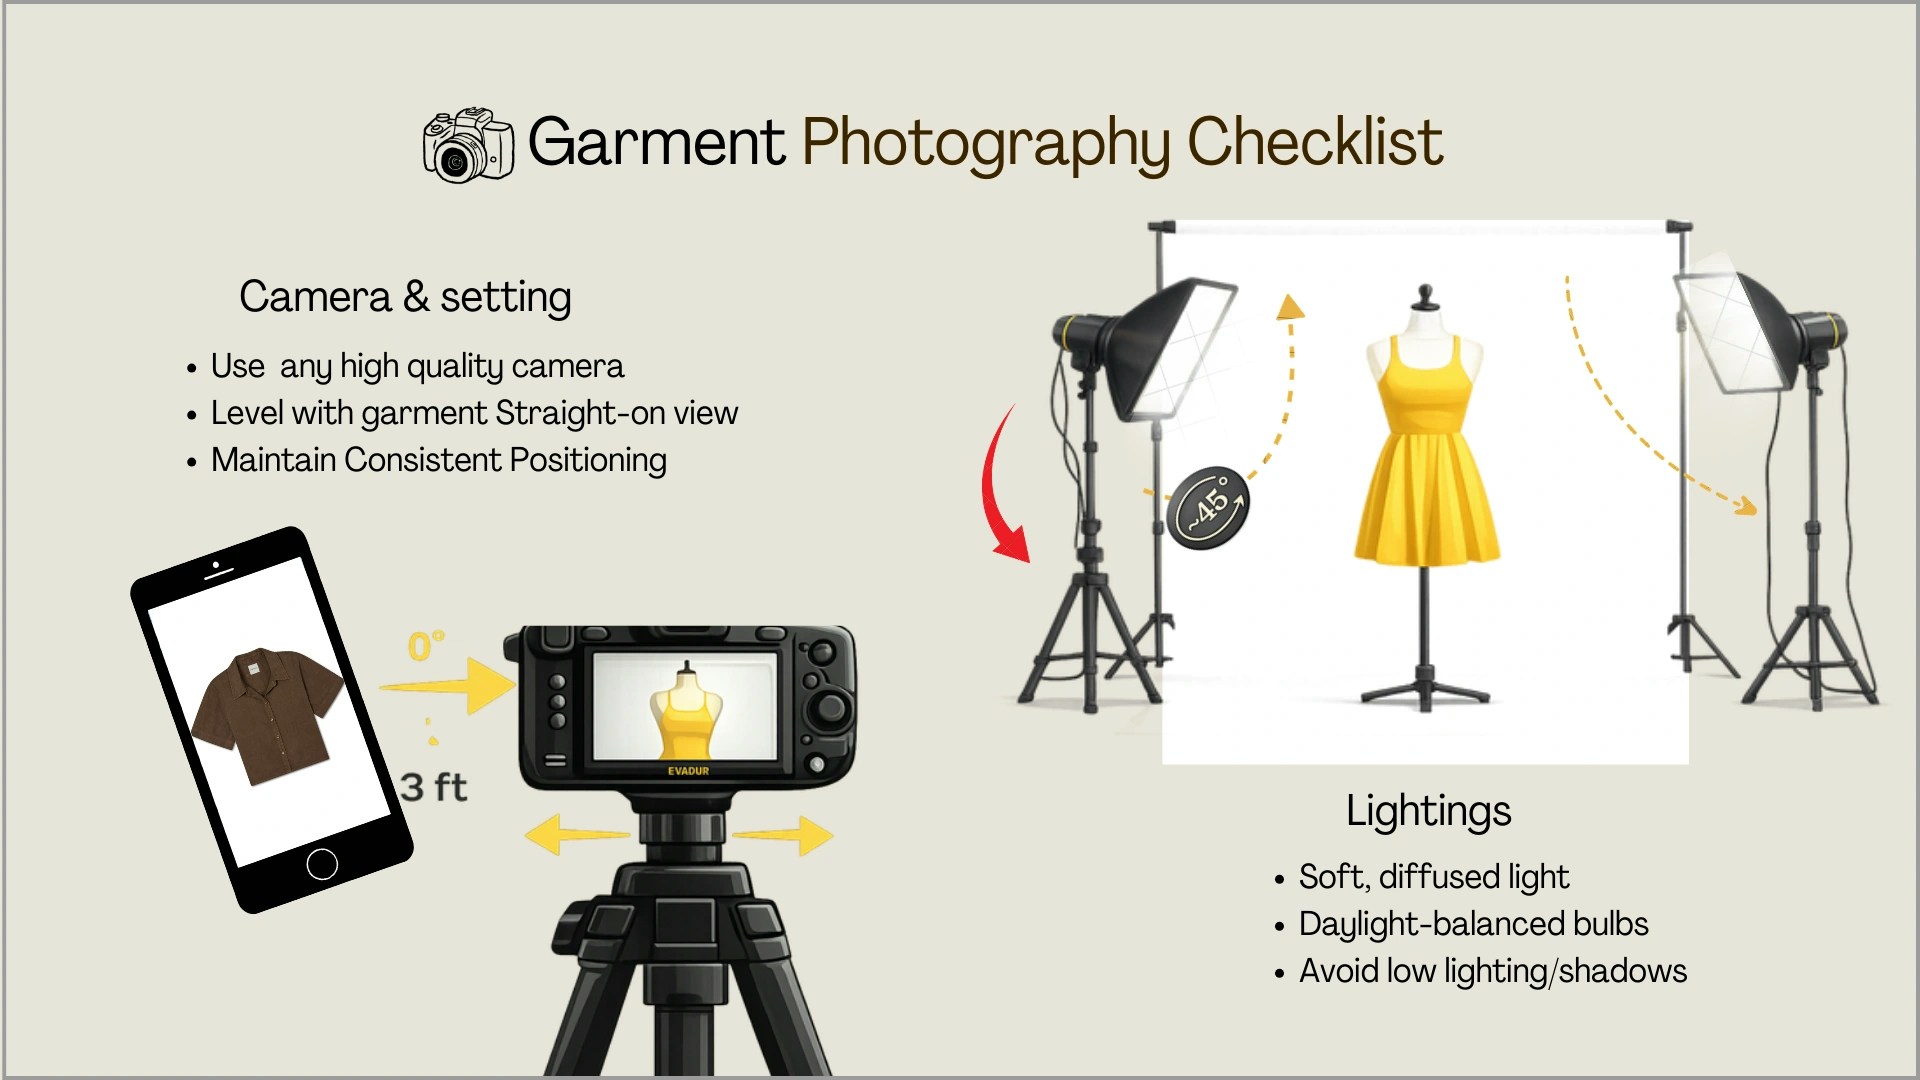
1.3 Camera Settings
Ayna’s AI relies on the quality of your input images to generate accurate results. Poor lighting, blur, or busy backgrounds can cause the AI to misread garment details, affecting the final output. Keep these essentials in mind:- Shoot at the highest resolution your device supports. Ayna accepts images from 1K (1024x1024) up to 8K (8192x8192) — higher resolution captures fabric texture and detailing more accurately.
- Use consistent, even lighting. Harsh shadows or mixed light can cause the AI to misinterpret garment colors and silhouette edges.
- Keep the entire garment in frame — no cropping at sleeves, hemlines, or collars. The AI needs to see the full garment structure to generate it accurately.
- Use a plain, uncluttered background (white or neutral). Busy backgrounds make it harder for the AI to separate the garment from its surroundings.
2. Input & Upload Guidelines
This section covers what you need to prepare and check before uploading garment images and clicking generate — including the correct upload formats, required views, and common mistakes to avoid. Following these guidelines helps Ayna understand the garment accurately and improves output quality.2.1 Garment Preparation
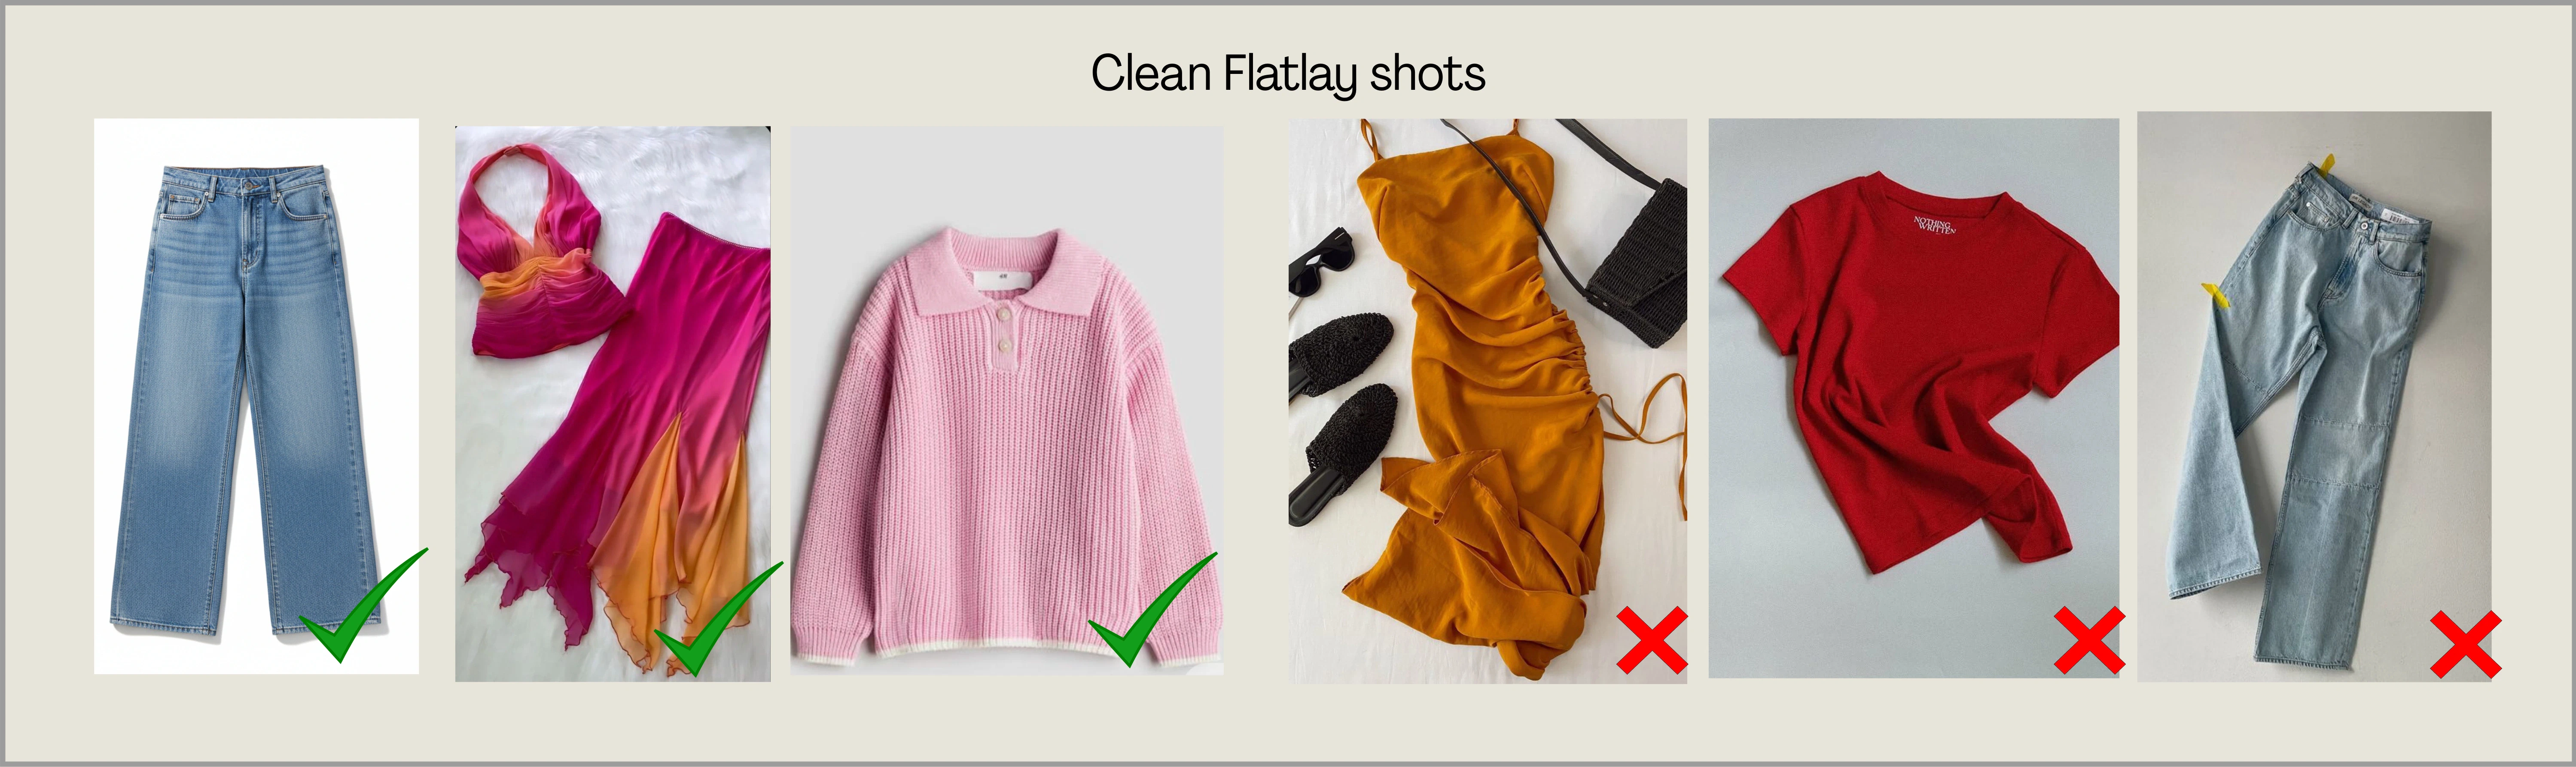
For best results, garments should be clean, ironed, and neatly arranged before photographing. Ayna supports Flat-lay, Mannequin images, and Model shots — explore the guidelines for each format below.2.1.1 Flat-Lay Shots
Flat-lay images are one of the best ways to upload garments on Ayna. Place the garment neatly on a flat surface so the full shape, structure, and details are clearly visible. A clean flat-lay helps Ayna detect the garment accurately and improves the final output quality.DOs and DON'Ts for Flat-Lay Shots
DOs and DON'Ts for Flat-Lay Shots
DOs
- Lay the garment flat, straight, and wrinkle-free
- Keep the full garment visible with a plain background
- Use good lighting and a clear image
- Don’t upload folded, crumpled, or twisted garments
- Don’t use cluttered backgrounds or dark lighting
- Don’t upload cropped or half-visible items
- Avoid uploading heavy ethnic-wear garments in this format
2.1.2 Hanger Shots
Hanger shots are also ideal for Ayna when the garment is hanging naturally and clearly shows its shape. The garment should be centered, properly aligned, and fully visible.DOs and DON'Ts for Hanger Shots
DOs and DON'Ts for Hanger Shots
DOs
- Hang the garment straight and centered
- Keep the garment fully visible with a clean background
- Upload sharp, well-lit images
- Don’t upload garments hanging unevenly or distorted
- Don’t upload images with missing parts (sleeves/hem cut off)
- Don’t use blurred, shadow-heavy, or low-quality photos

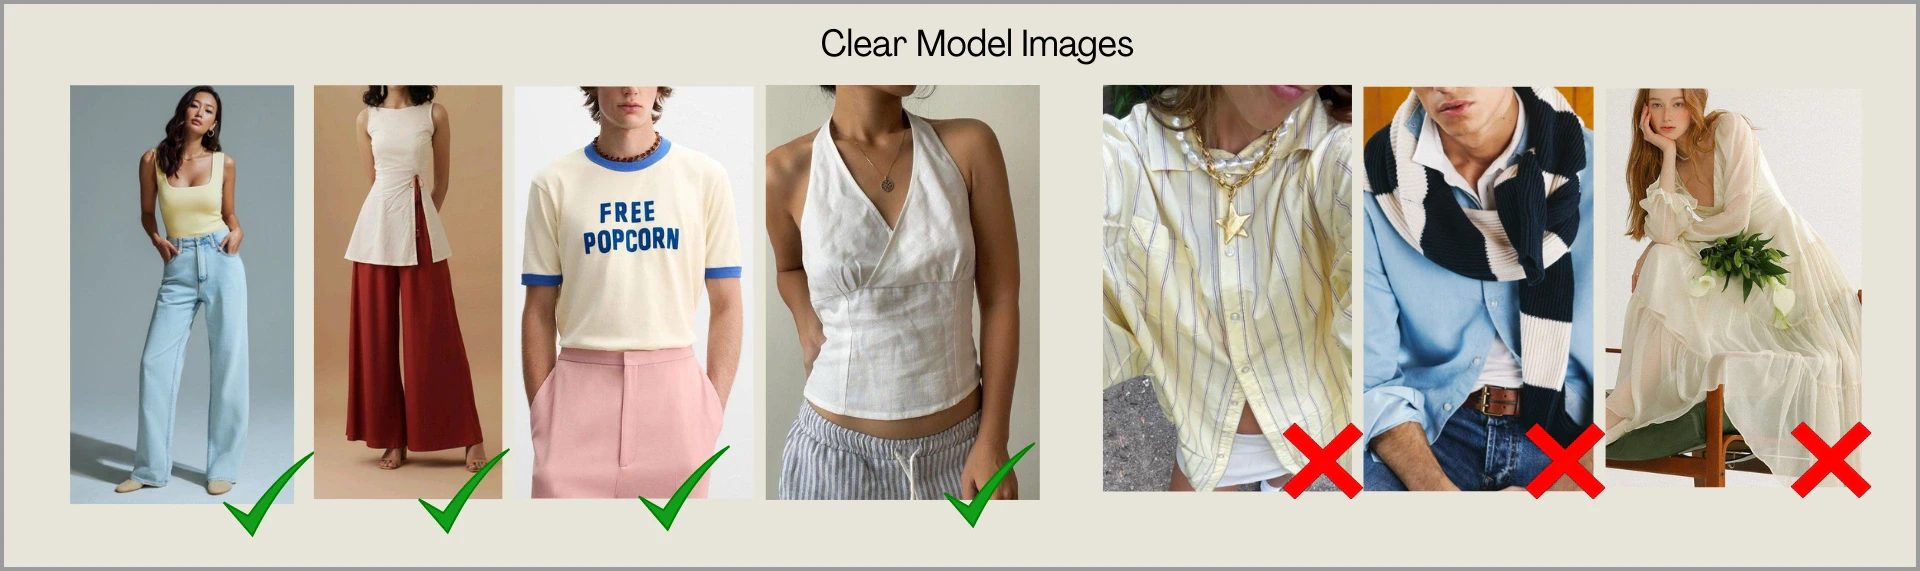
2.1.3 Model Shots
Model shots are recommended for garments that require drape, flow, and natural fit to be understood correctly. This includes outfits where the fabric falls in layers or where styling is an important part of the garment structure. Uploading a clear model image helps Ayna capture the silhouette, garment length, and overall look more accurately.DOs and DON'Ts for Model Shots
DOs and DON'Ts for Model Shots
DOs
- Upload full-body or 3/4 body images where the garment is clearly visible
- Ensure the garment drape and flow is visible (especially sarees, dupattas, long dresses)
- Use clean backgrounds and good lighting
- Keep poses natural so the garment is not hidden
- Avoid images where the garment is blocked by props or objects
- Don’t upload images with heavy distractions, busy walls, or clutter
- Avoid sitting poses or cropped frames where the garment length is not visible
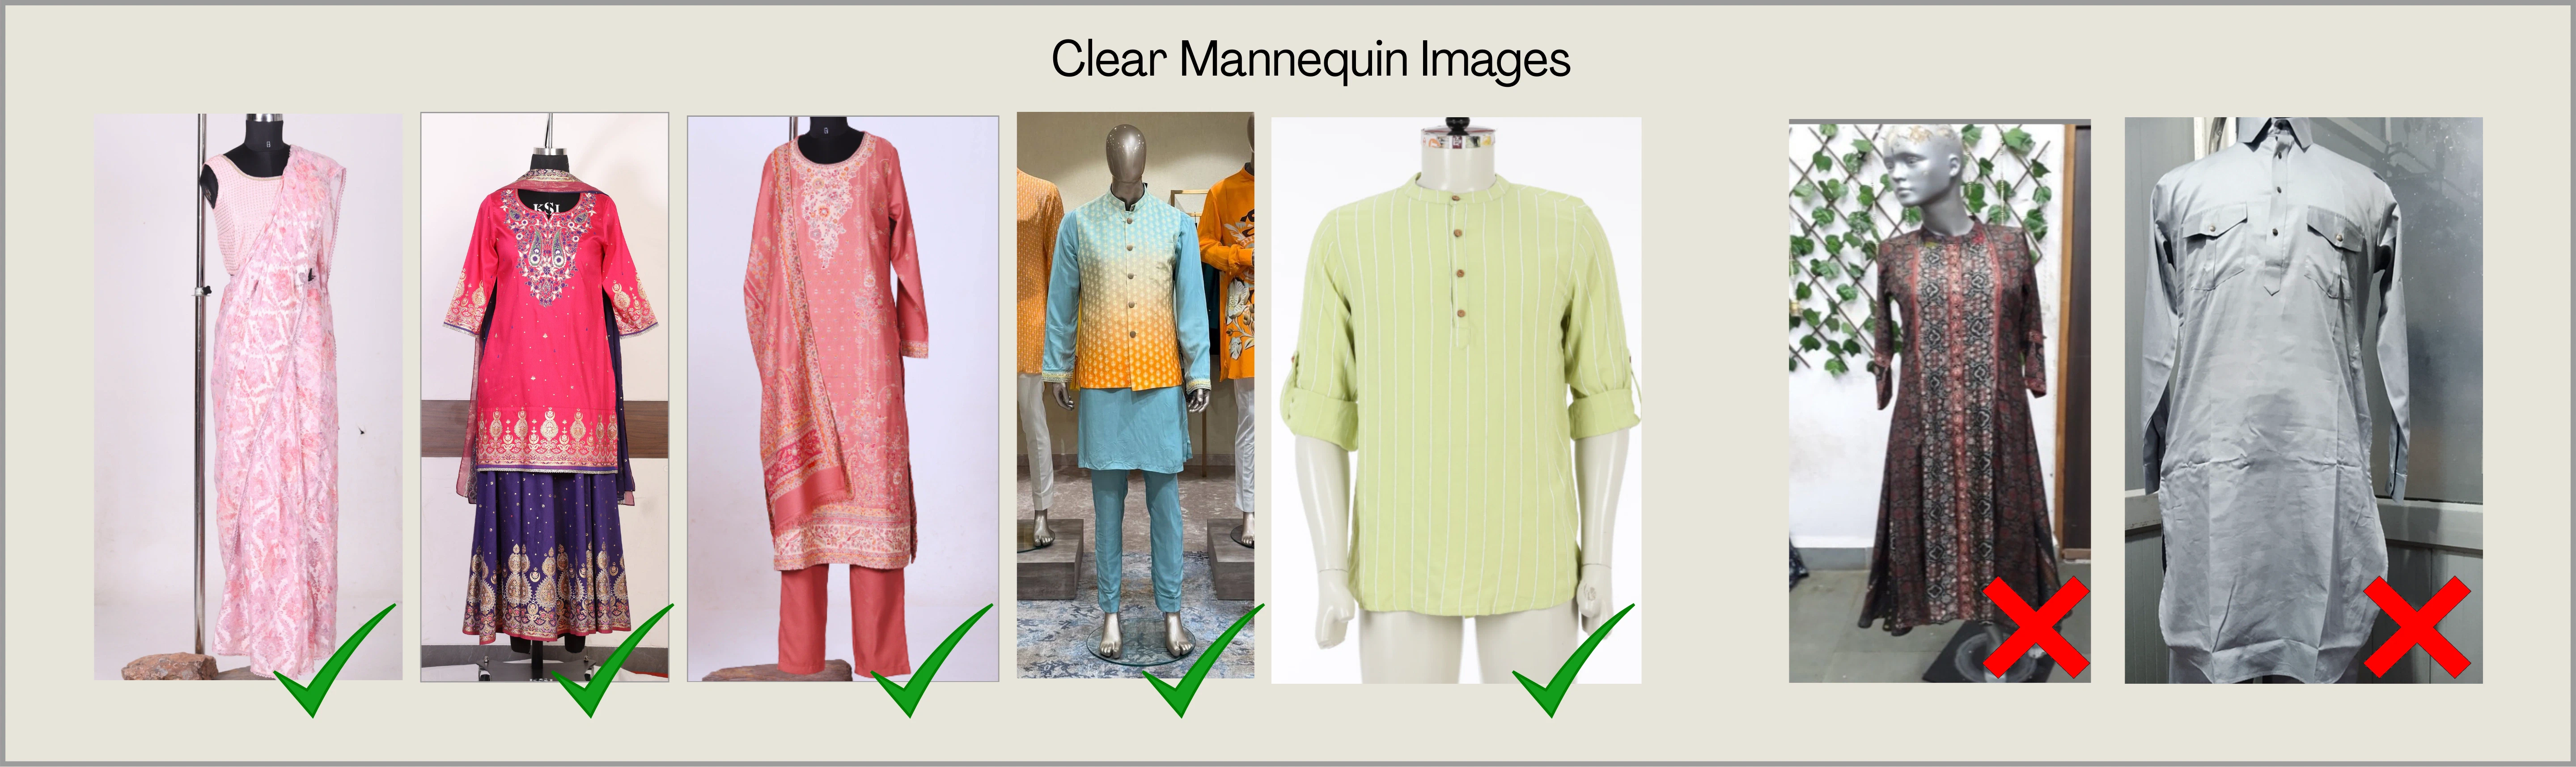
2.1.4 Mannequin Shots
Mannequin shots are ideal when you want to show the garment in a structured way without a human model. They are highly recommended for outfits that need clear visibility of shape, layering, and fabric fall. Mannequins are best for garments like: Sarees, 3-piece suits (kurta set with dupatta), Lehenga sets, Dresses, Outfits with layers or heavy embroidery, etc.DOs and DON'Ts for Mannequin Shots
DOs and DON'Ts for Mannequin Shots
DOs
- Upload mannequin images where the garment is properly fitted and centered
- Make sure the full garment is visible from top to bottom
- Keep the exact drape, fabric flow that you want to achieve (especially dupattas and drapes)
- Use a plain background and good lighting
- Avoid mannequin images where the garment is incomplete or not properly arranged
- Don’t upload images where the garment is folded, hanging unevenly, or messy
- Avoid cluttered backgrounds and poor lighting
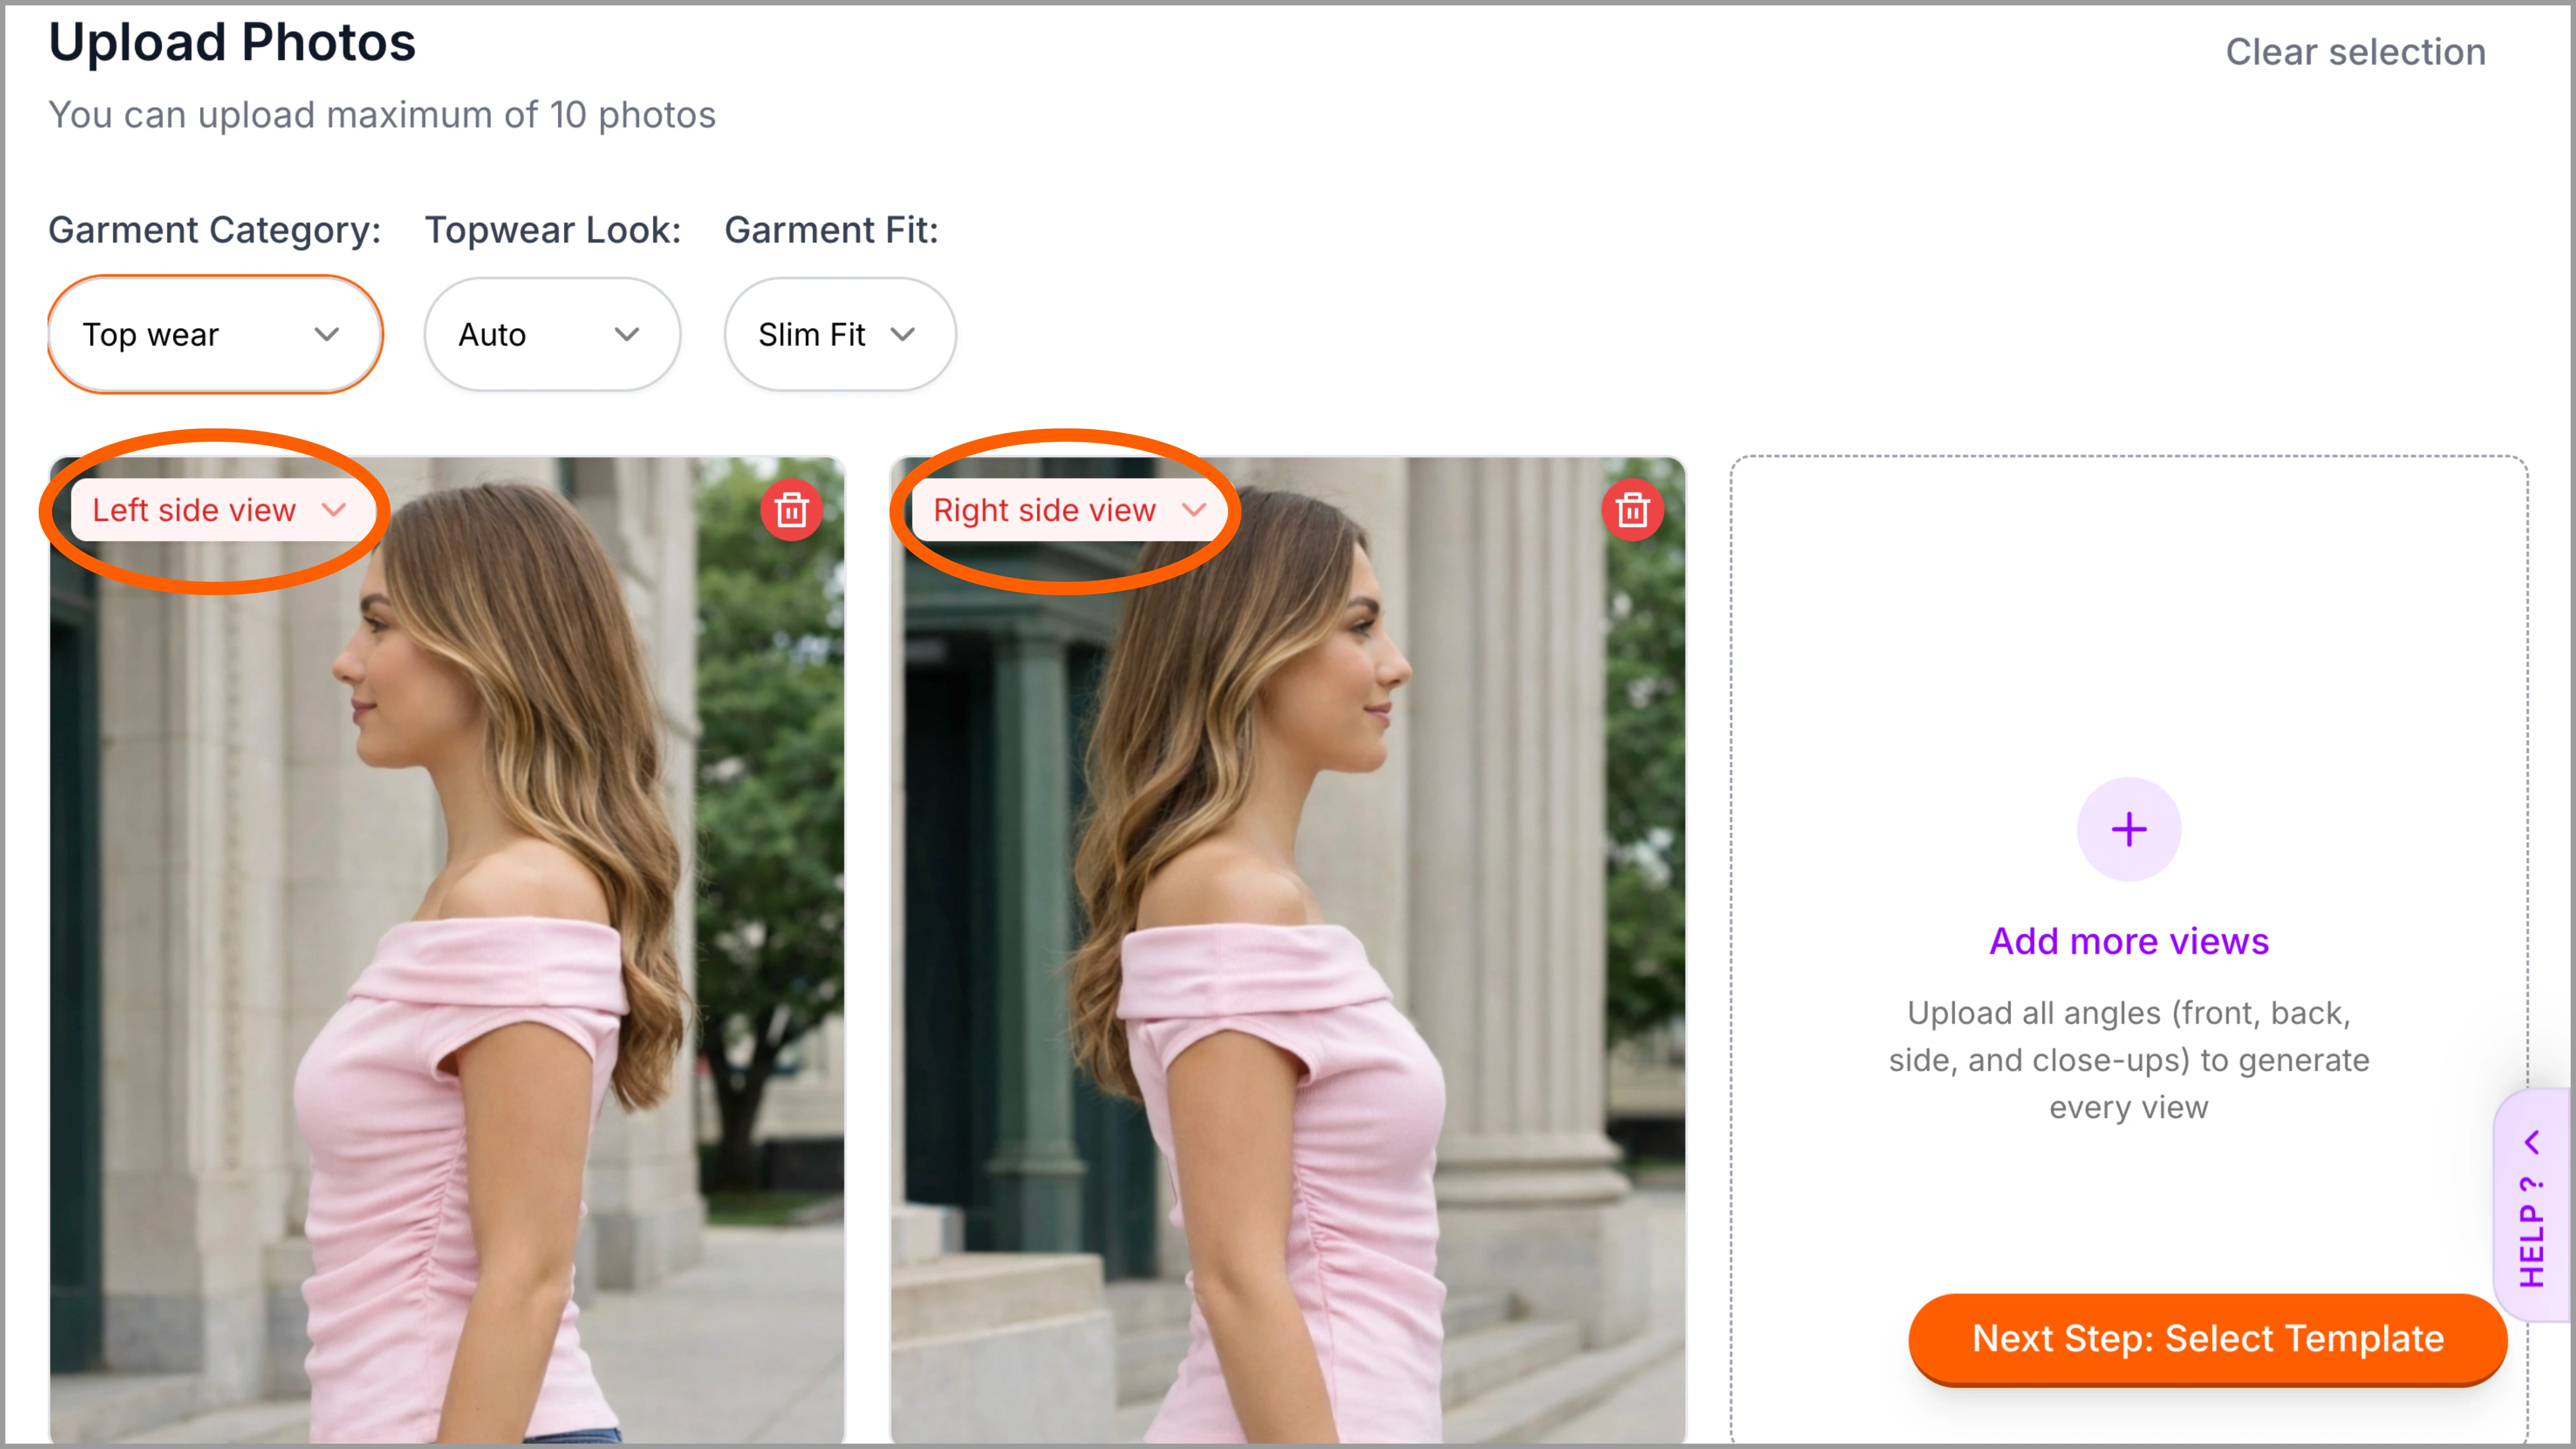
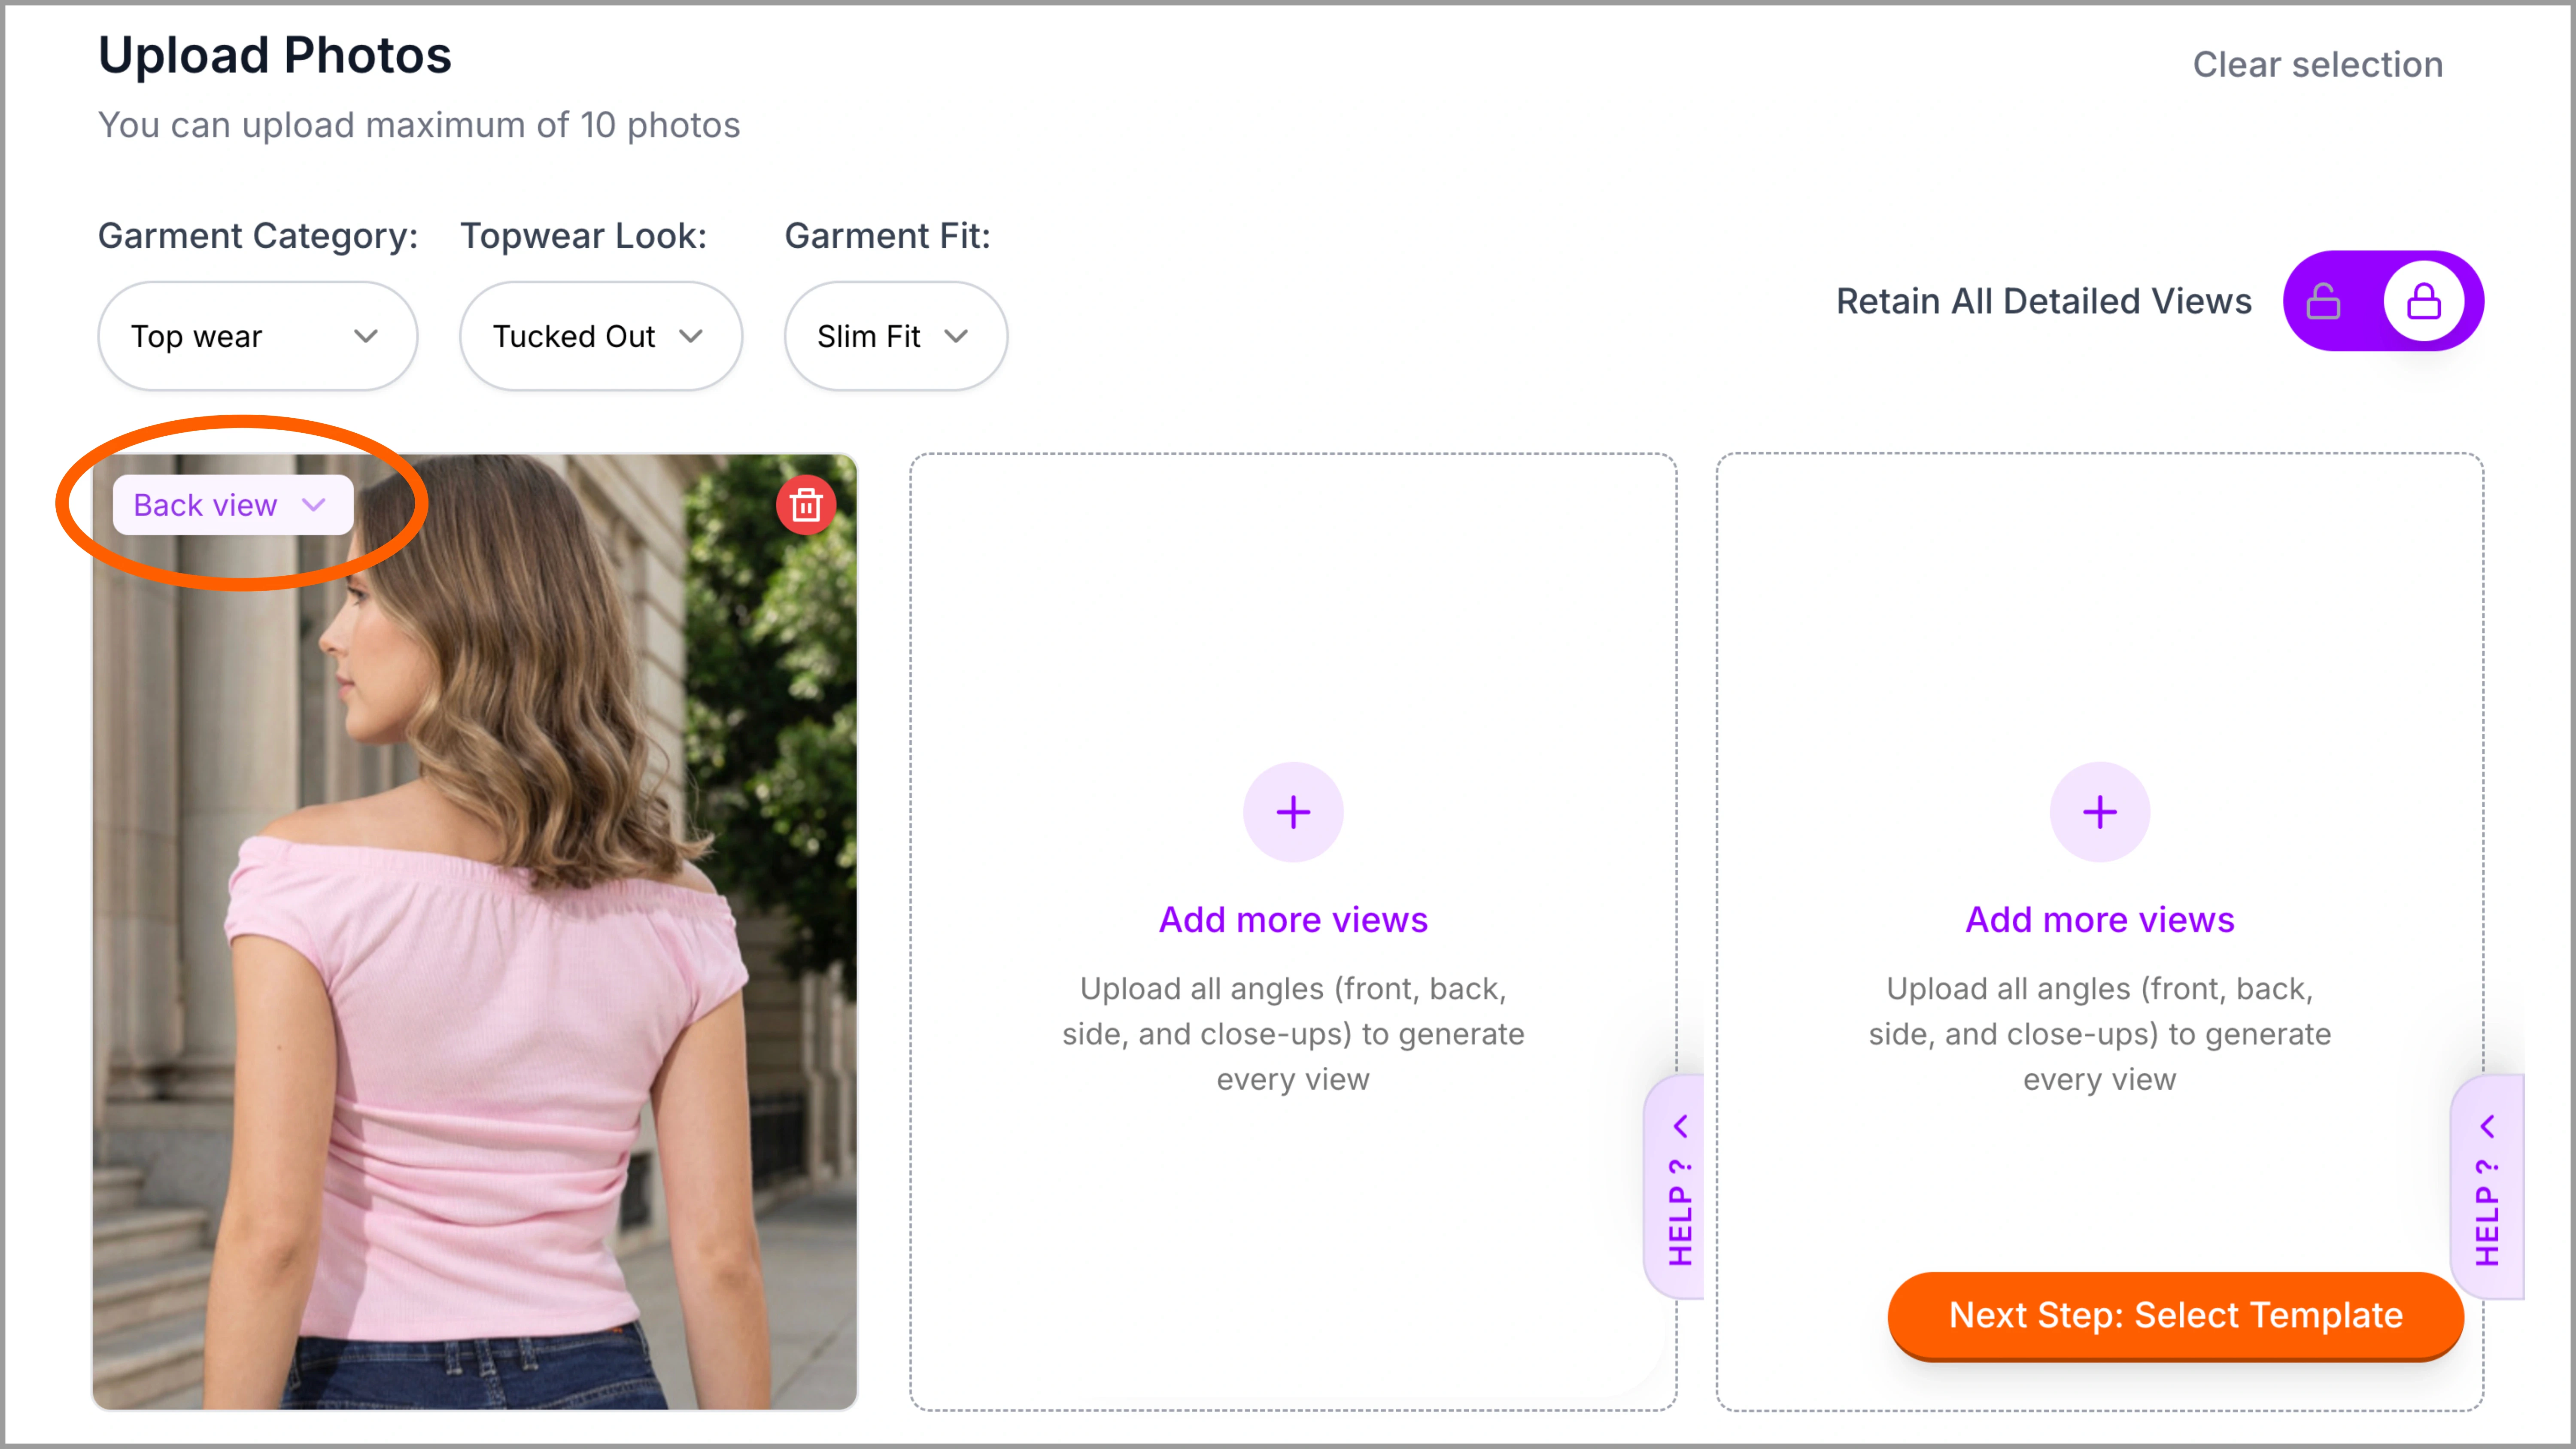
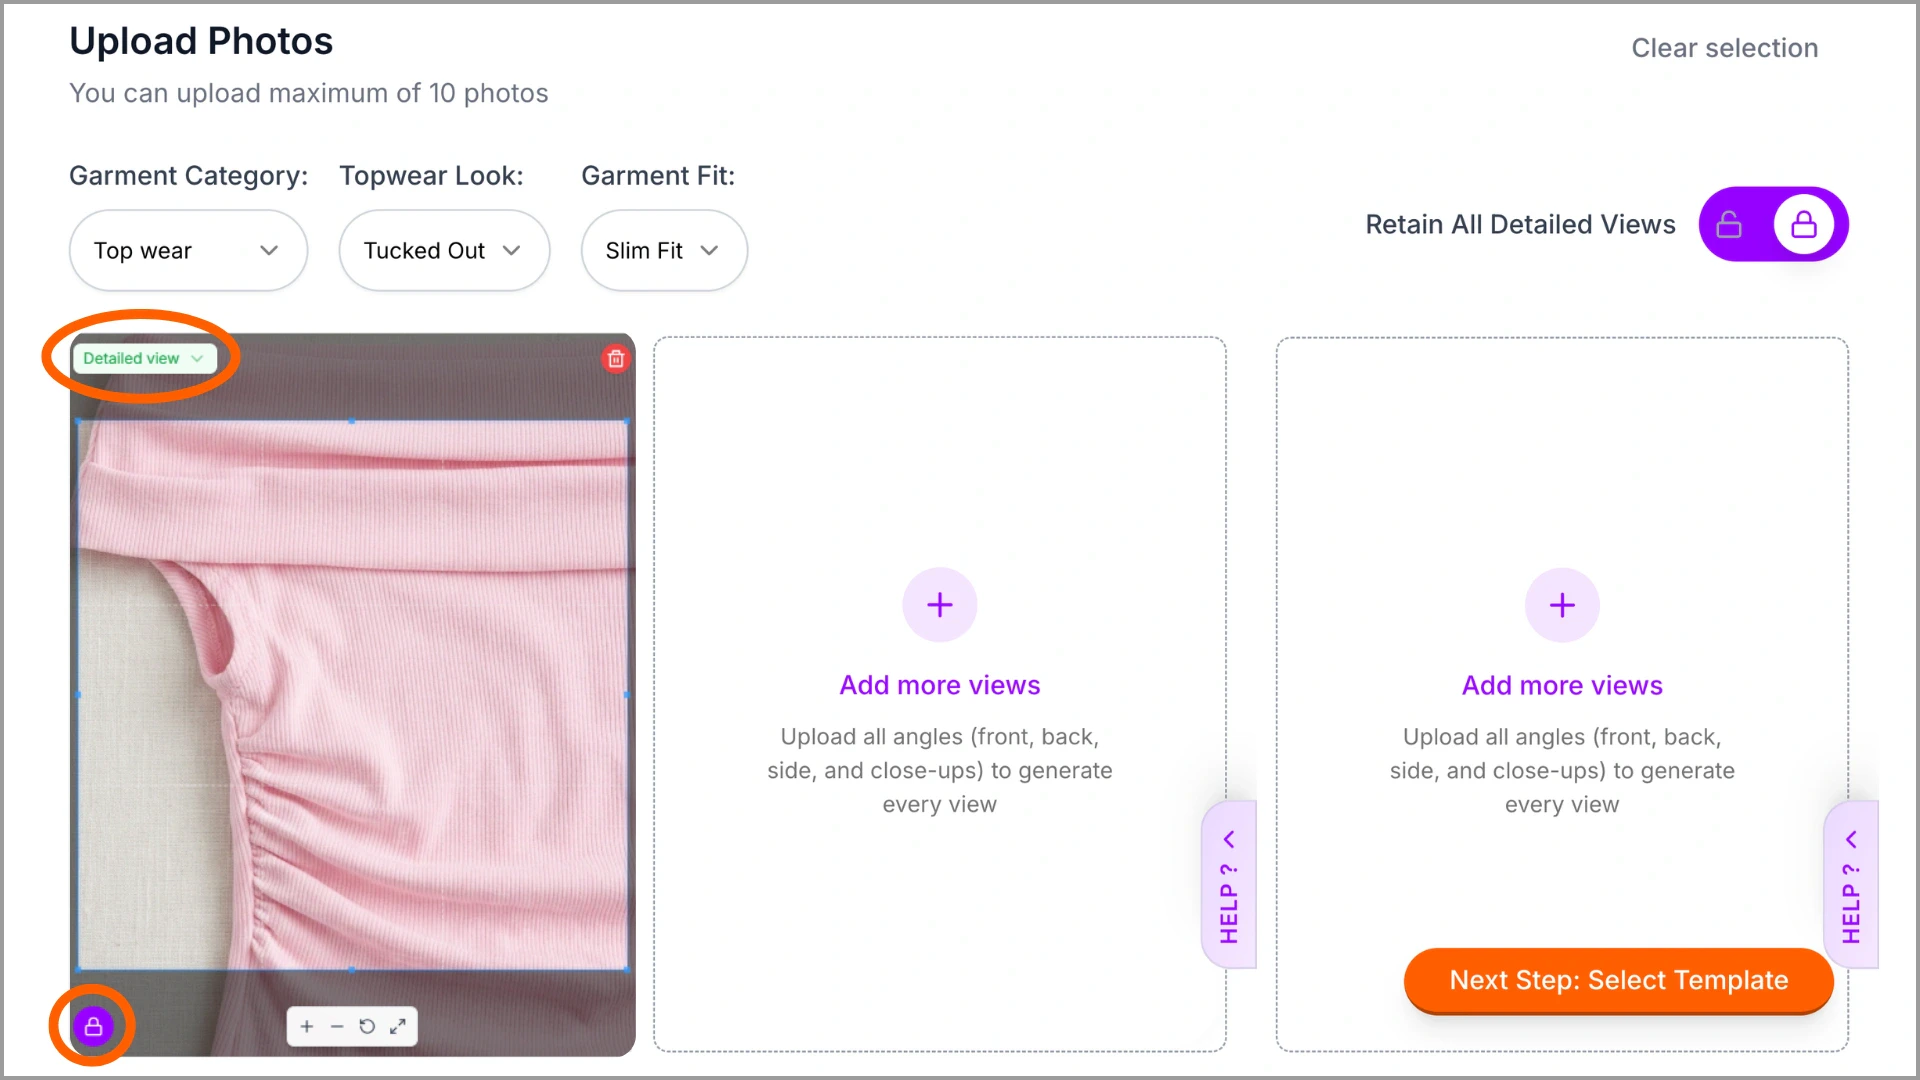
2.2 Views Required
Different types of garment views can be uploaded on Ayna, such as front, back, side, detailed shots, or any other available angle. Upload clear images of each view. For example: Adding front and back views of the garment ensures accurate results in front and back poses. Ayna automatically detects and labels each uploaded view. If a view is incorrectly identified, you can modify it using the Custom View option. A) Front Views The front view is required to capture the garment’s main design, neckline, front pattern, and overall shape. It helps Ayna understand the primary silhouette and key styling elements visible from the front. We have Left Front and Right Front views as well, these views are automatically tagged, and can be used to generate 45 degree angle images easily.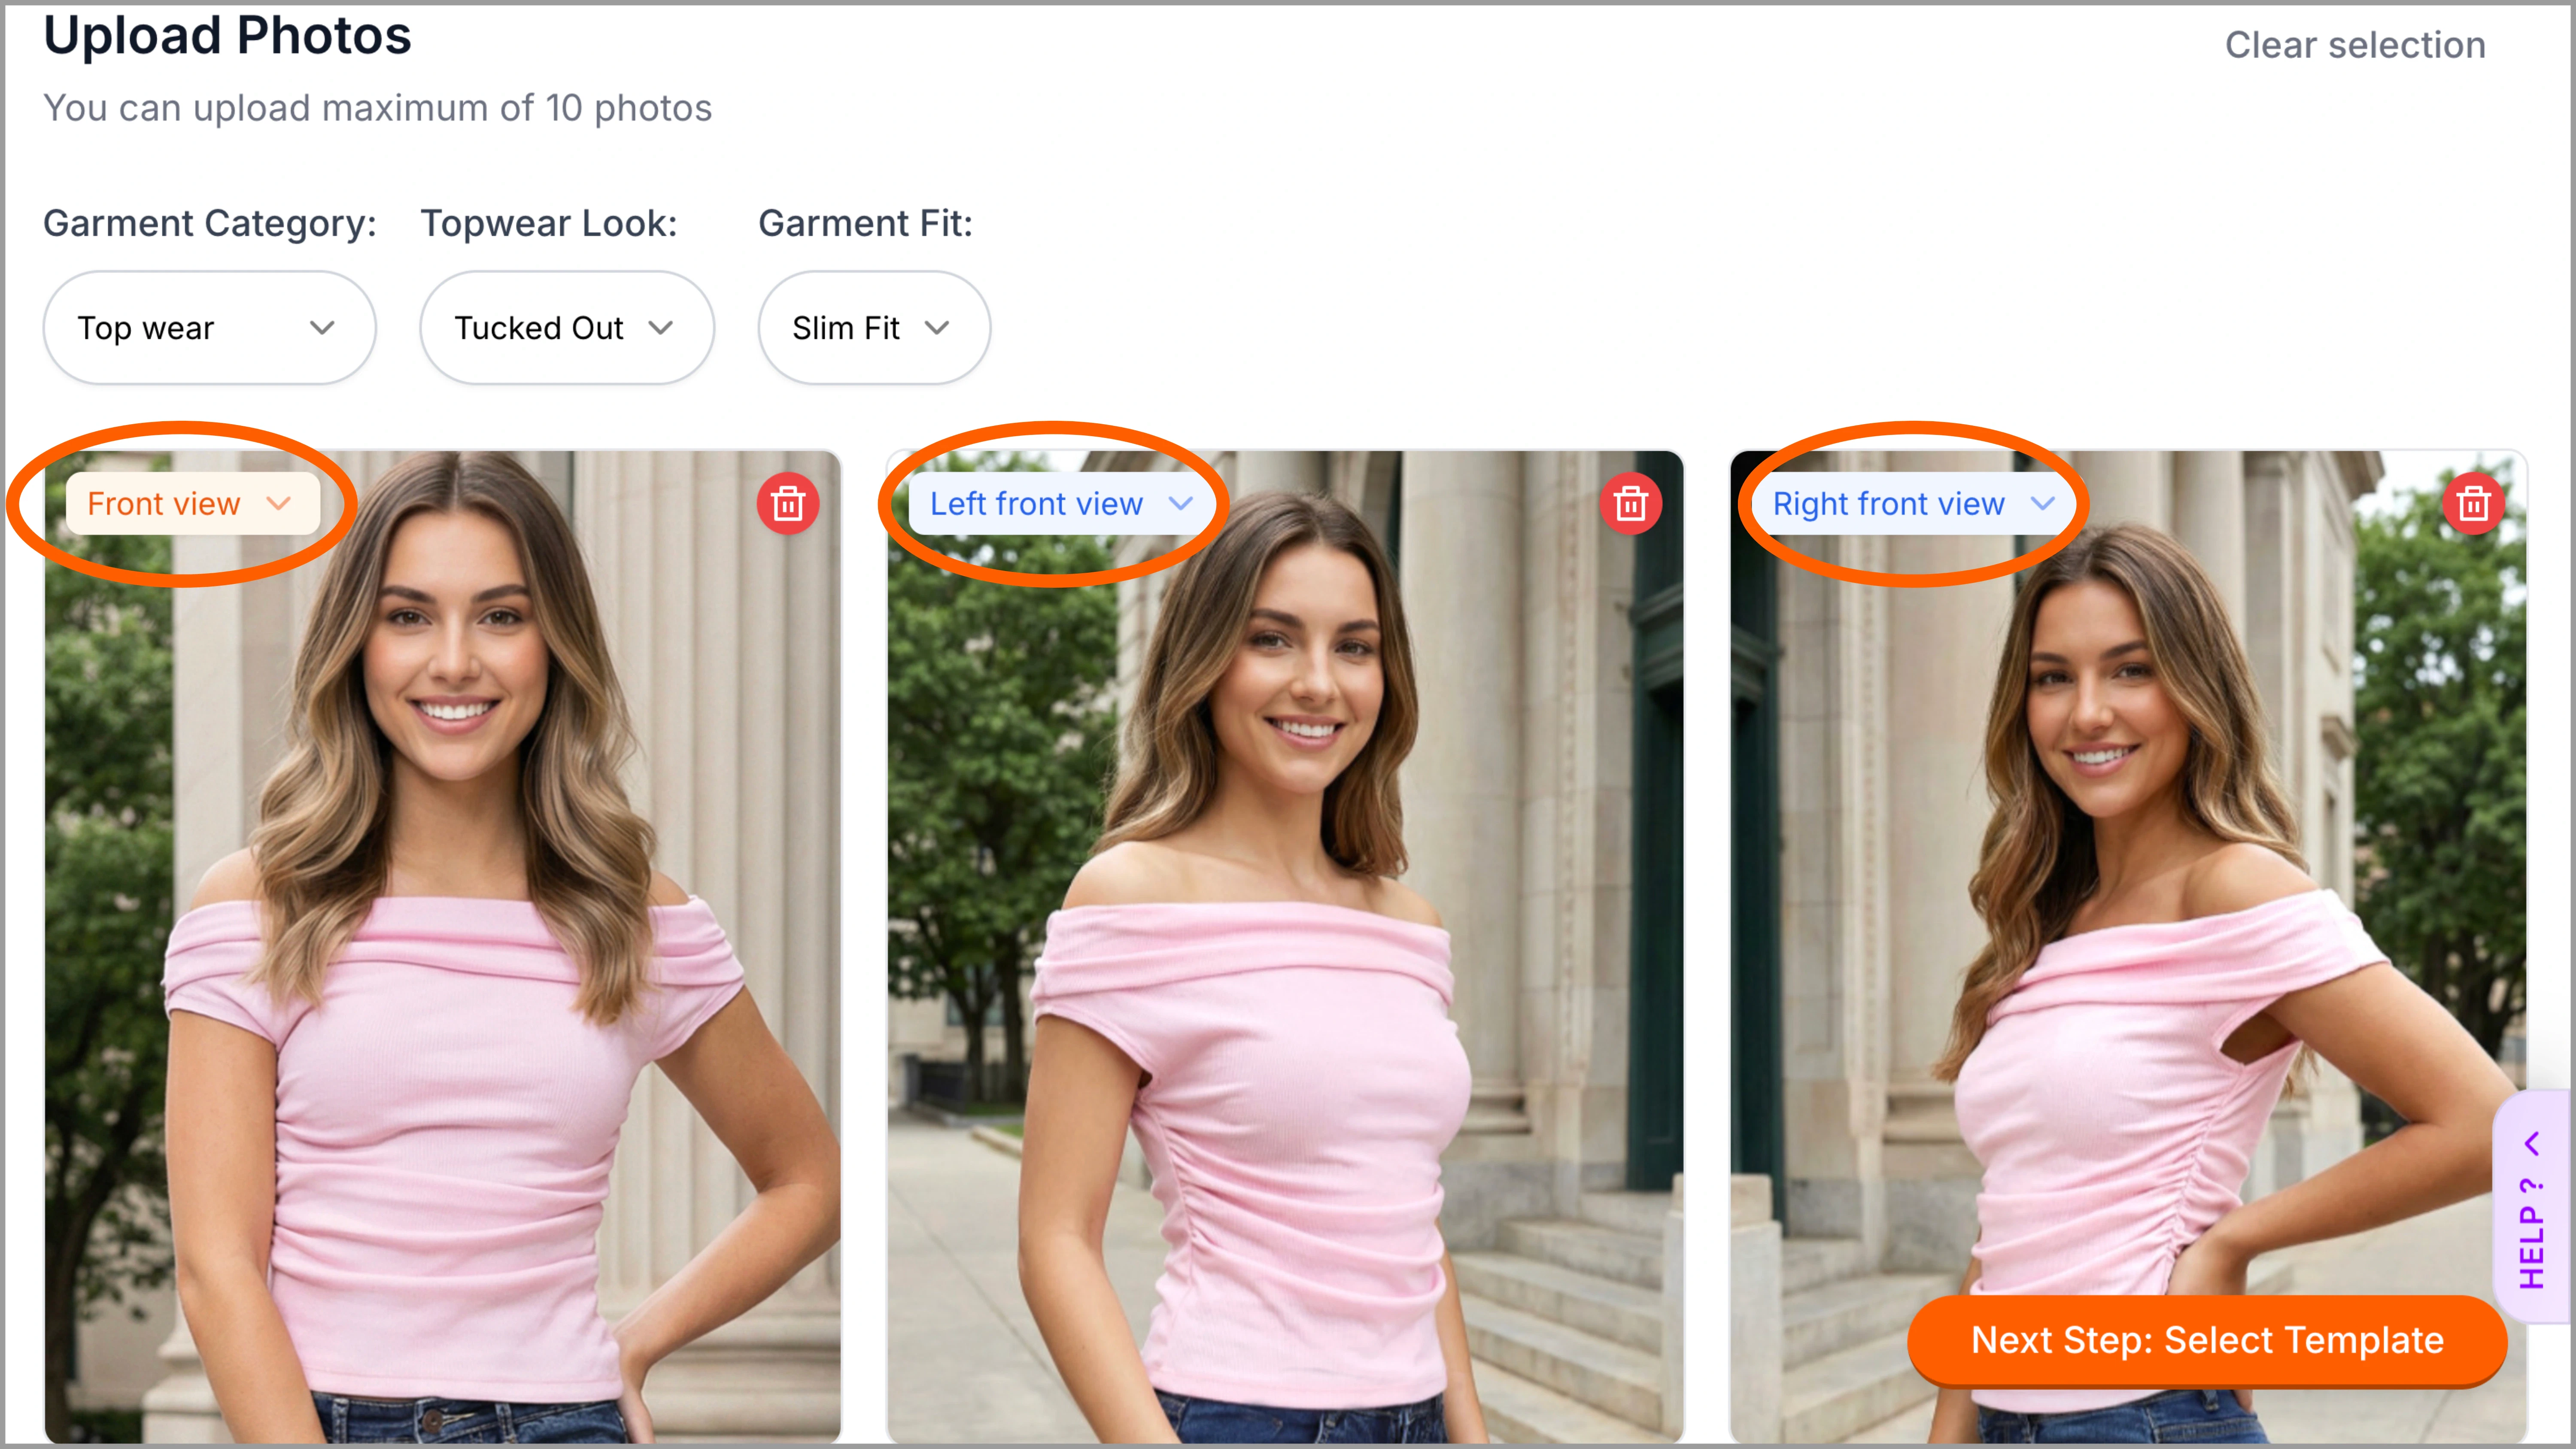
2.3 Common Styling Mistakes
To get the best results on Ayna, your garment images must clearly show the product’s shape, structure, and details. Styling mistakes like folds, overlapping parts, wrong angles, or busy backgrounds make it difficult for Ayna to detect the garment correctly. These issues often lead to inaccurate silhouettes, missing details, or distorted outputs. Some of the common styling mistakes to avoid are: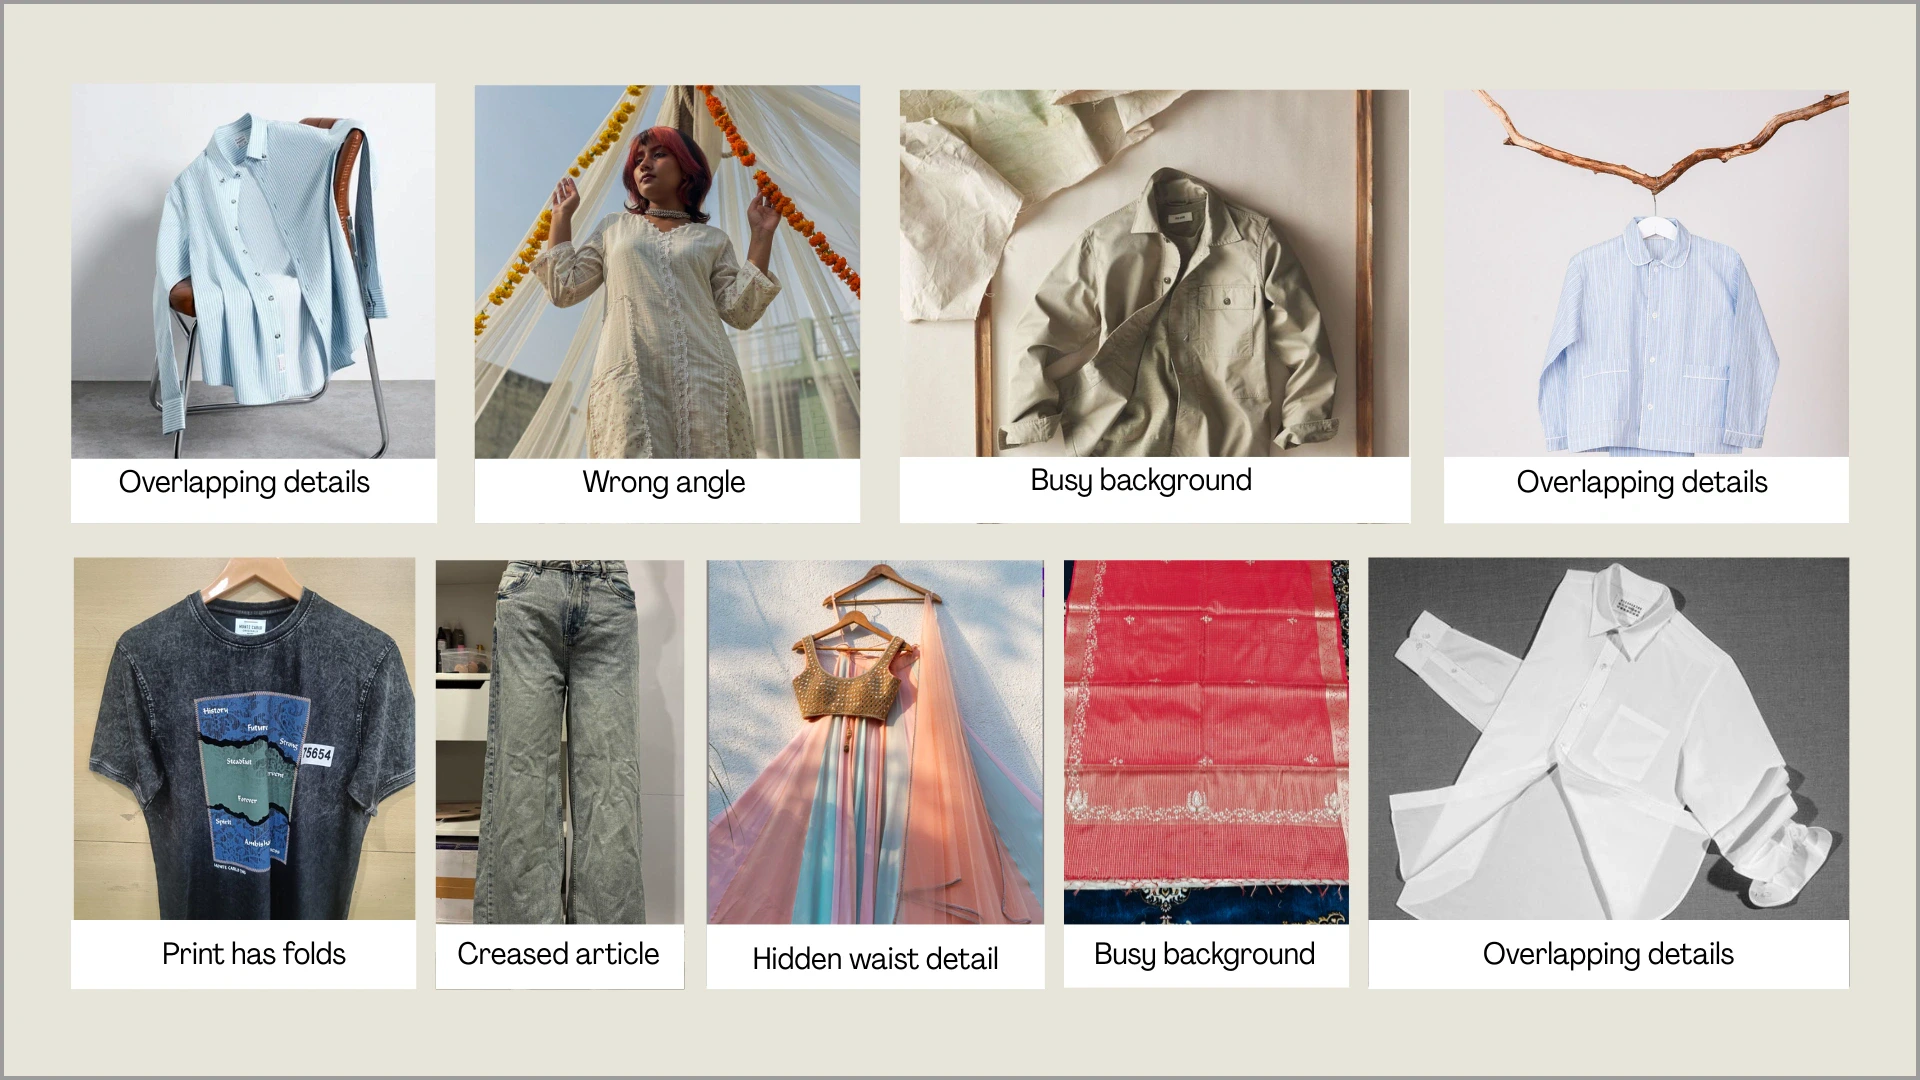
- Wrong Angle: Avoid tilted or dramatic angles. Straight, centered shots maintain correct proportions and structure.
- Busy Background: Avoid cluttered backgrounds. A clean, plain backdrop keeps the garment clear and well-defined.
- Folded or Broken Prints: Wrinkled or folded printed fabrics can distort patterns and misplace design elements.
- Creased / Wrinkled Garments: Heavy creases hide structure and affect overall garment clarity. Smooth, ironed garments work best.
- Hidden Waist Detail: Covered waistlines (by hands, drapes, or folds) affect length and fit accuracy.
- Multiple Garments in One Frame: Avoid overlapping garments in a single image. Upload one clear garment per frame.
2.3.1 Examples That Affect Output Quality
Below are common issues and how they impact Ayna’s output: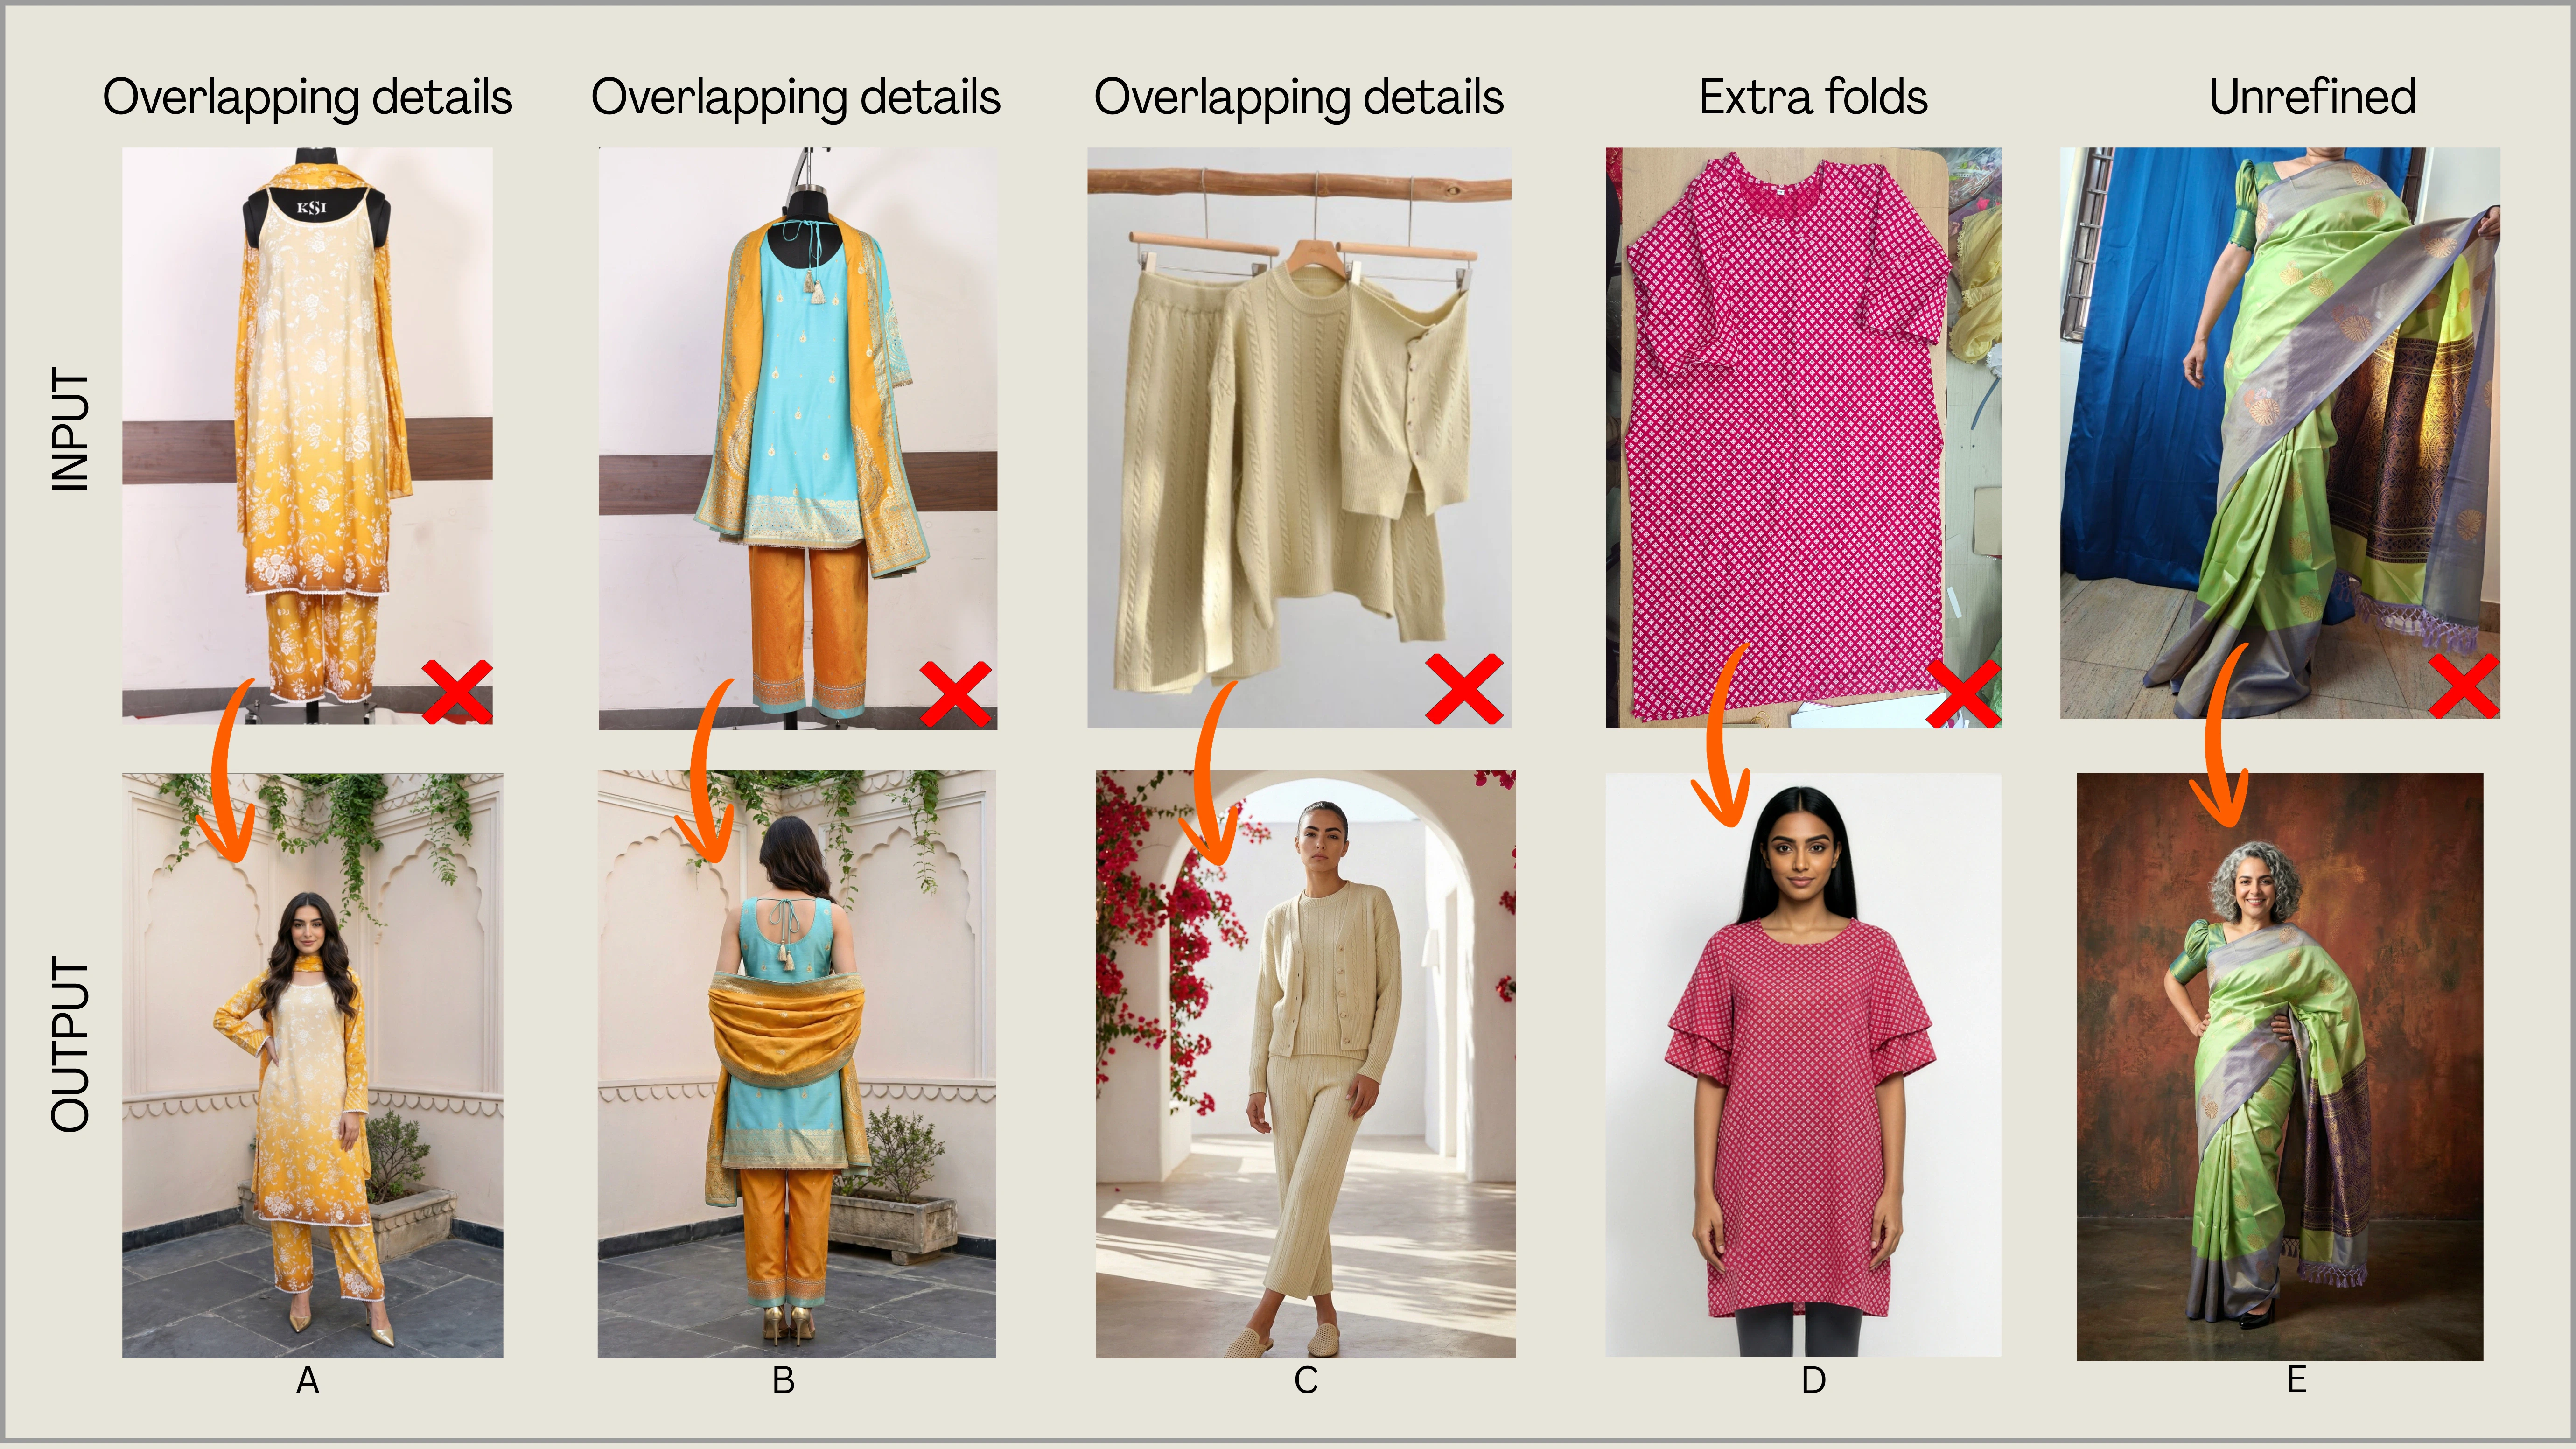
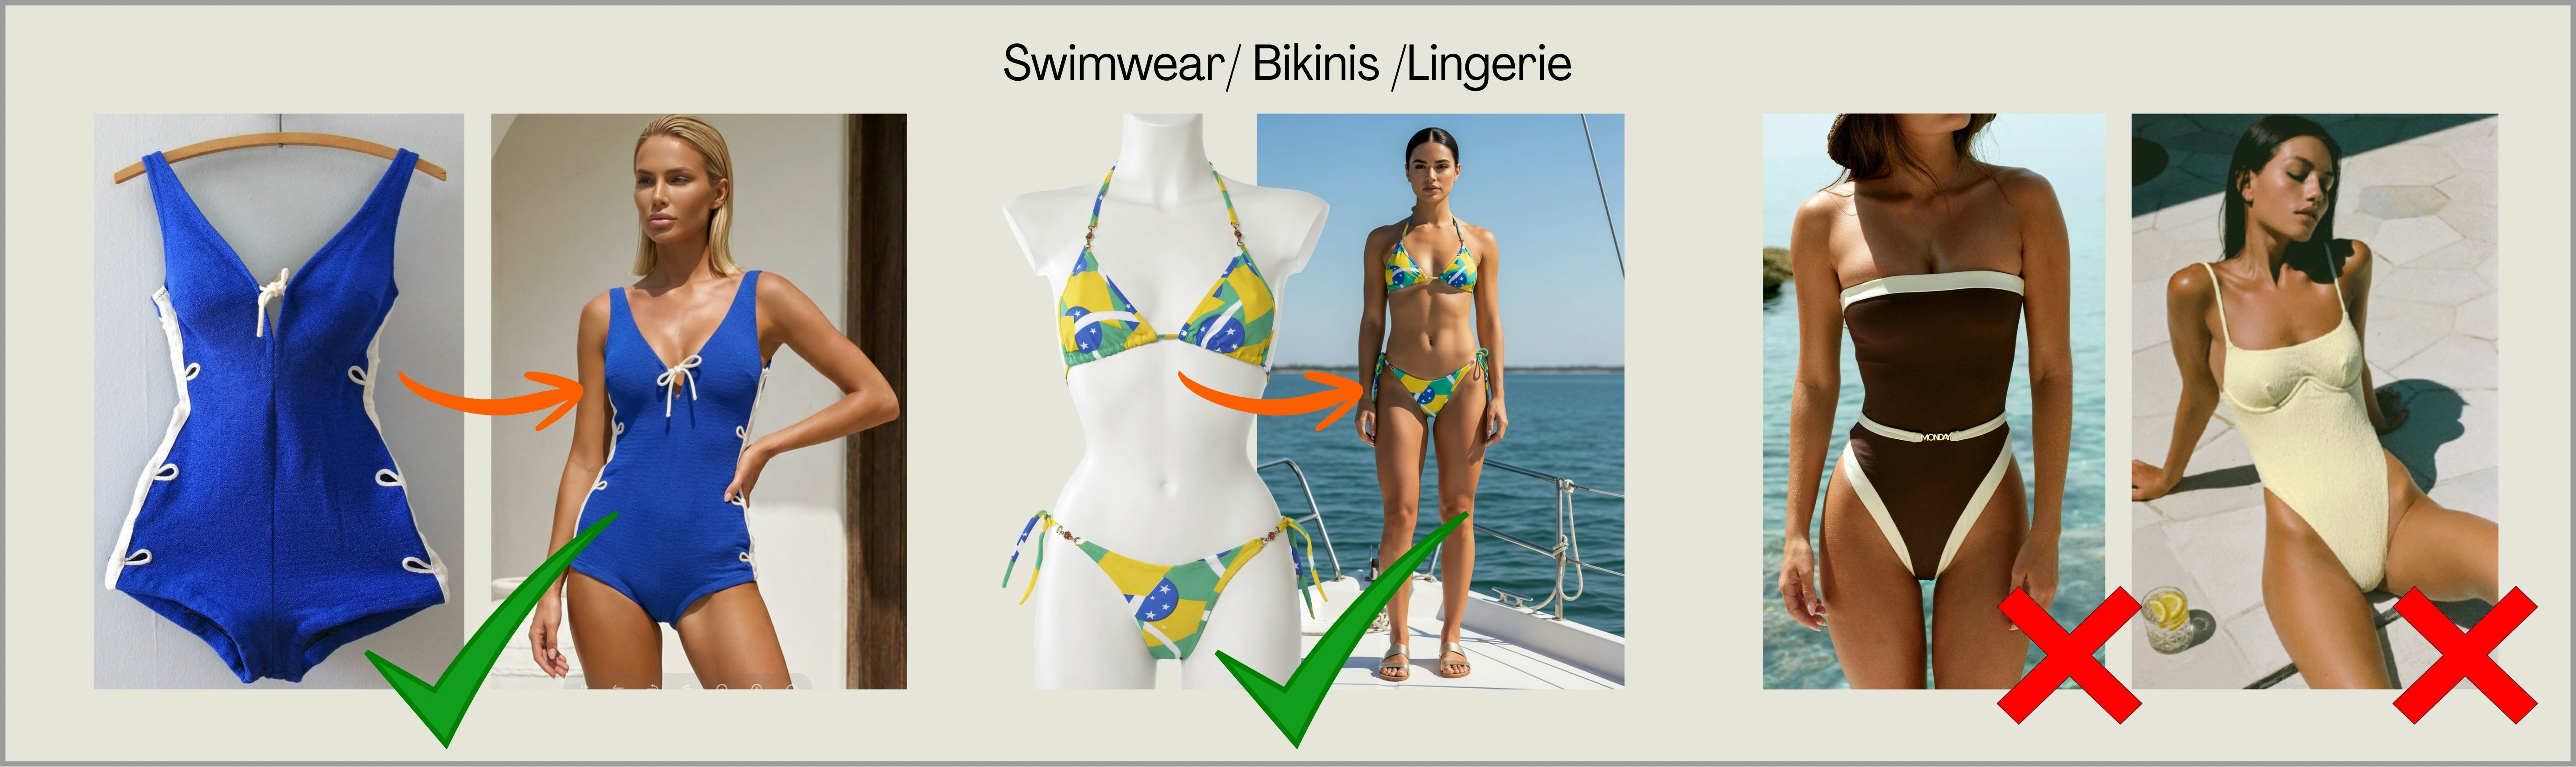
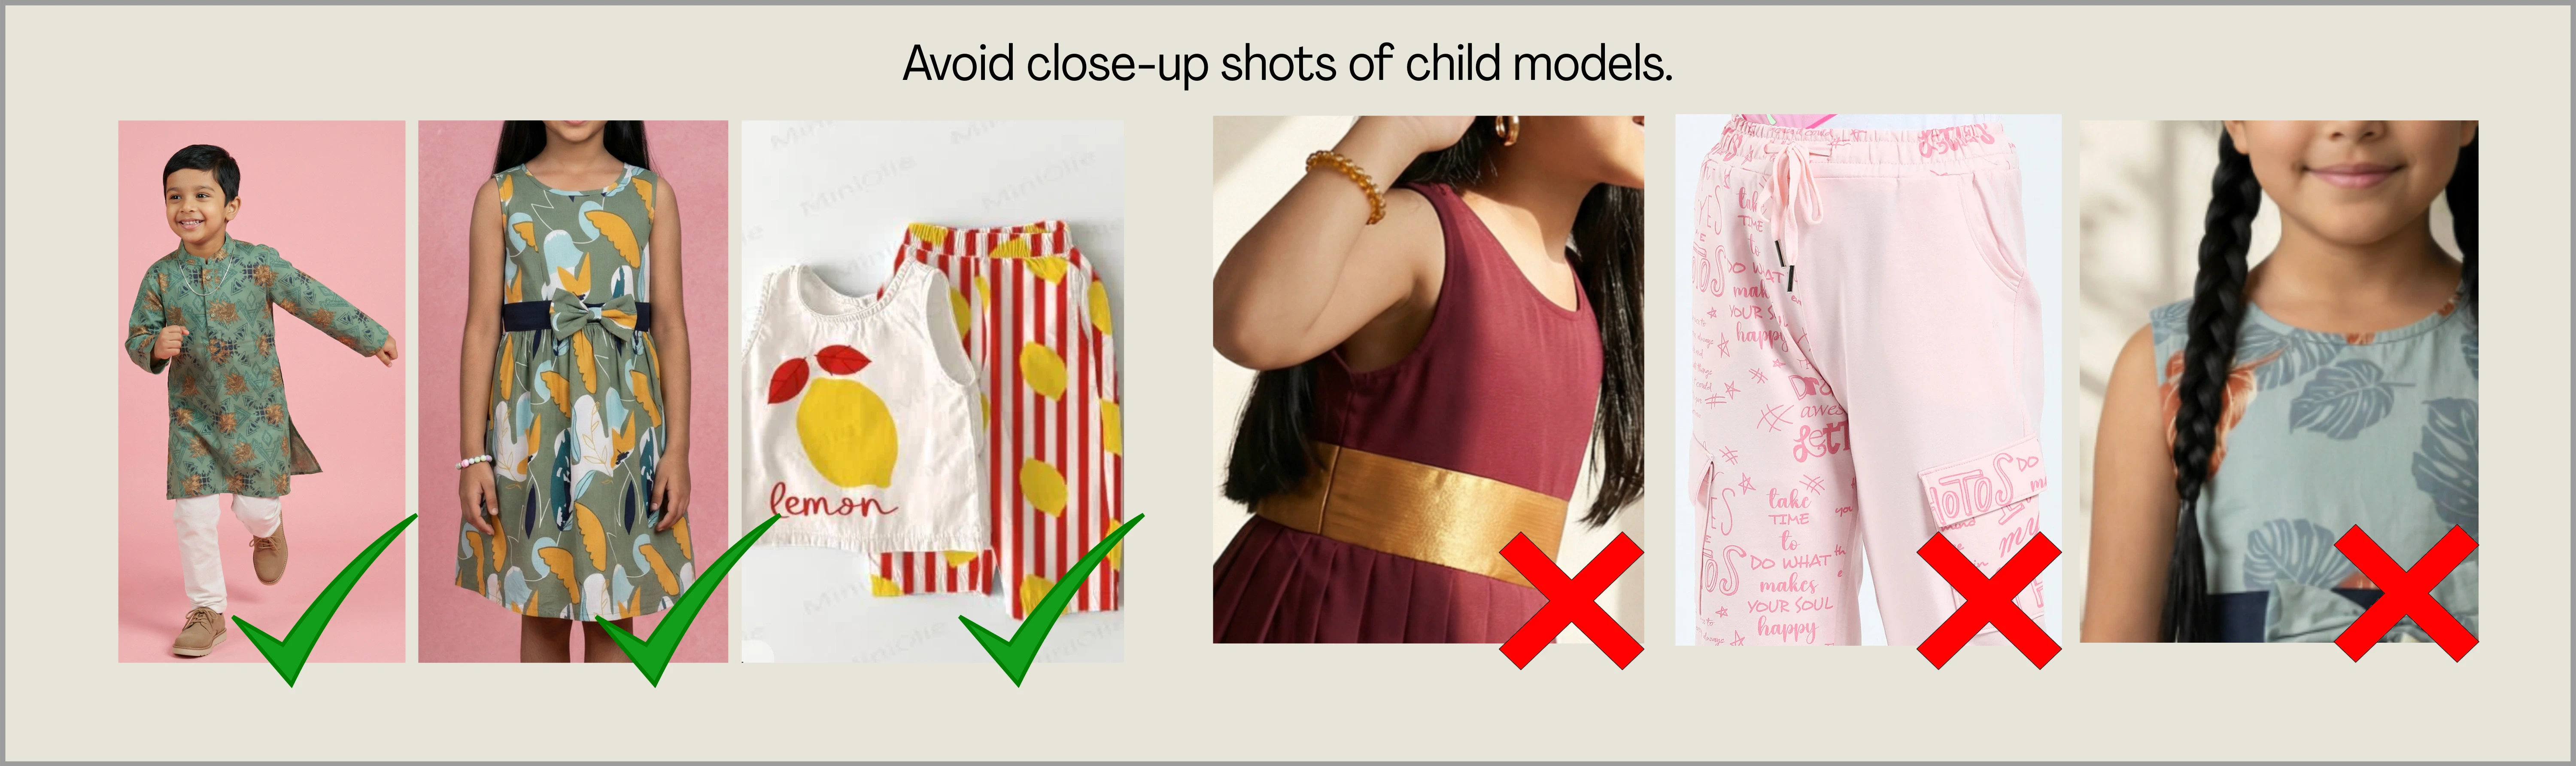
2.4 Images to Avoid
To ensure smooth processing and accurate results, avoid uploading images with transparent fabrics, exposed or sensitive body areas, close-up photos of children, or unclear garment presentation. These types of images may cause generation to fail or produce inaccurate outputs. These garments can still be uploaded in the correct format (mannequin, flat-lay, or properly styled model shots). Here are the key categories to watch for: 1) Sheer / Transparent Garments (Net, Mesh, Organza, Lace) Sheer garments are difficult to detect accurately because the garment boundaries are unclear and may get flagged by AI. Upload these only as a mannequin shot or full model shot with their respective inners or undergarment.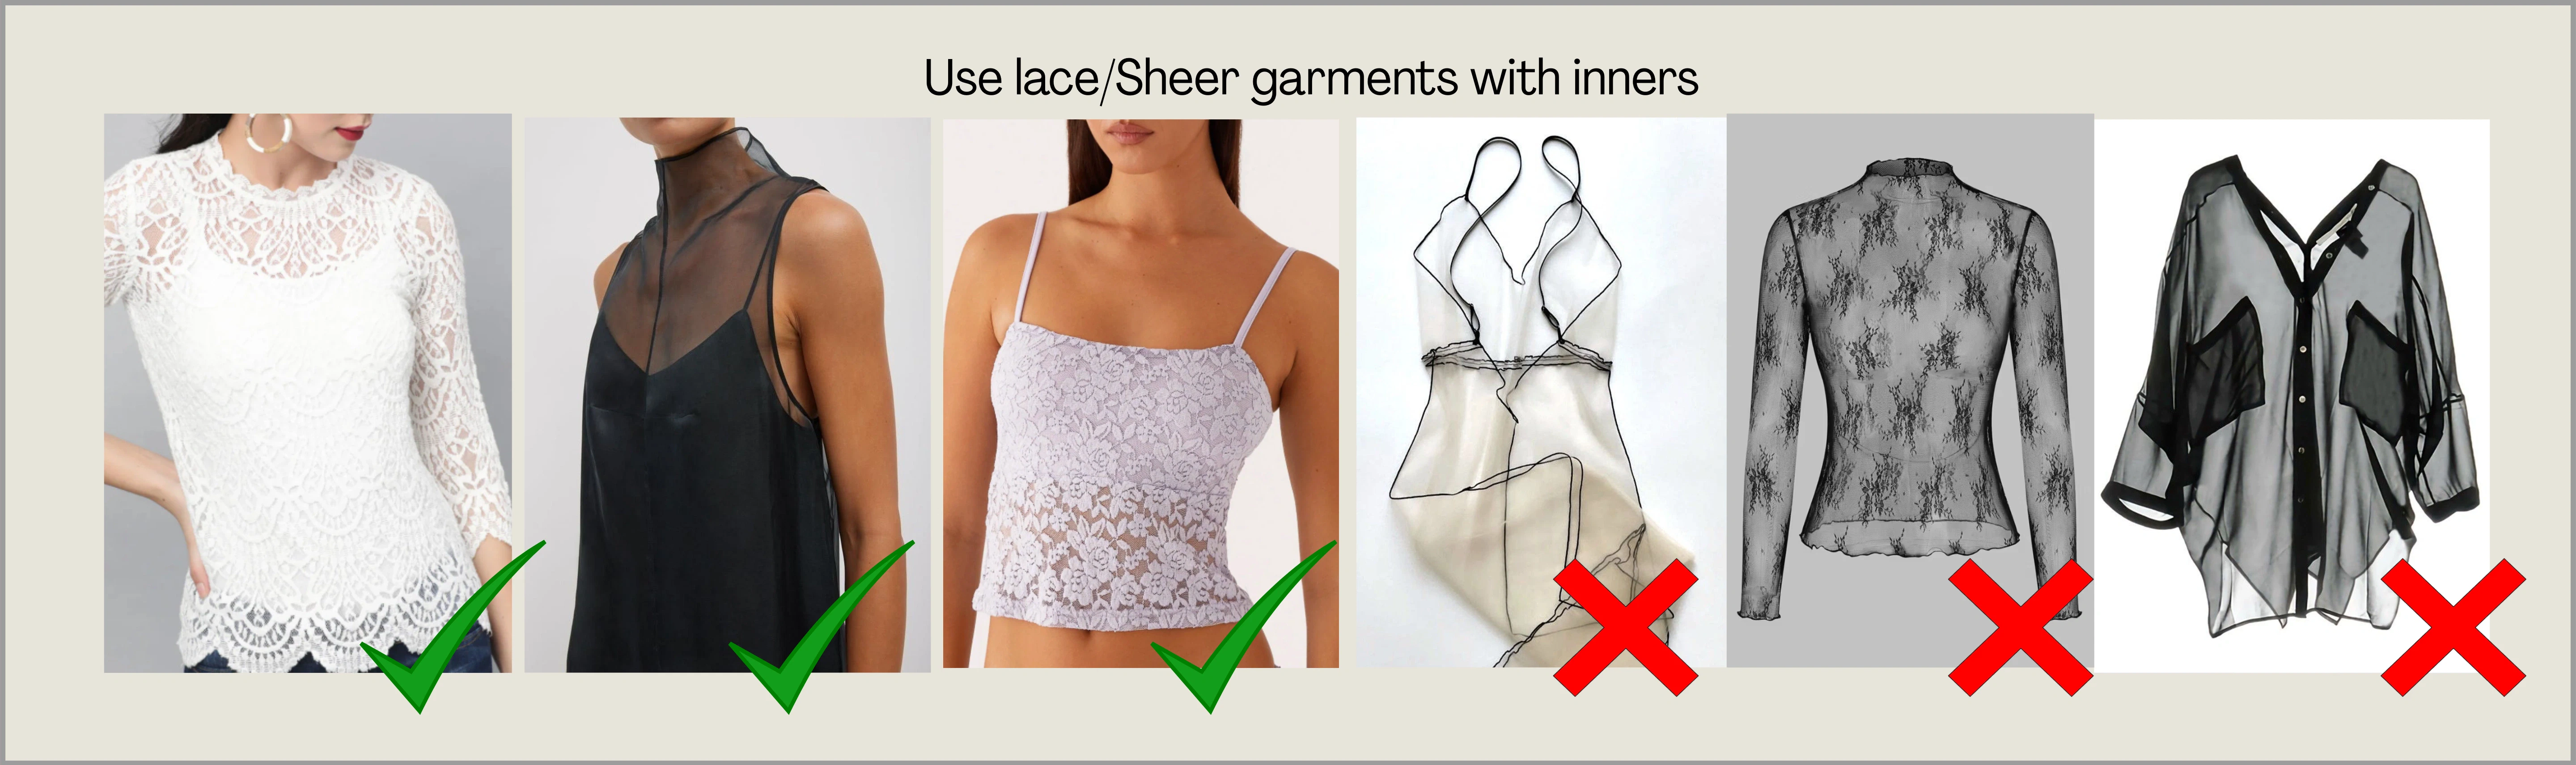
3. Using Ayna Studio
This section walks you through uploading garments and generating photoshoots on Ayna — from supported file formats, to choosing the right garment category, to running your first generation.3.1 Basic Upload Guidelines
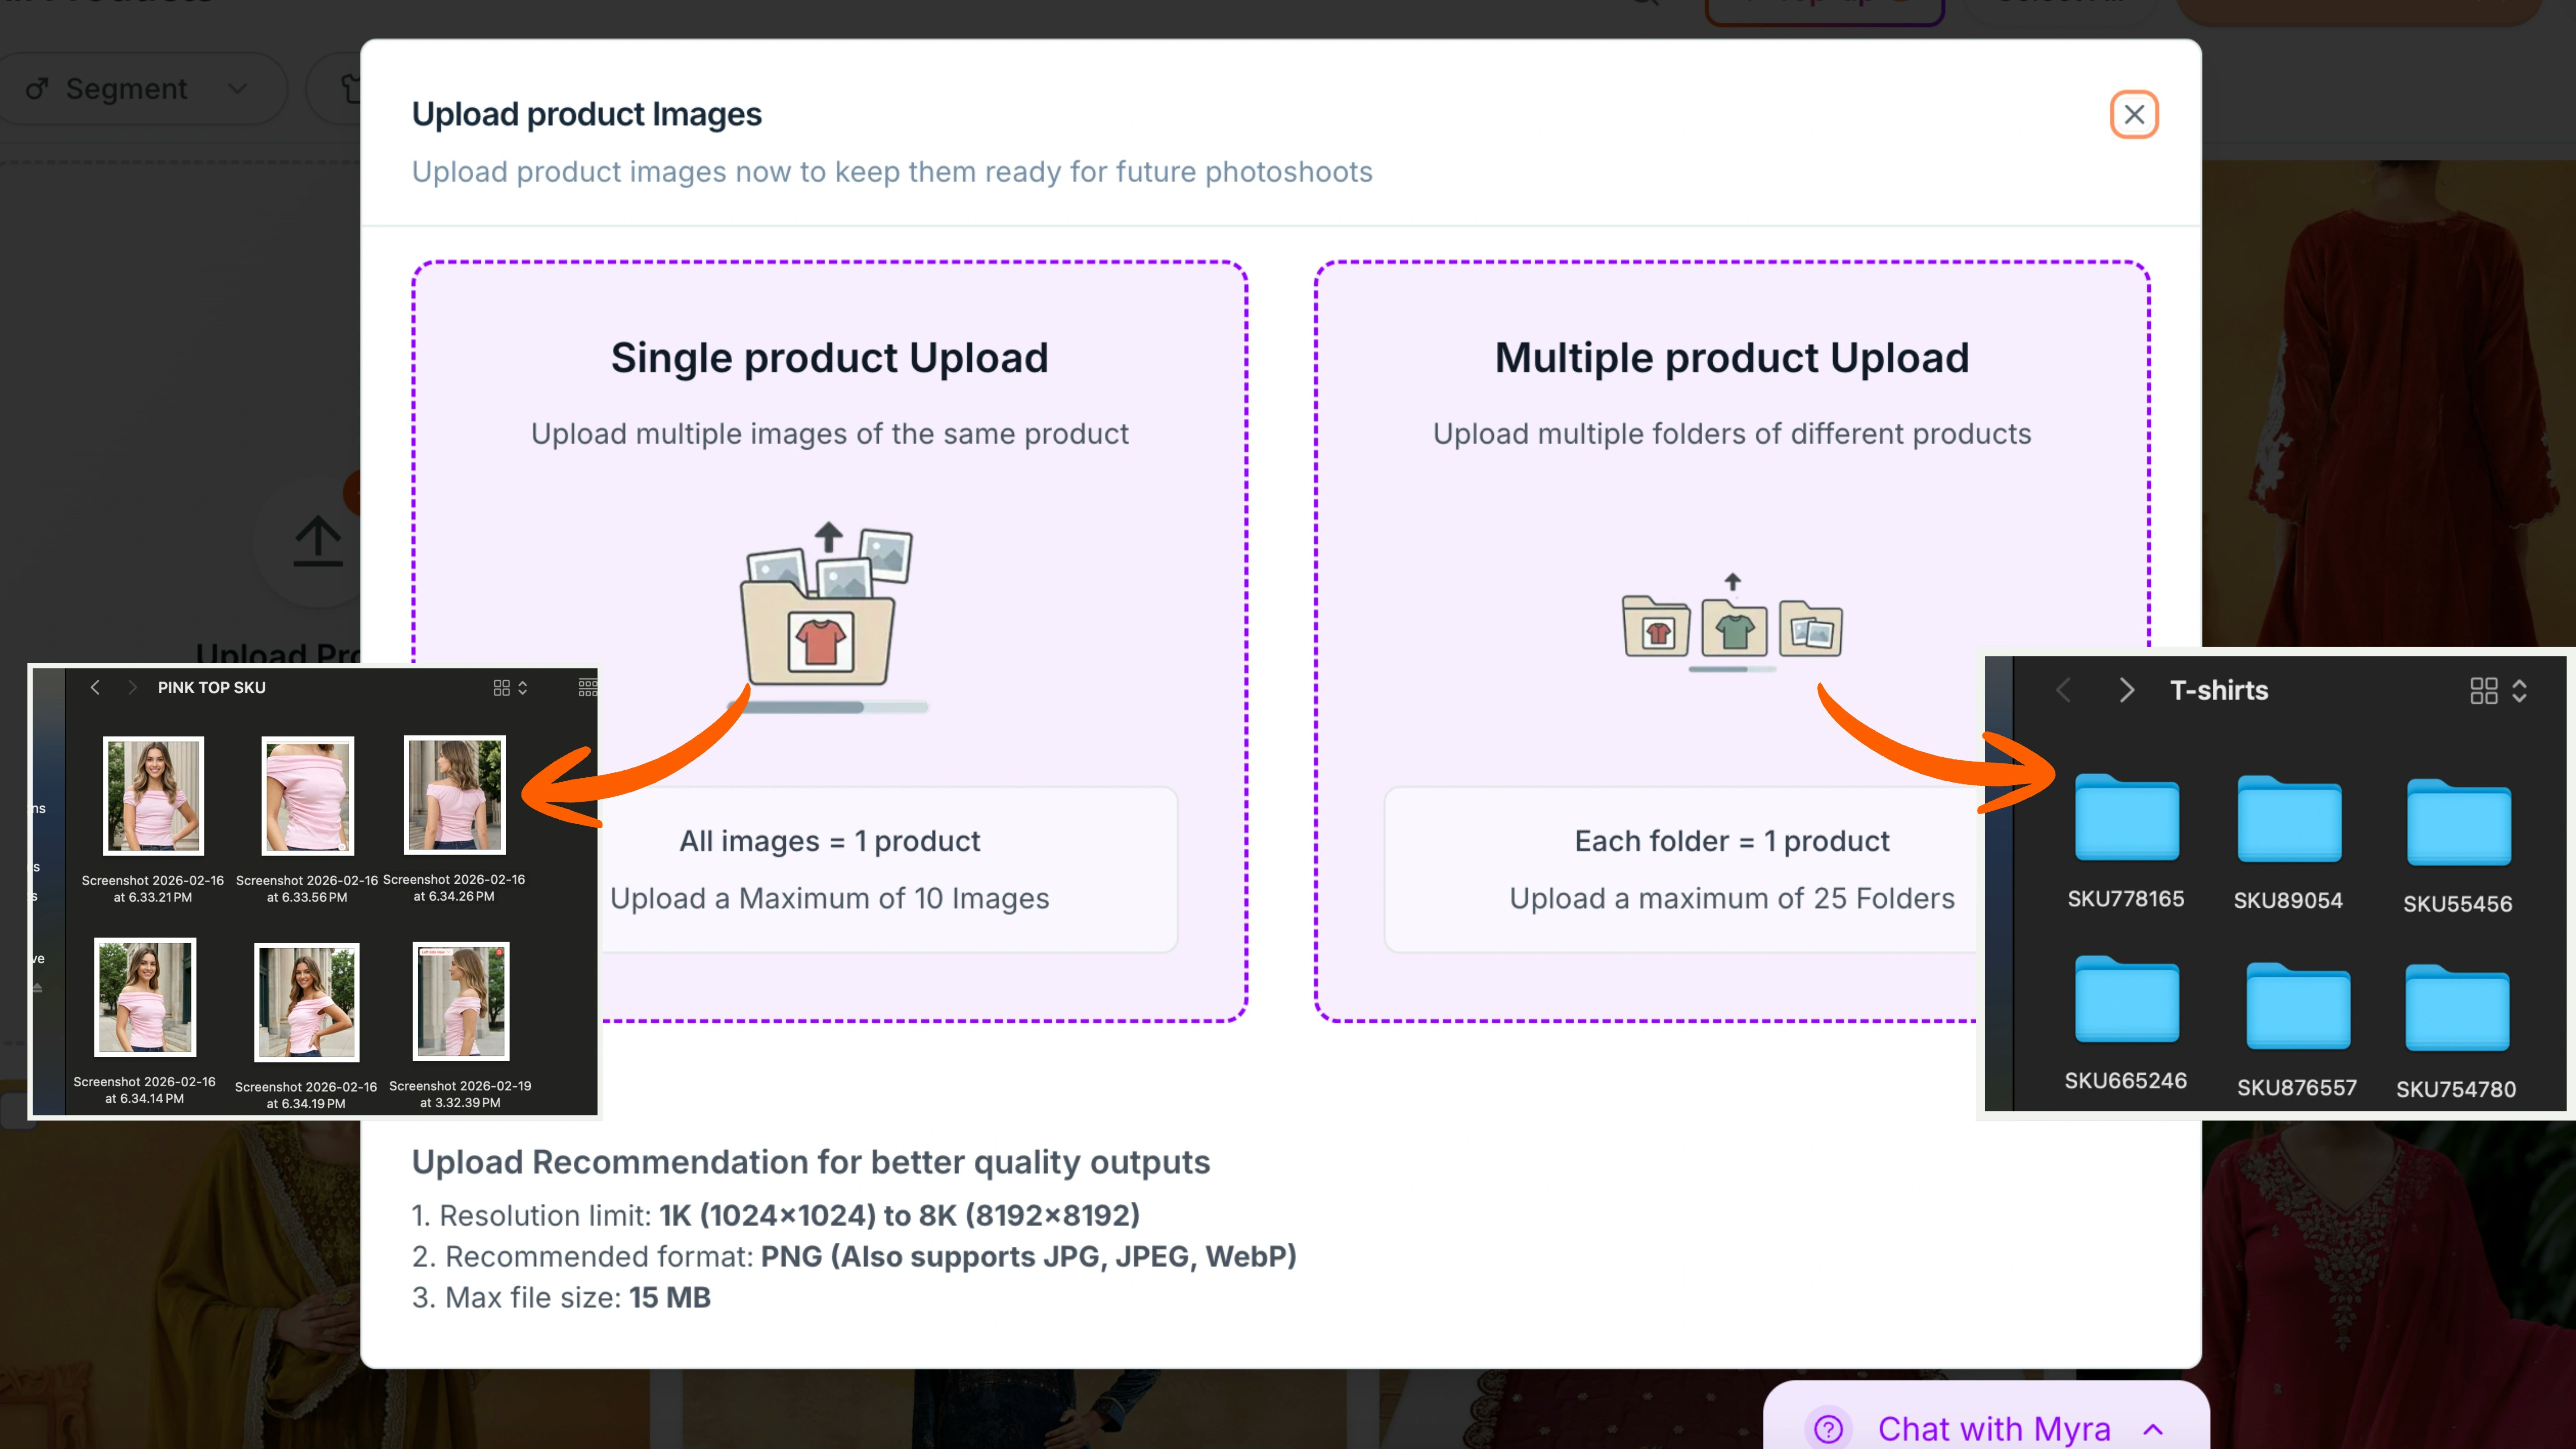
These are some upload guidelines that need to be followed for every image, otherwise Ayna might not process your input image:- Recommended resolution: 1K (1024 x 1024) to 8K (8192 x 8192)
- Maximum file size: 15 MB per image
- Best format: PNG
- Also supported: JPG, JPEG, and WEBP
3.2 Single or Bulk Uploading
- Single Product Upload: Upload one product at a time by dragging and dropping multiple images of the same garment (up to 10 images per product).
- Multiple Product Upload: You can upload multiple folders of garments where each folder contains images of one product, grouped under the same garment category.
3.3 Garment Categories and Examples
Once you click on Start a Photoshoot, you can select the segment — Men, Women, Boys, Girls, or Baby. Ayna has 4 main garment categories: Top Wear, Bottom Wear, Full Body, or Top + Bottom (Set). Each category is designed to match the garment structure correctly. Here’s what each option includes and when to select it.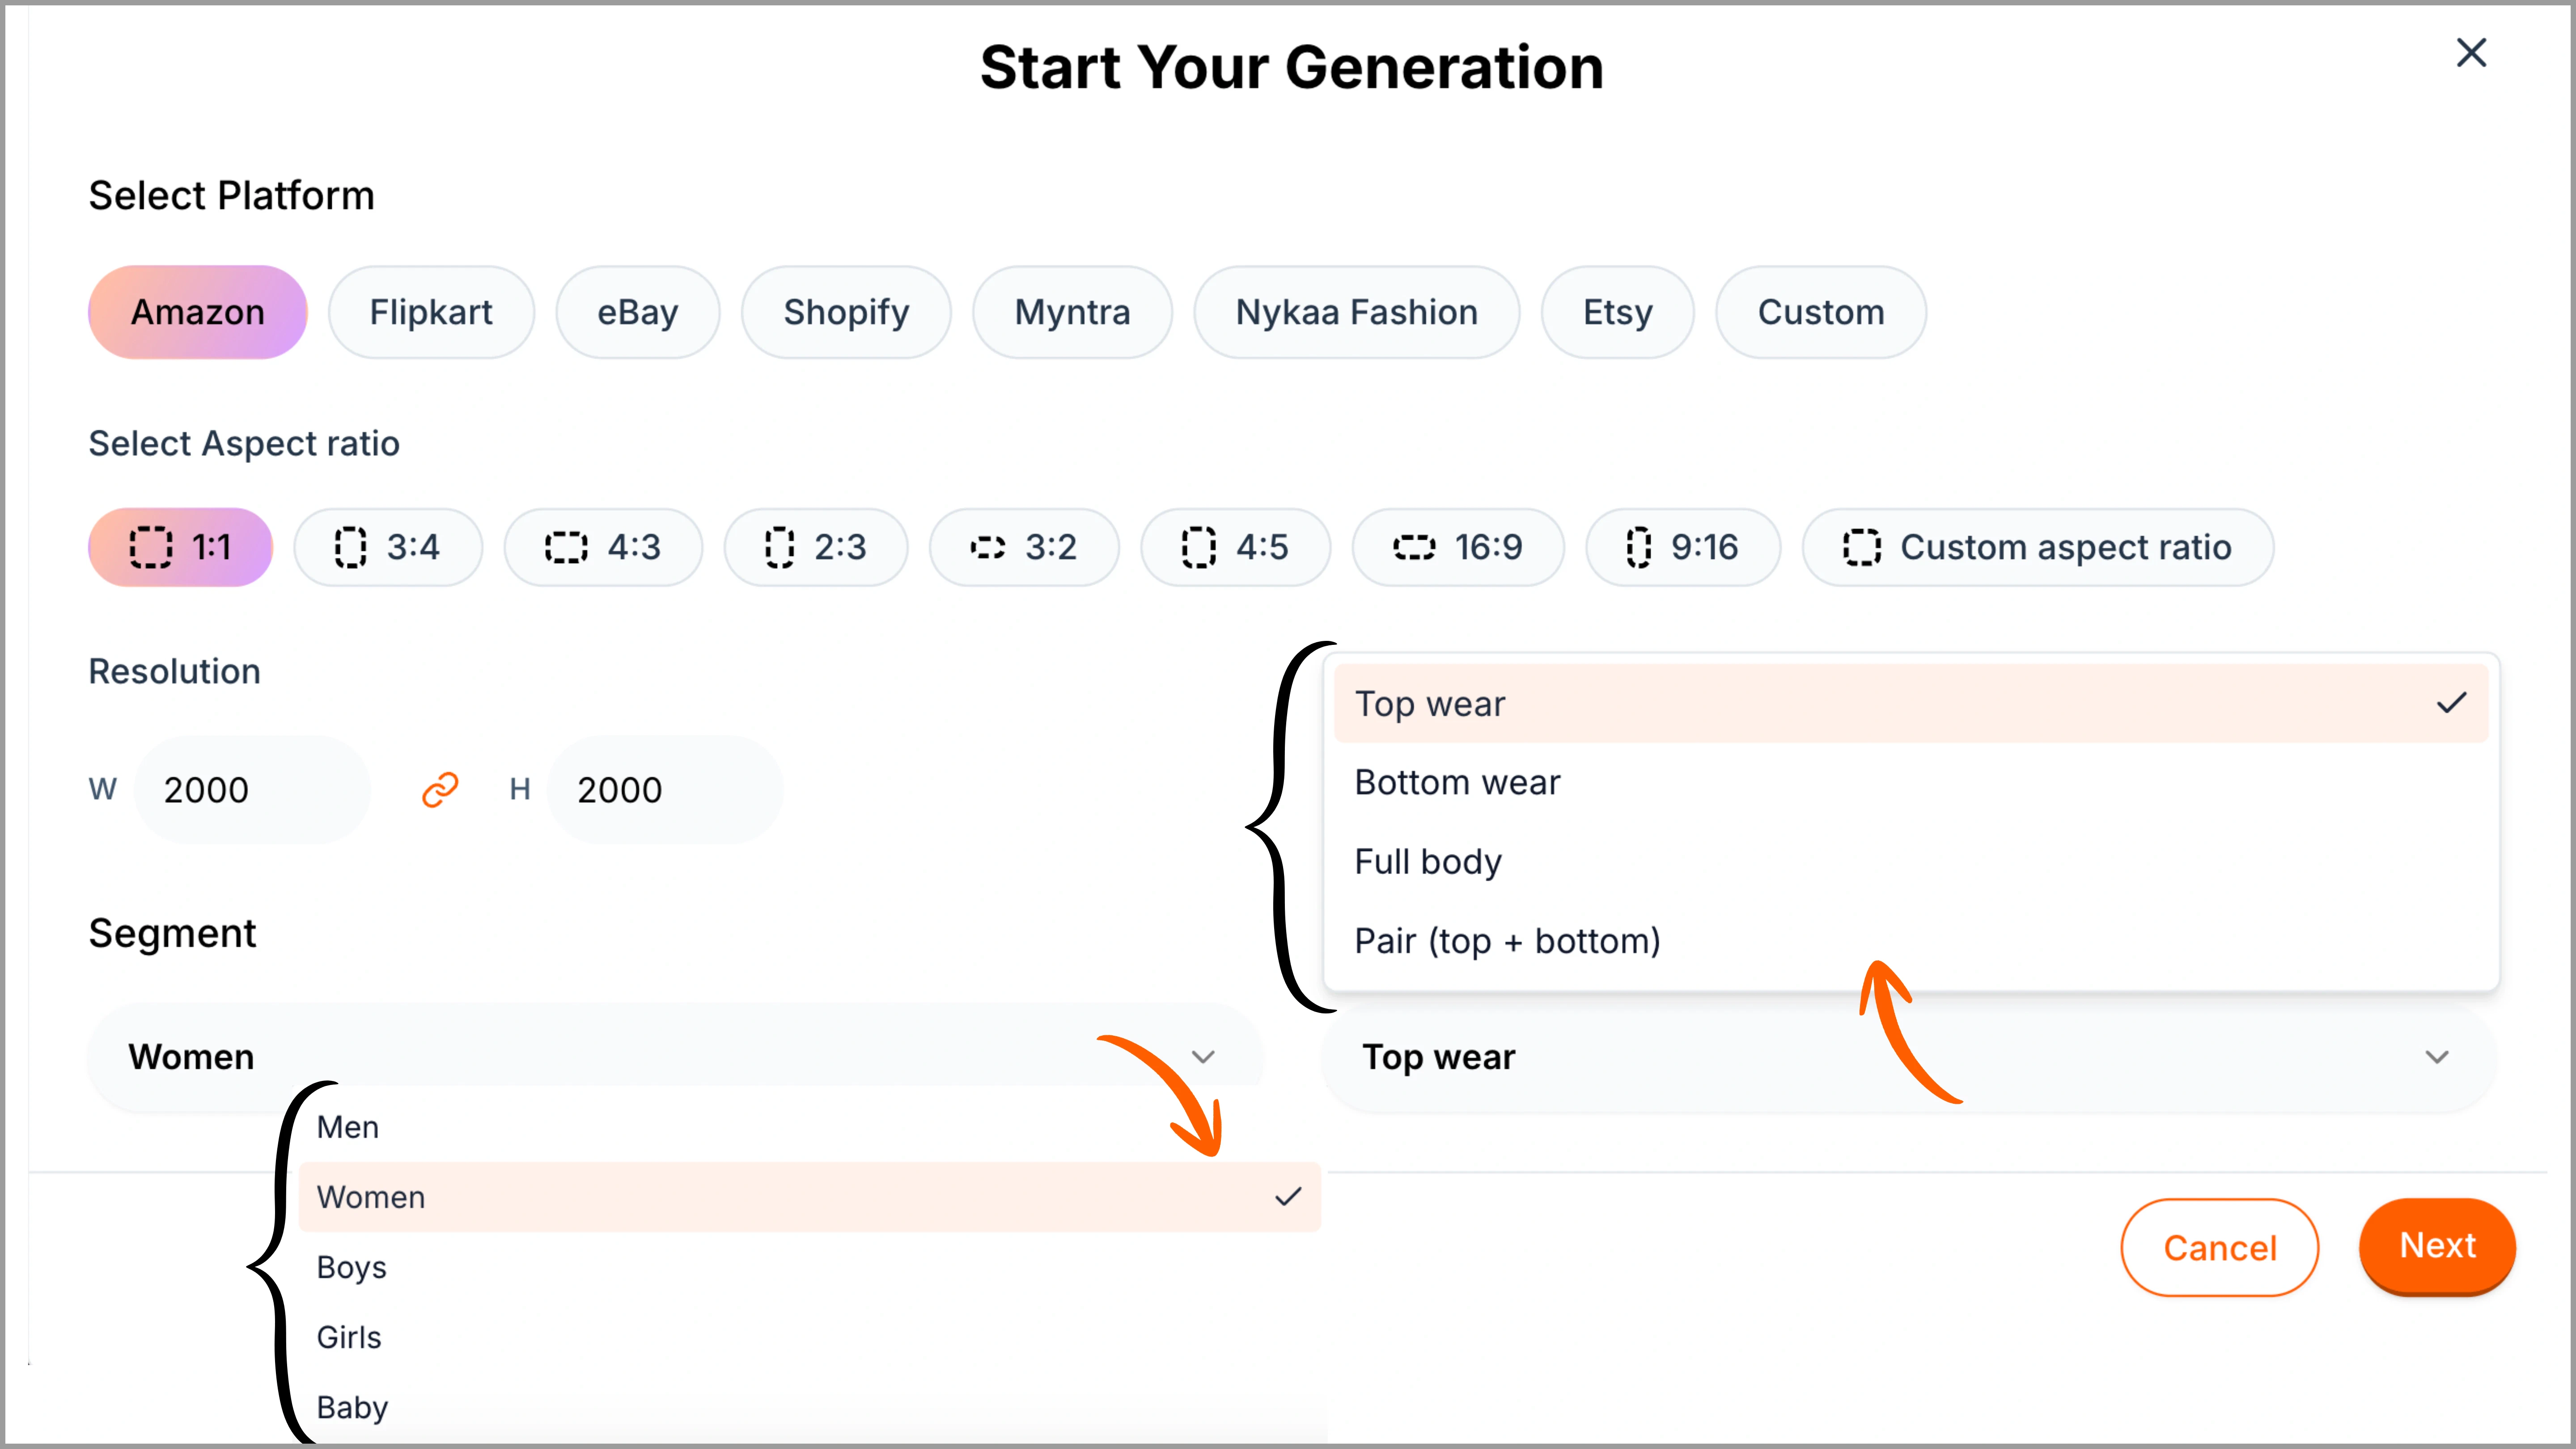
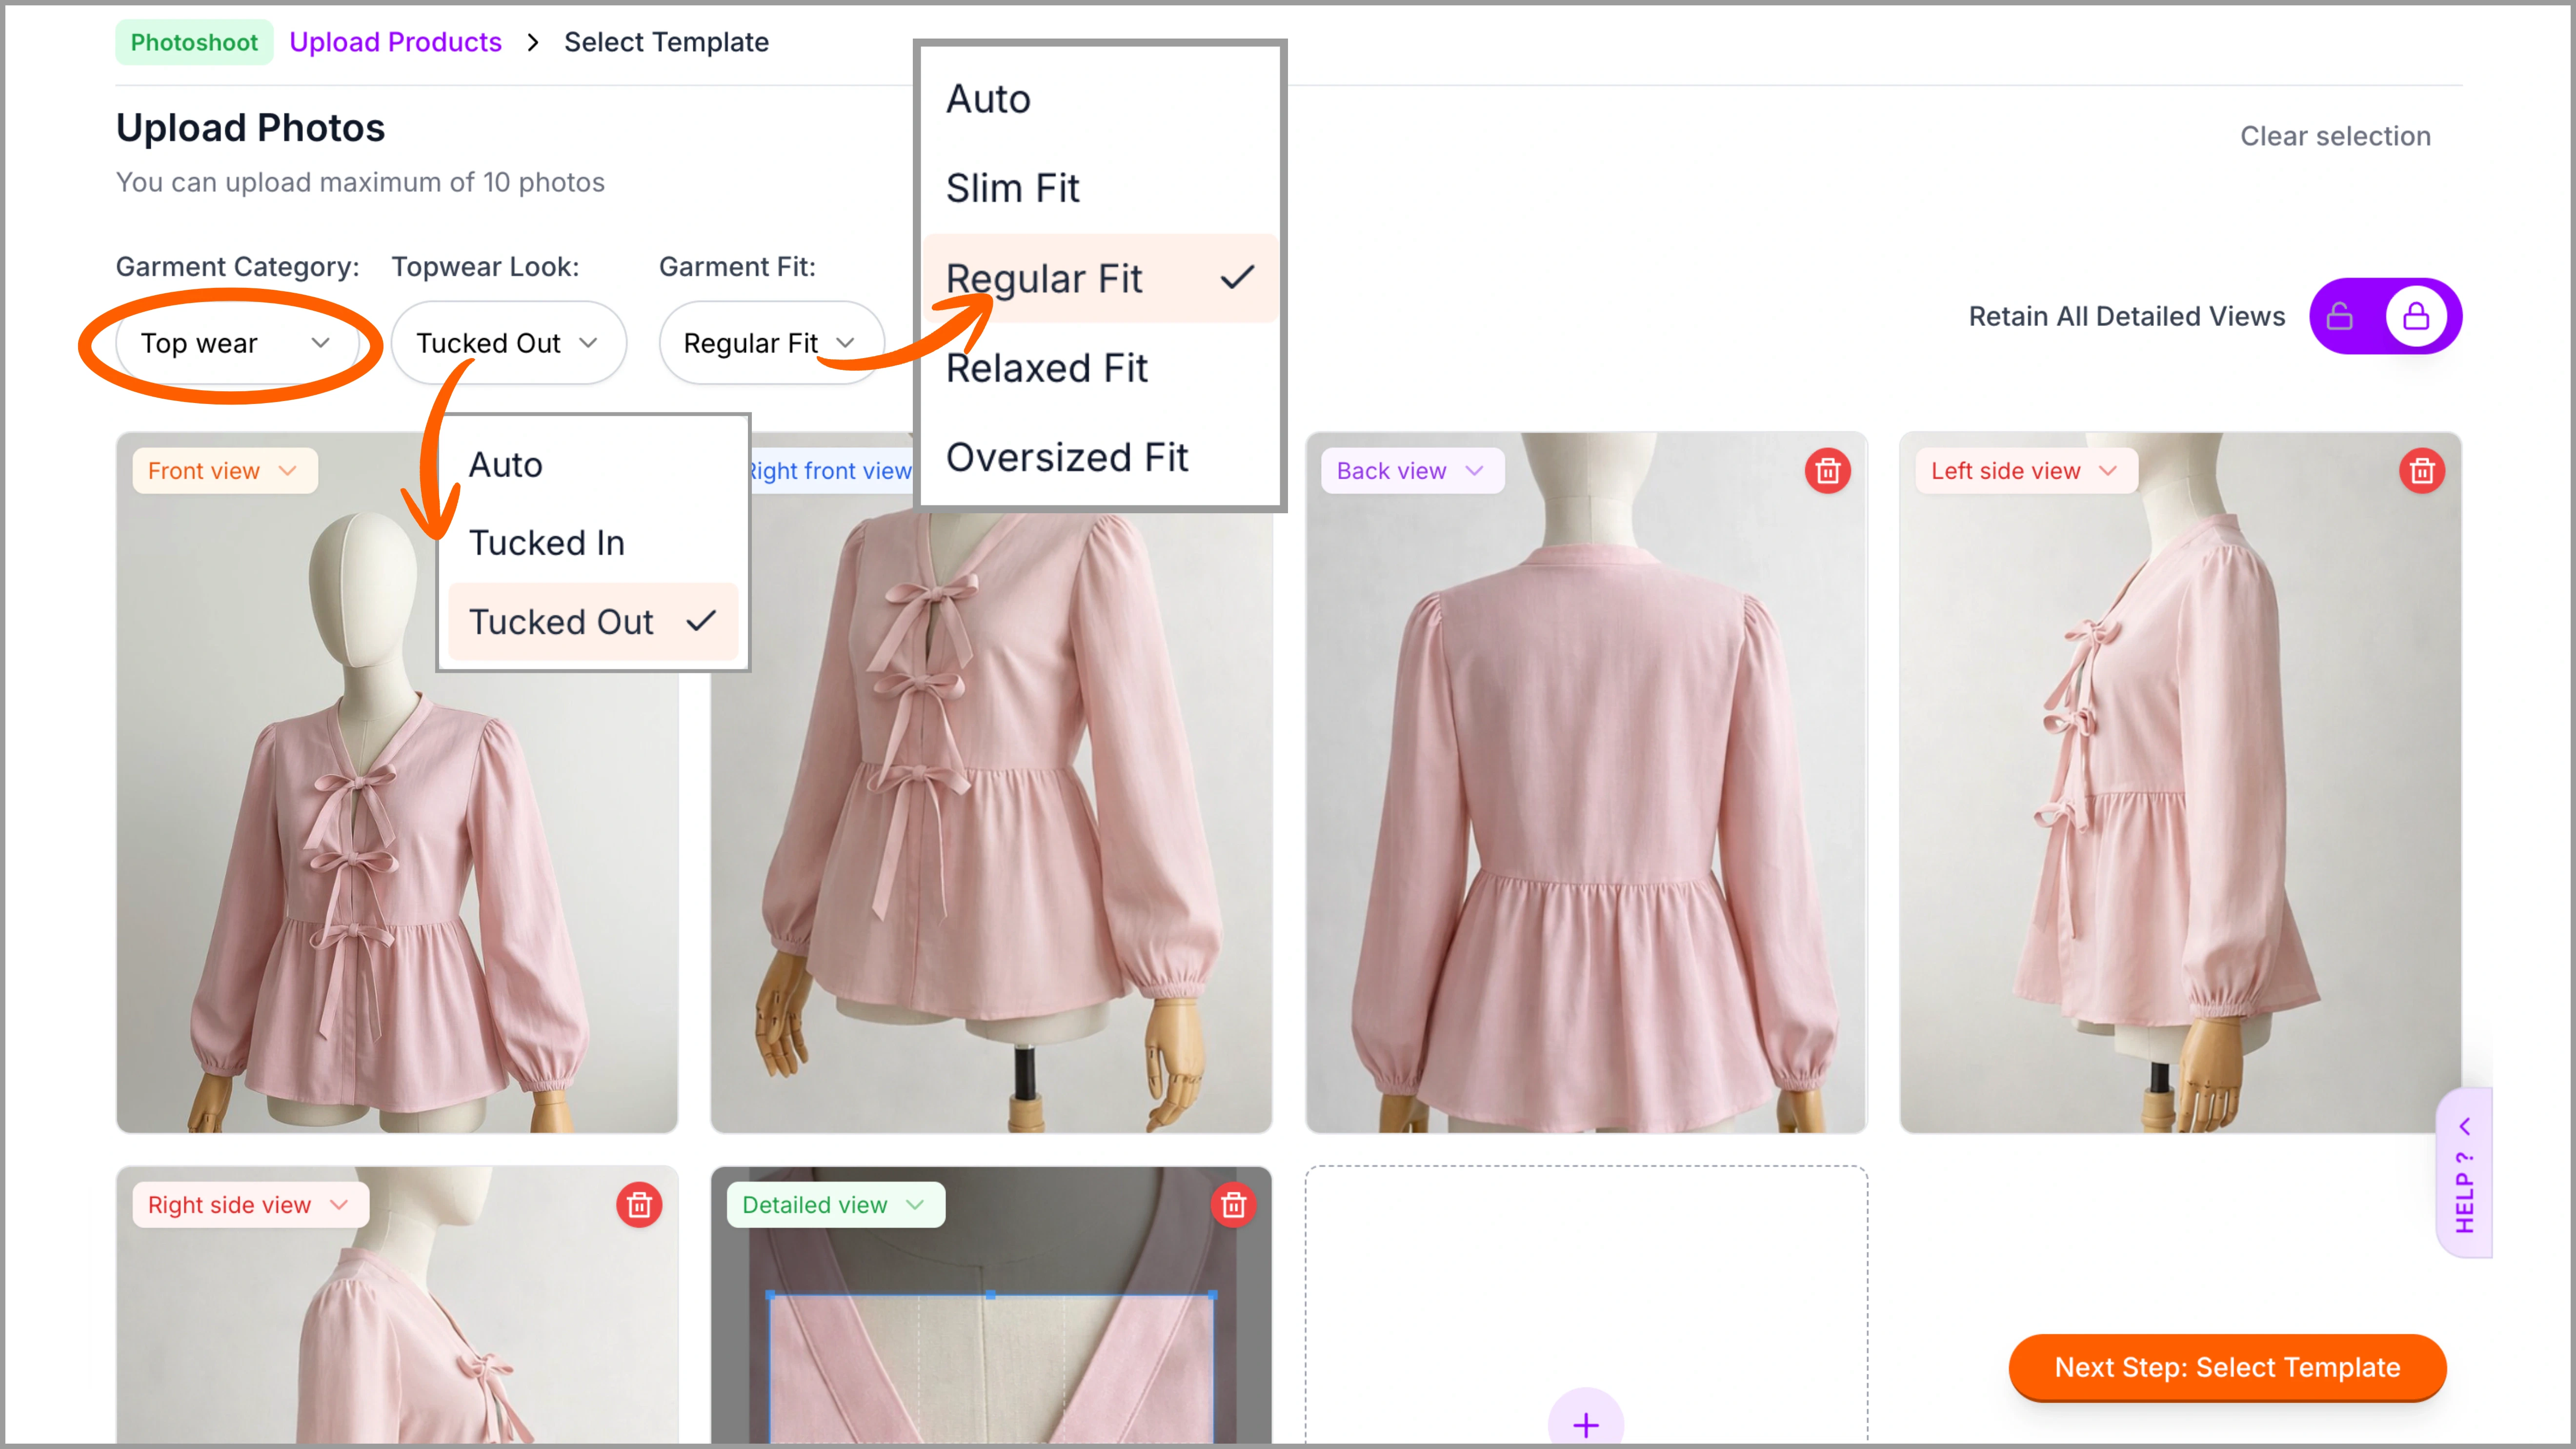
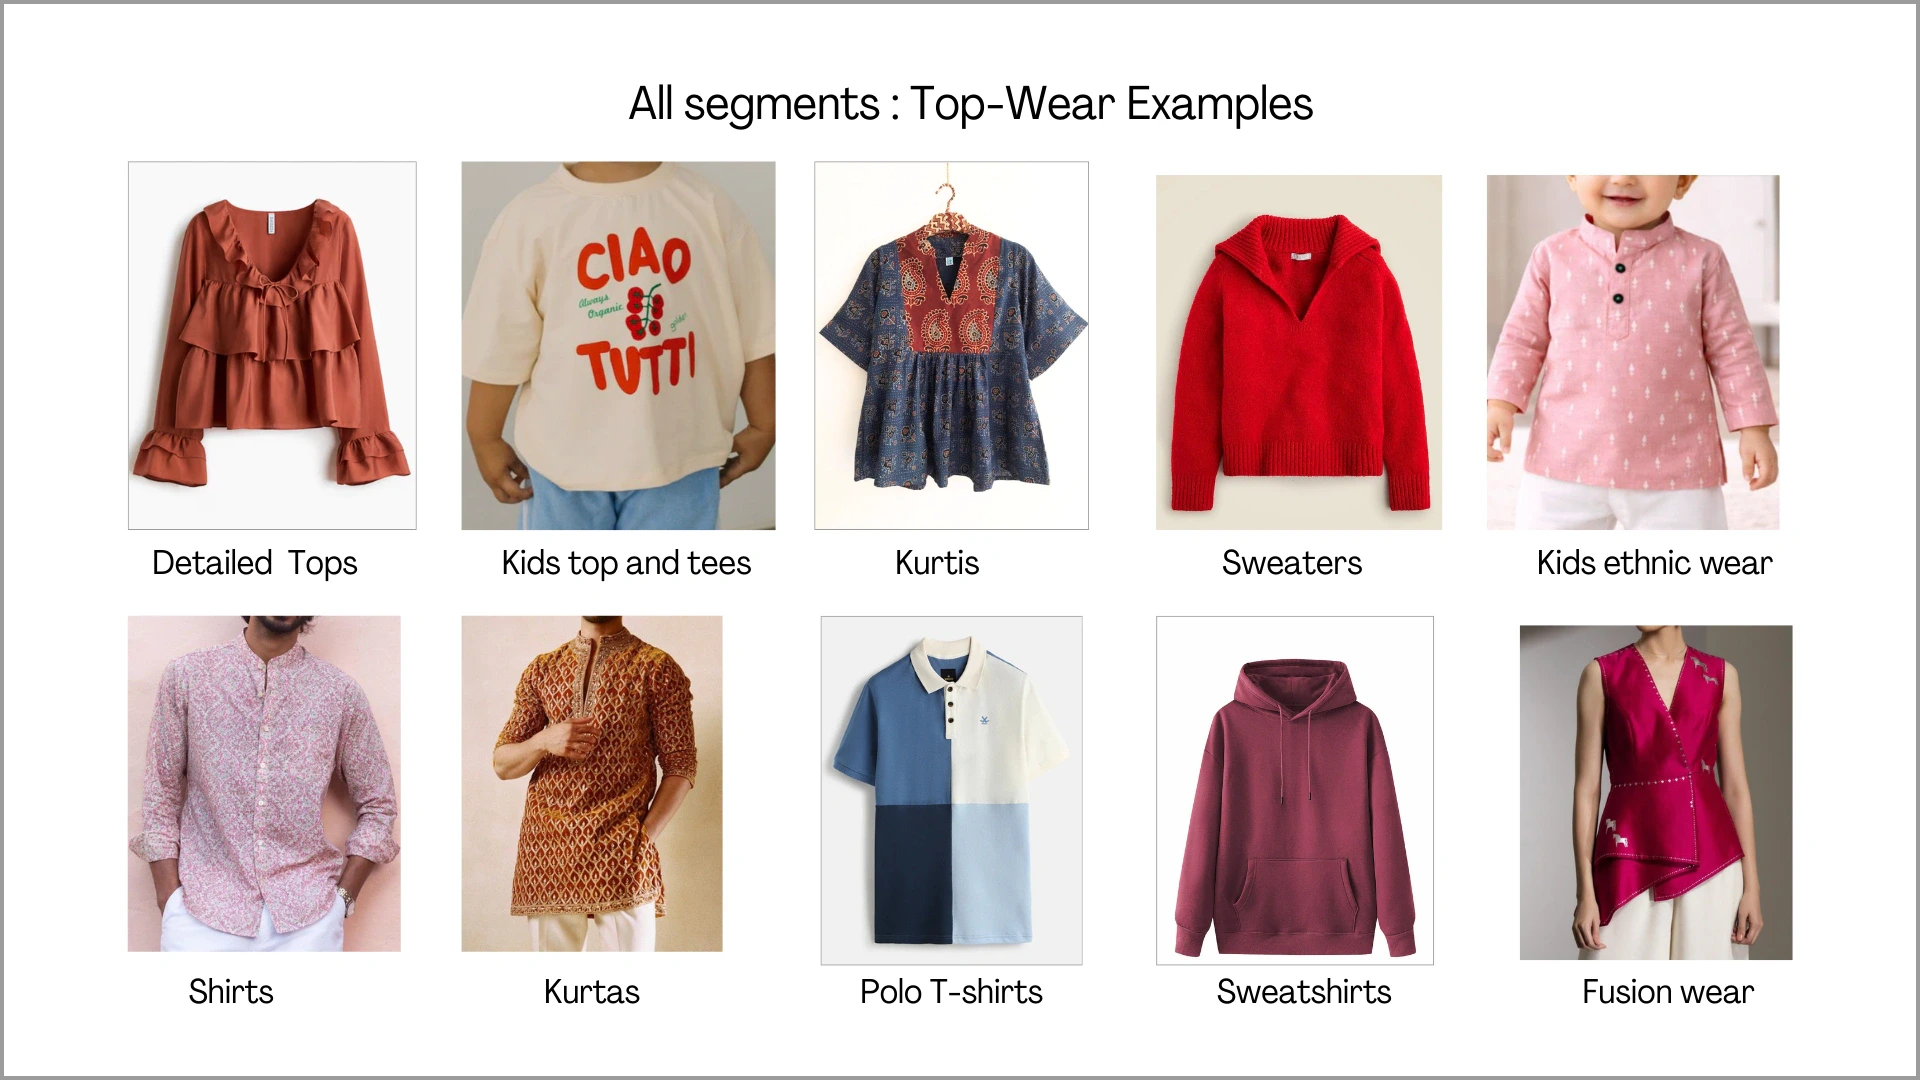
3.3.1 Top Wear
After selecting the segment (Men, Women, Boys, Girls, or Baby), choose Top Wear for garments such as Tops, T-shirts, Shirts, Kurtis, Sweatshirts, and similar upper-body styles. This category is suitable for any garment worn only on the upper half of the body. Bottoms and accessories can be later chosen from Ayna’s style library. Before uploading the images, make sure to select ‘Top Wear’ and choose fit styles after uploading the images.Top wear supports flat-lay, hanger shots, mannequin, and model shots. However, if the garment has heavy detailing, it is recommended to upload mannequin or model images with side views for better structural clarity.
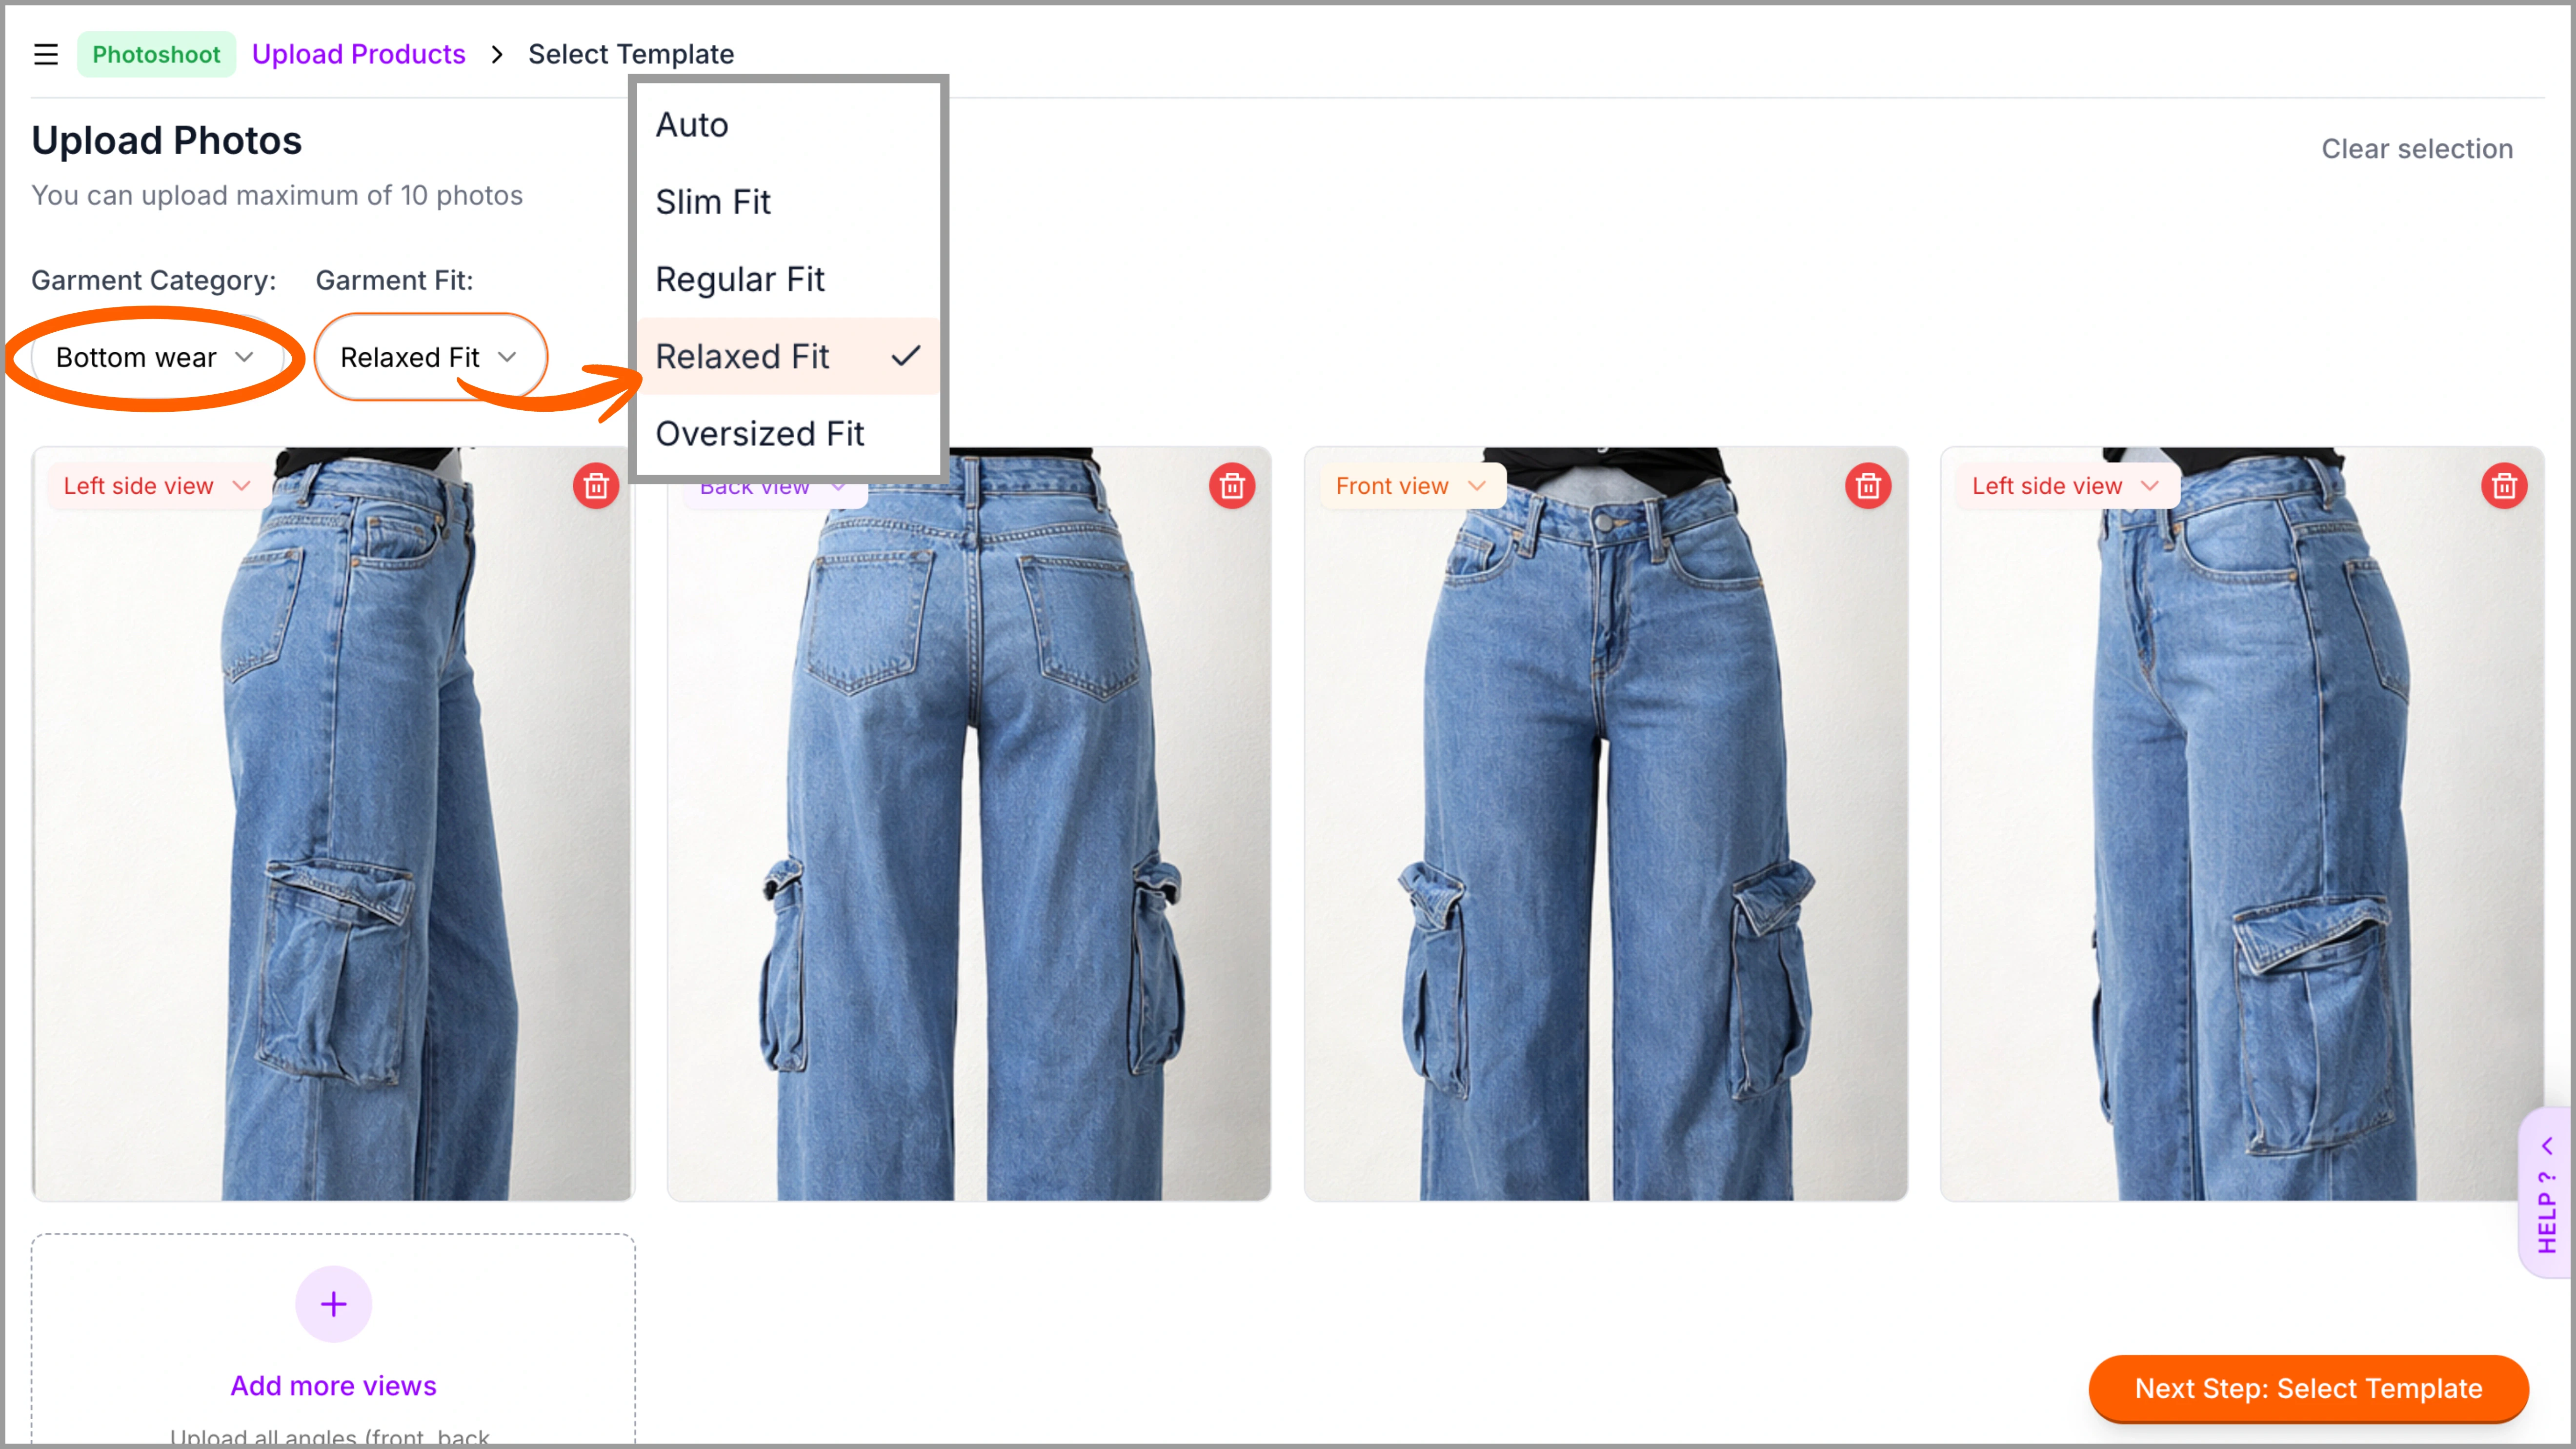
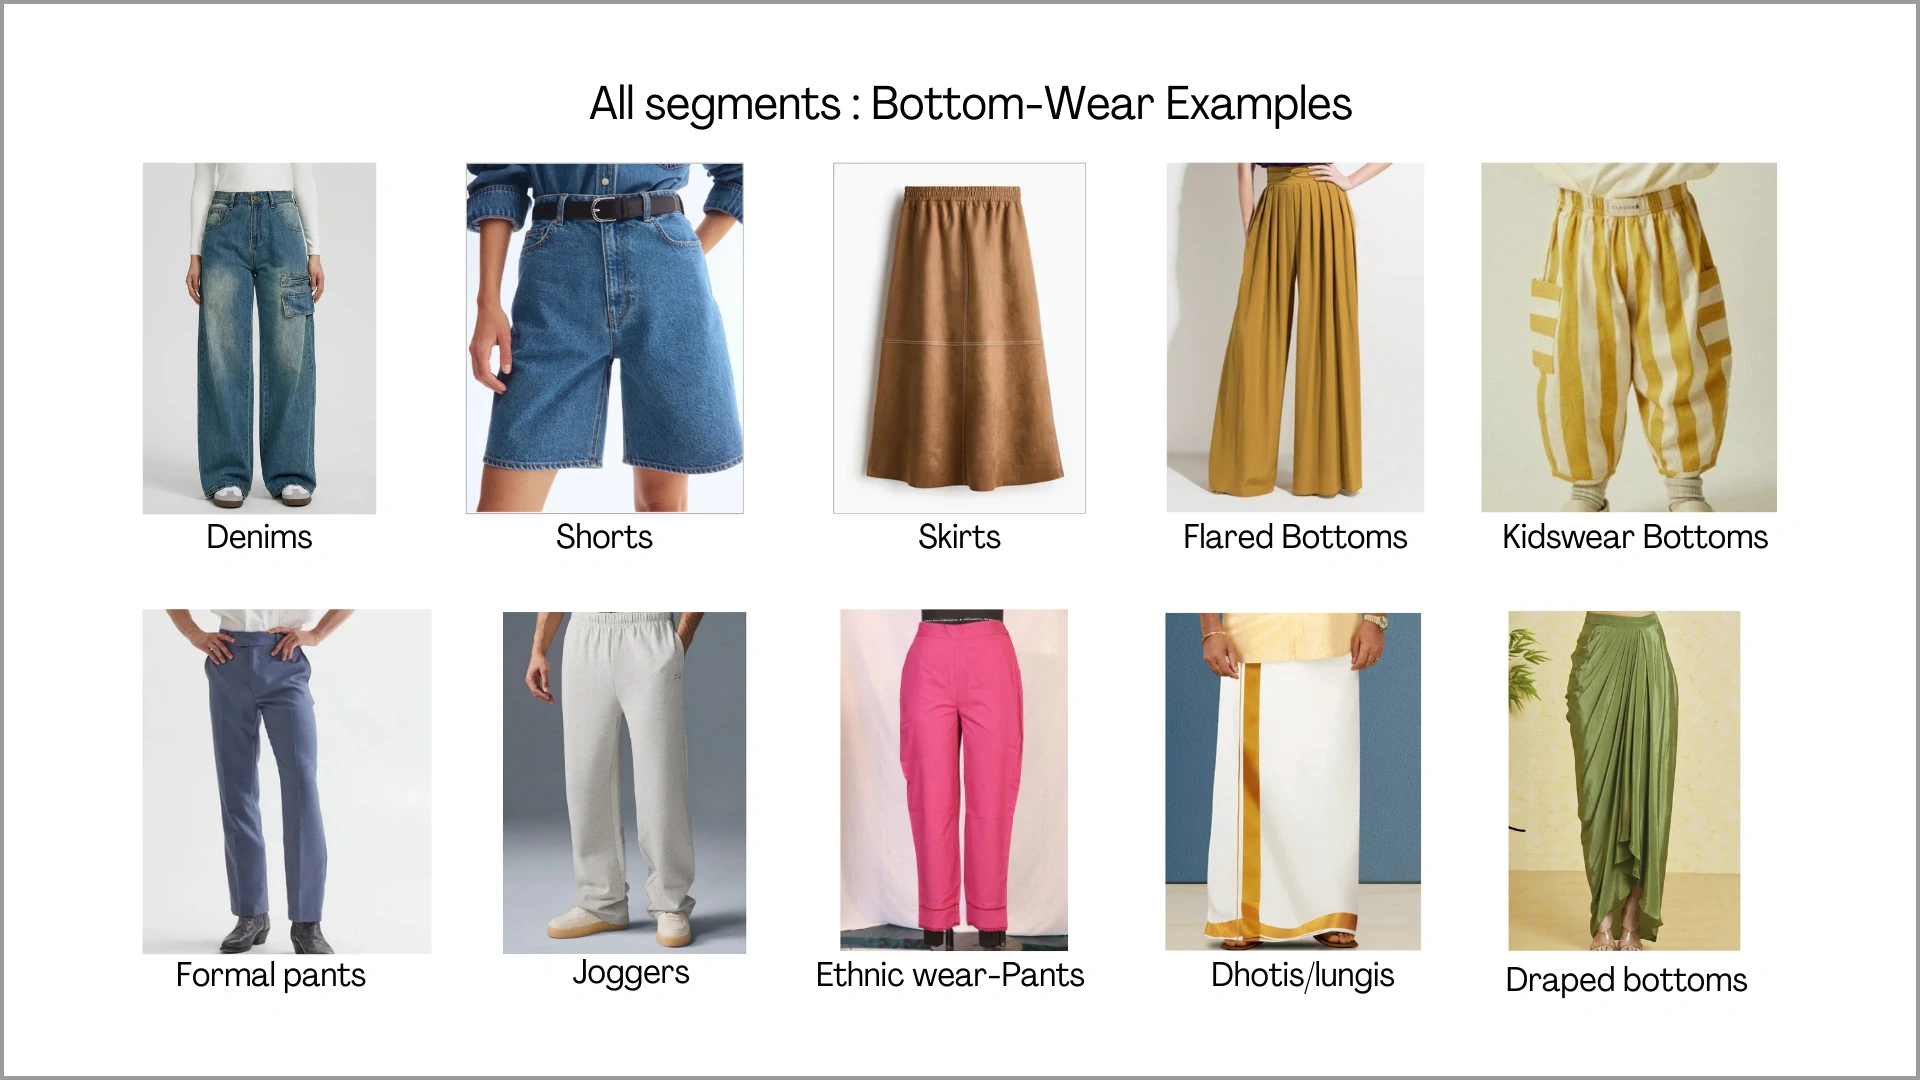
3.3.2 Bottom Wear
Choose Bottom Wear for garments such as Pants, Denims, Cargos, Skirts, Shorts, Dhotis, and similar lower-body styles. This category is suitable for any garment worn only on the lower half of the body. Top-wear and accessories can be later selected from Ayna’s style library. Before uploading the images, make sure to select ‘Bottom Wear’ and choose fit styles after uploading the images.Bottom wear works well with flat-lay and mannequin formats. For garments with side pockets, cargo panels, flaps, or utility details, include side-angle views or upload on mannequin/model to capture full structure.
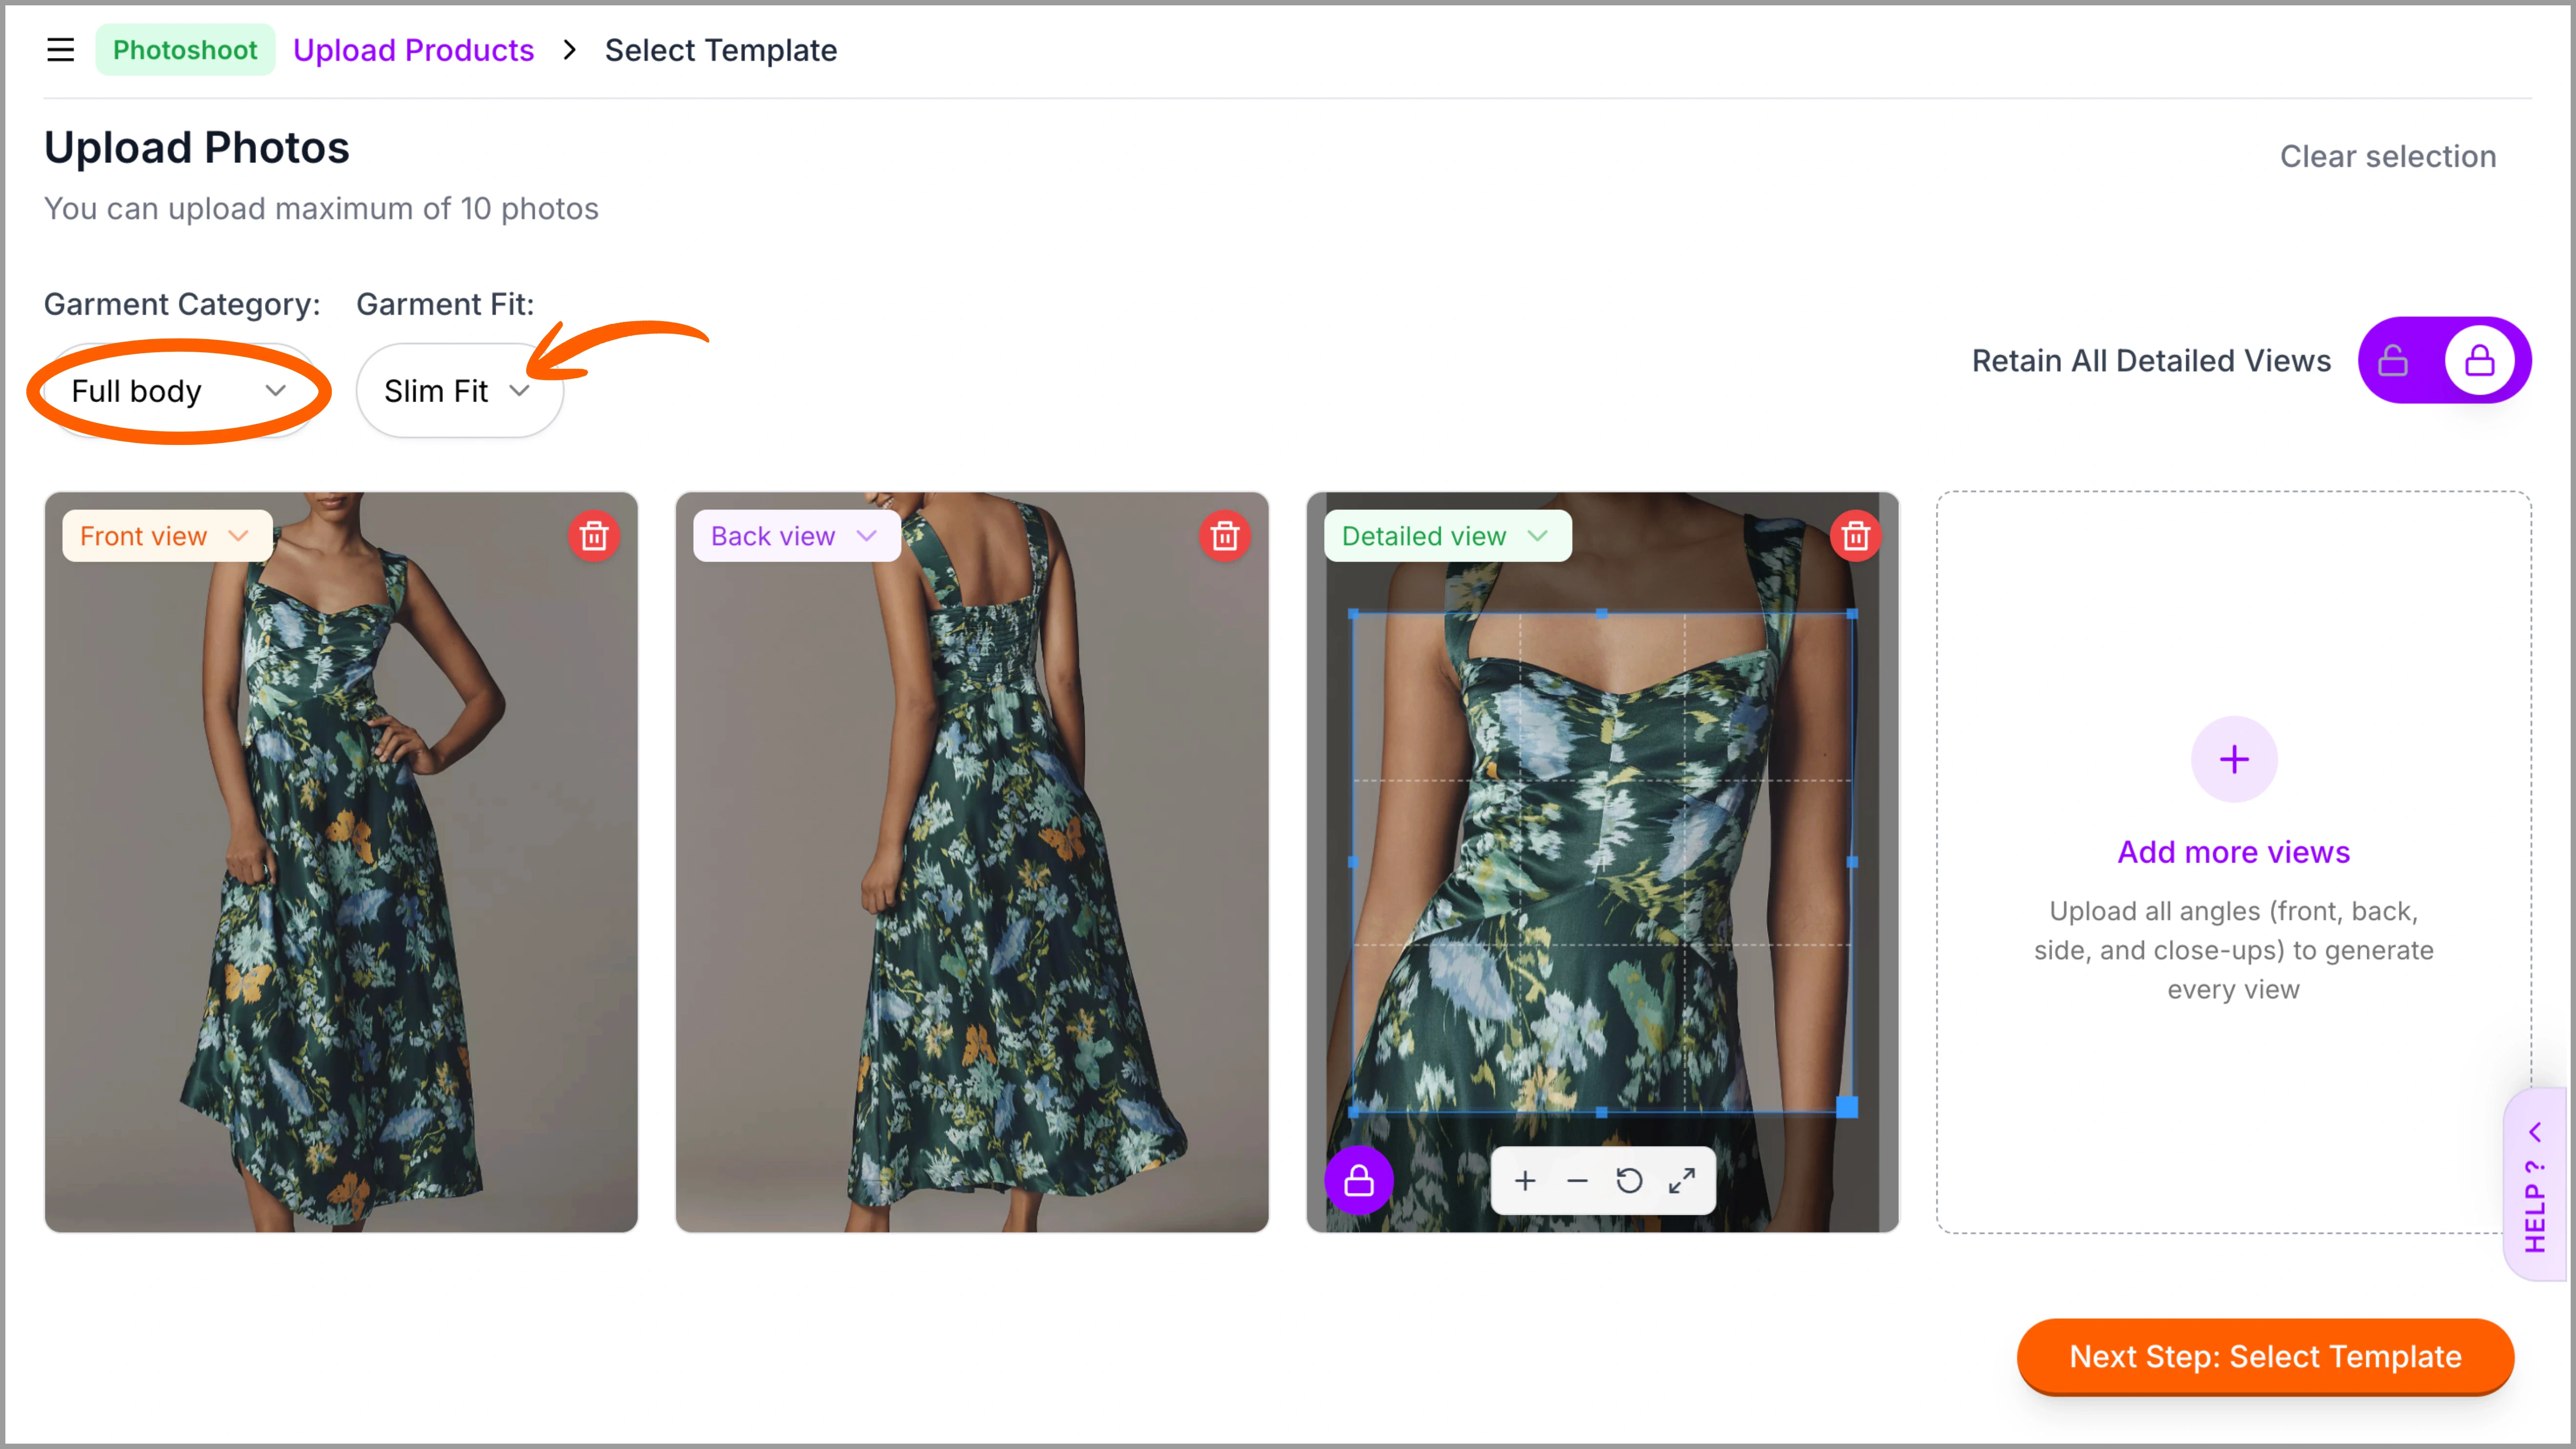
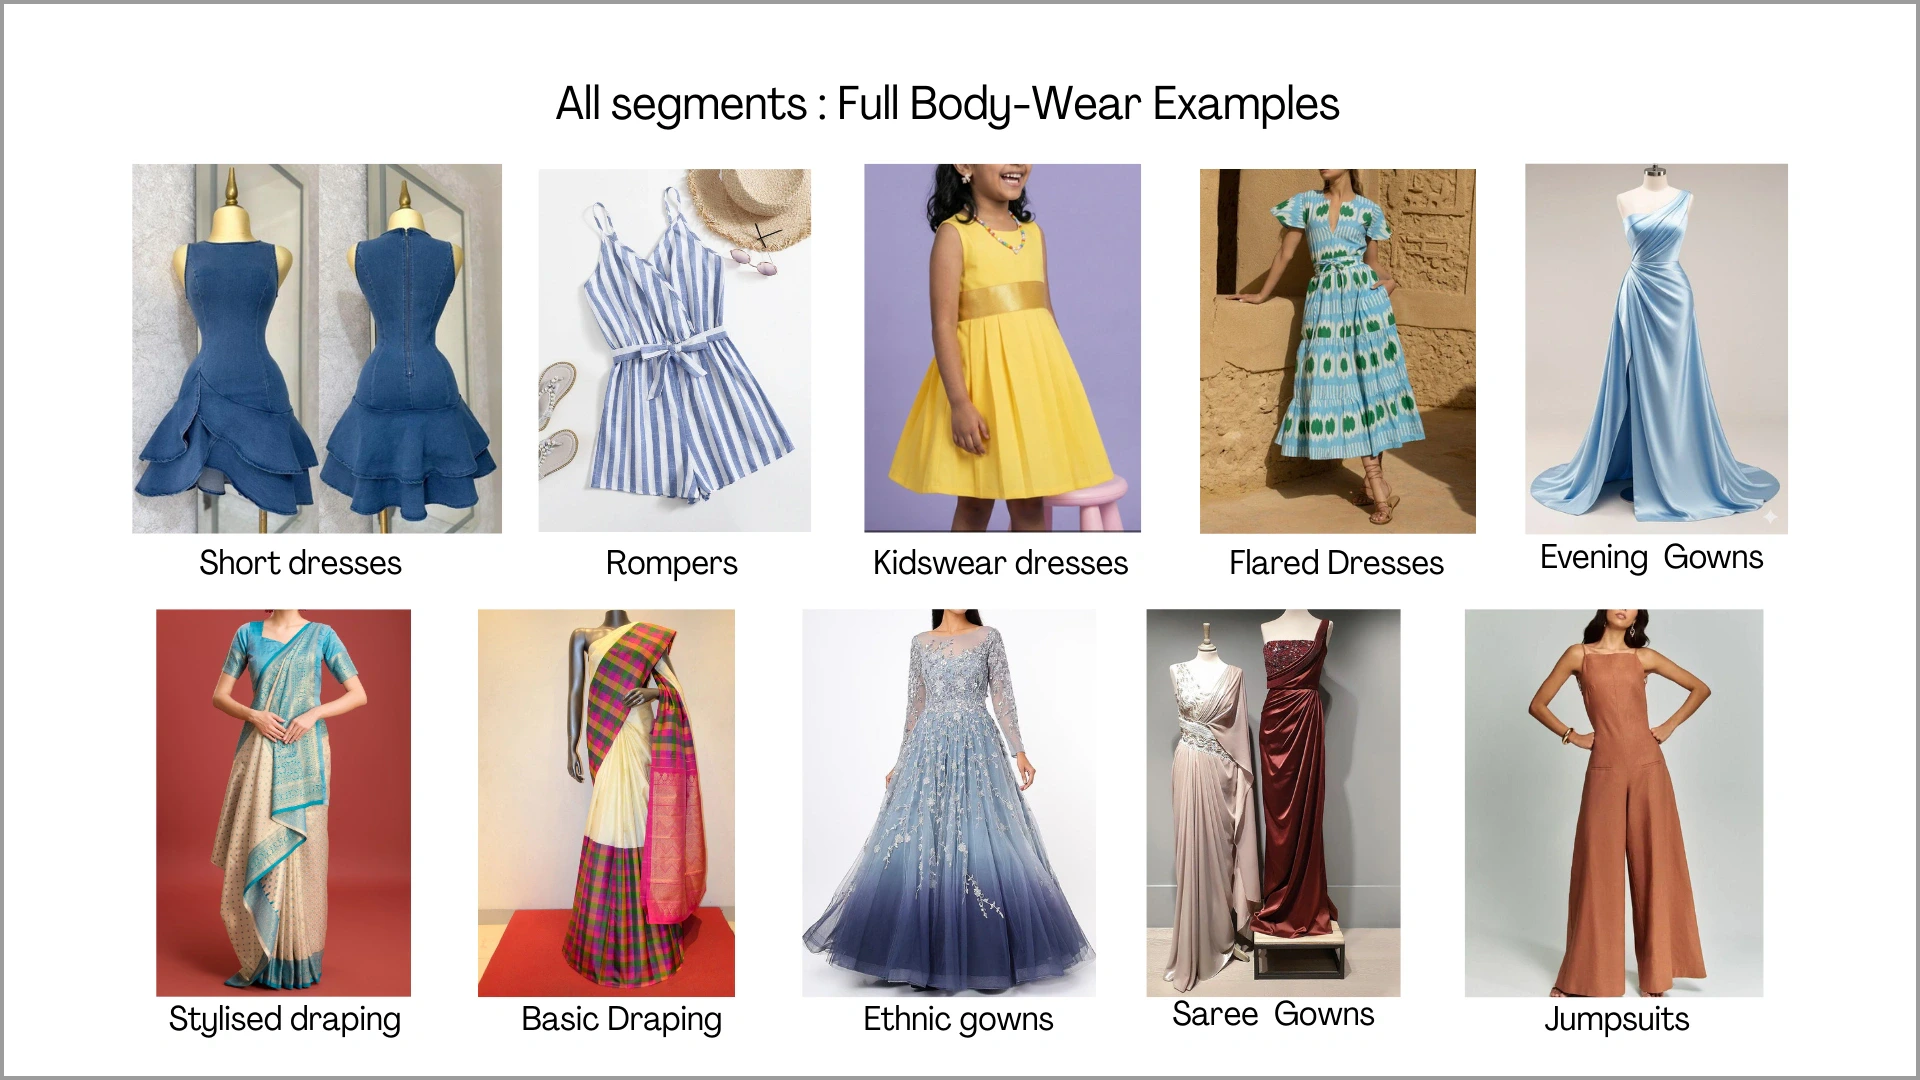
3.3.3 Full Body
Choose Full Body for garments such as sarees, dresses, long gowns, jumpsuits, or even coordinated 3-piece sets. This category is suitable for outfits that cover both the upper and lower body as a complete look. Before uploading the images, make sure to select ‘Full Body’ and choose fit styles after uploading the images.Full-body garments like sarees, gowns, and dresses require clear silhouette visibility. For draped or flowy styles, mannequin or model shots are recommended to properly capture fall, pleats, and structure.
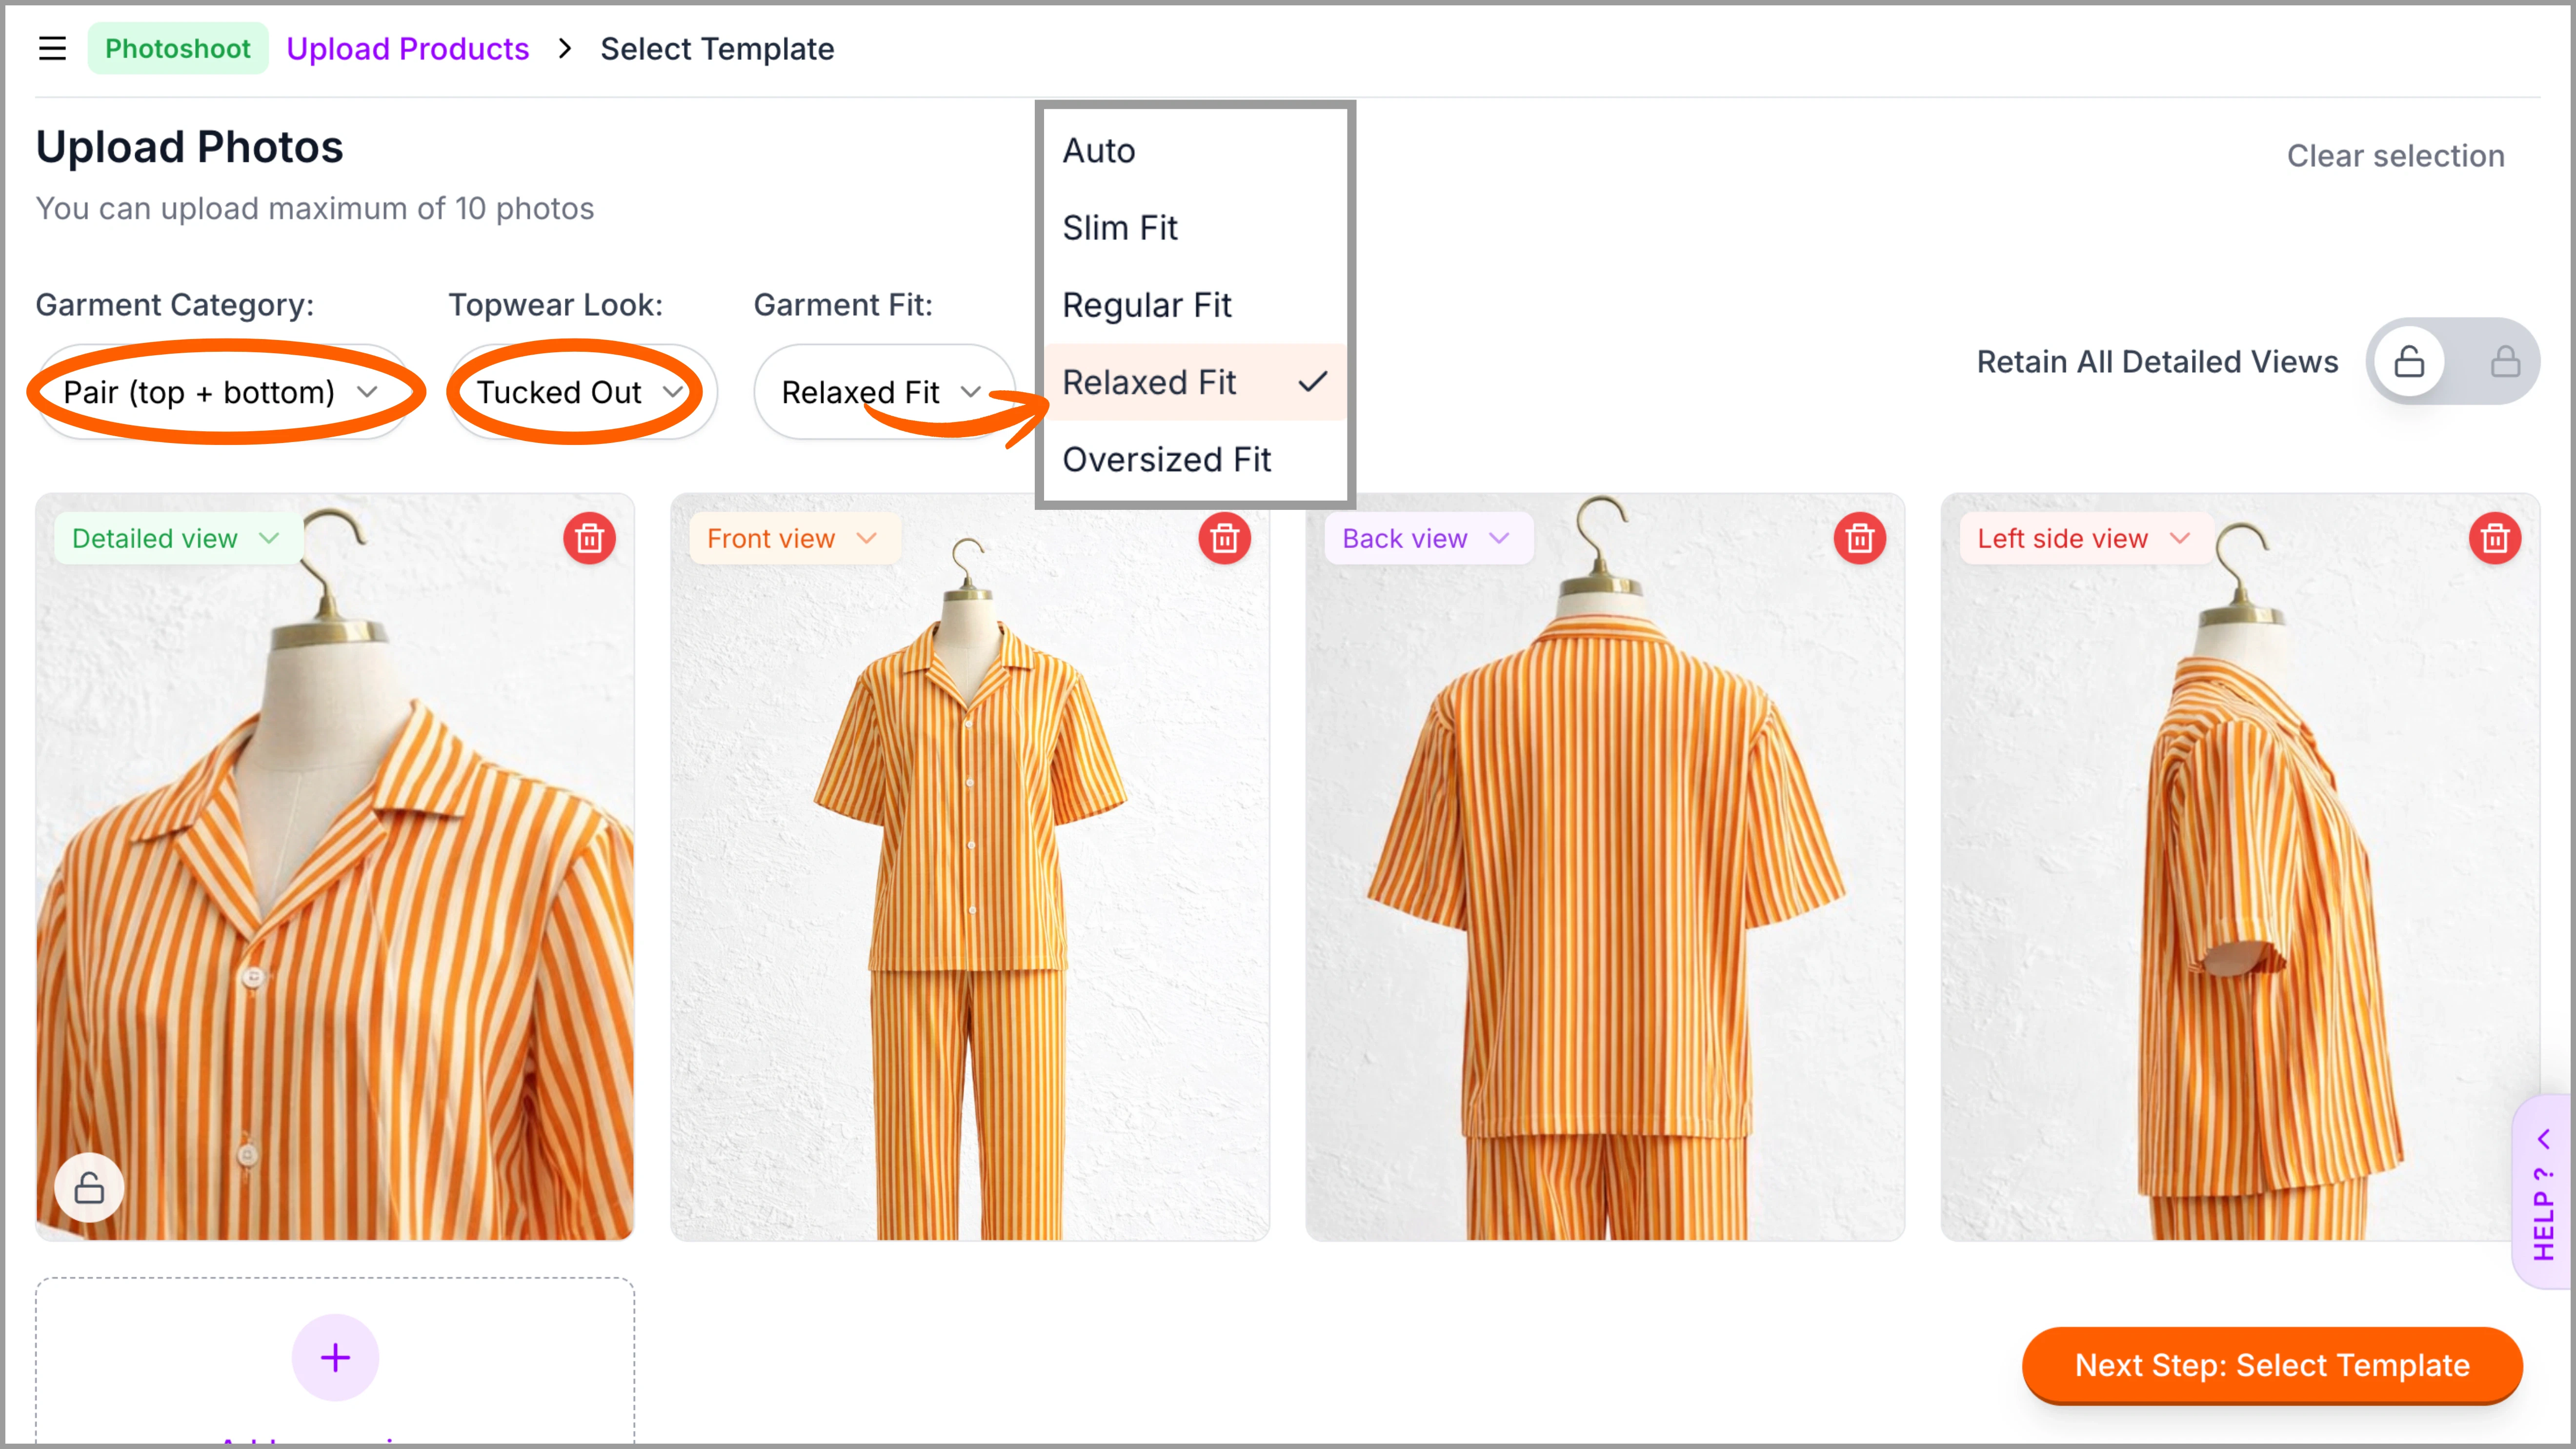
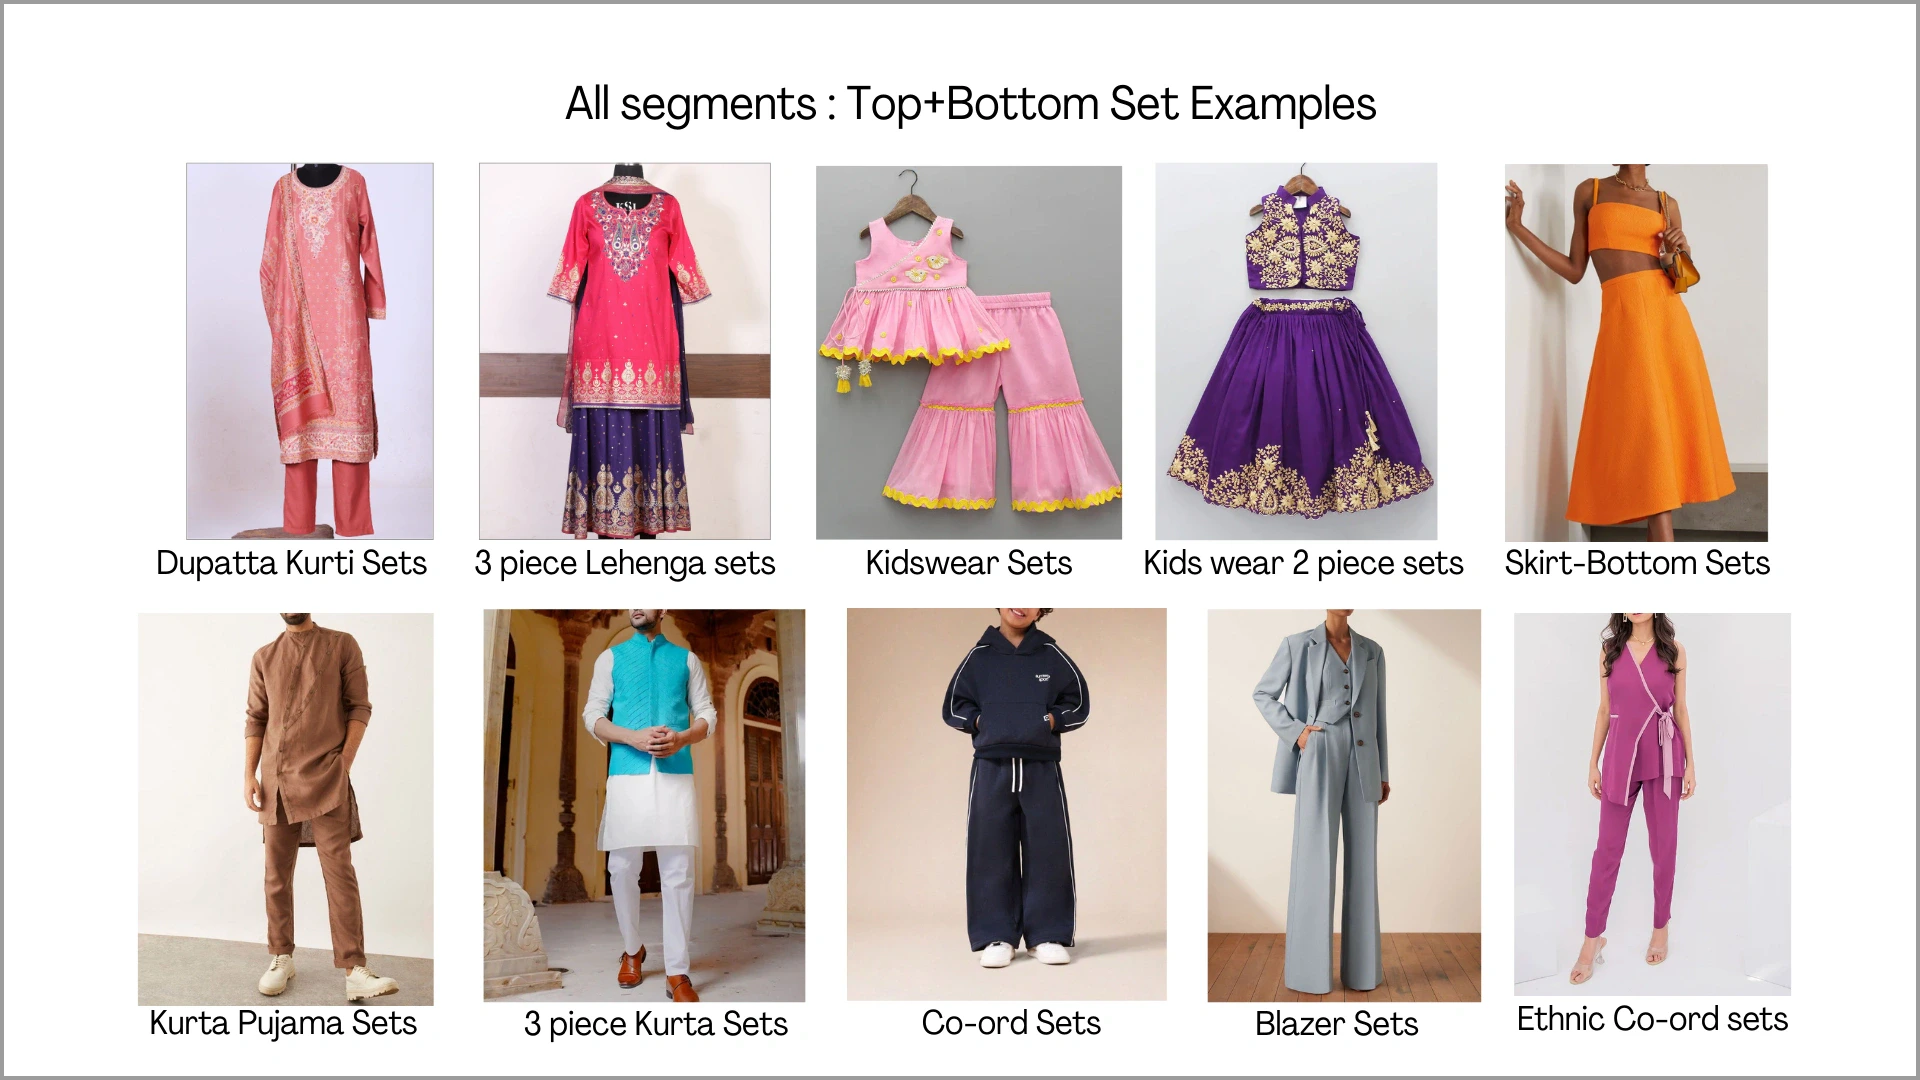
3.3.4 Pair (Top + Bottom)
Choose Top + Bottom (Set) for coordinated outfits such as co-ord sets, kurti with pants, tracksuits, or any matching top-and-bottom combination uploaded together. This category is suitable when both pieces are intended to be generated as a complete set.Top-Bottom should be uploaded together in one frame. Ensure both pieces are clearly visible and not overlapping. For detailed sets, mannequin or model shots are preferred. Hanger images also work well for structured sets.
3.4 How to Use Ayna Studio
After uploading your images, you can generate new photoshoots or refresh your existing catalogue with ease using Ayna Studio. Ayna allows you to upload garments, change backgrounds, apply themes and templates, and create multiple pose and styling variations in just a few clicks. Watch a quick walkthrough here. Or explore the step-by-step process in our detailed guide: How to Use Ayna Studio4. Post-Production & Download
Now that Ayna has generated your photoshoot, you can refine your images, apply marketplace-specific cropping, reorder and organize your files, and finally download your outputs for use across platforms.4.1 Image Refinement
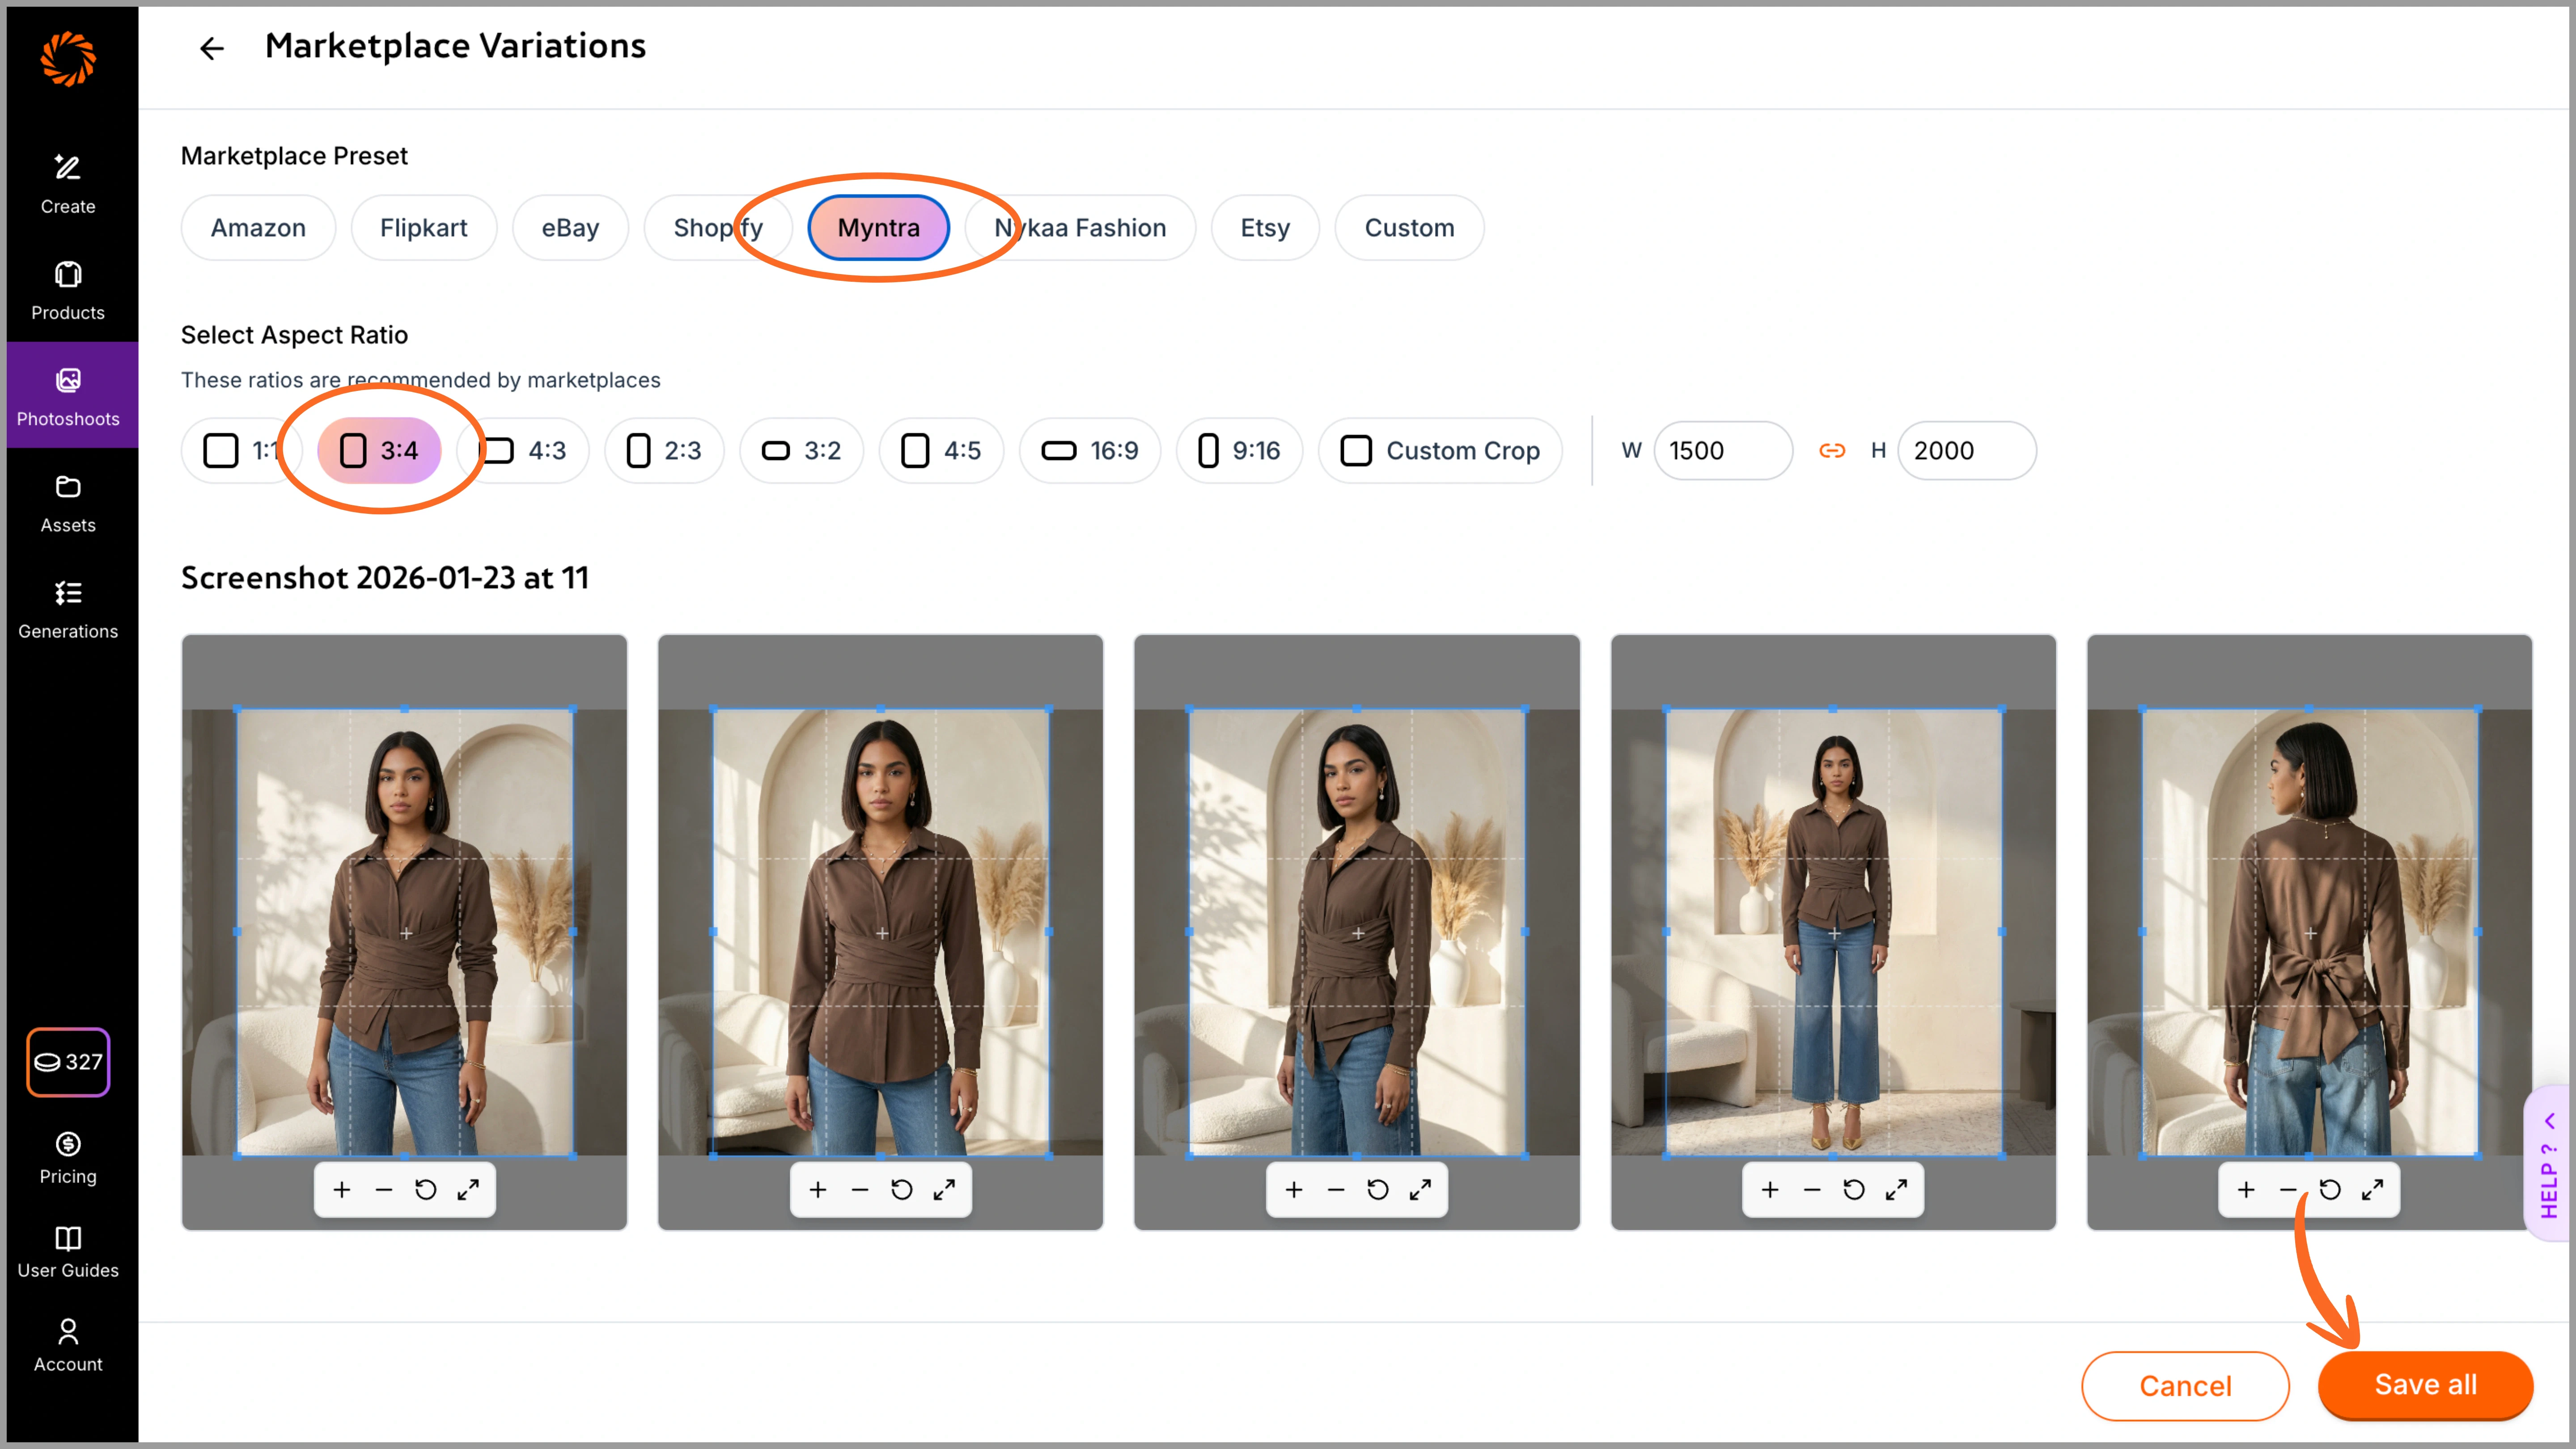
For a detailed walkthrough of image refinement, see: Refine Image4.2 Marketplace Variations
Once your photoshoot is generated in a custom size, you can instantly create marketplace-specific variations such as Myntra, Nykaa Fashion, Flipkart, and more. Select the desired marketplace to crop your images in the exact ratio supported by them and save changes. All variations can be viewed under the ‘photoshoot’ section. This eliminates the need for manual resizing or cropping. All marketplace versions are automatically saved under the same photoshoot, and you can select and download them together in a single folder. To use this feature seamlessly, we recommend creating your initial images in the Amazon (1:1) ratio so that images can easily be cropped without missing out on any details.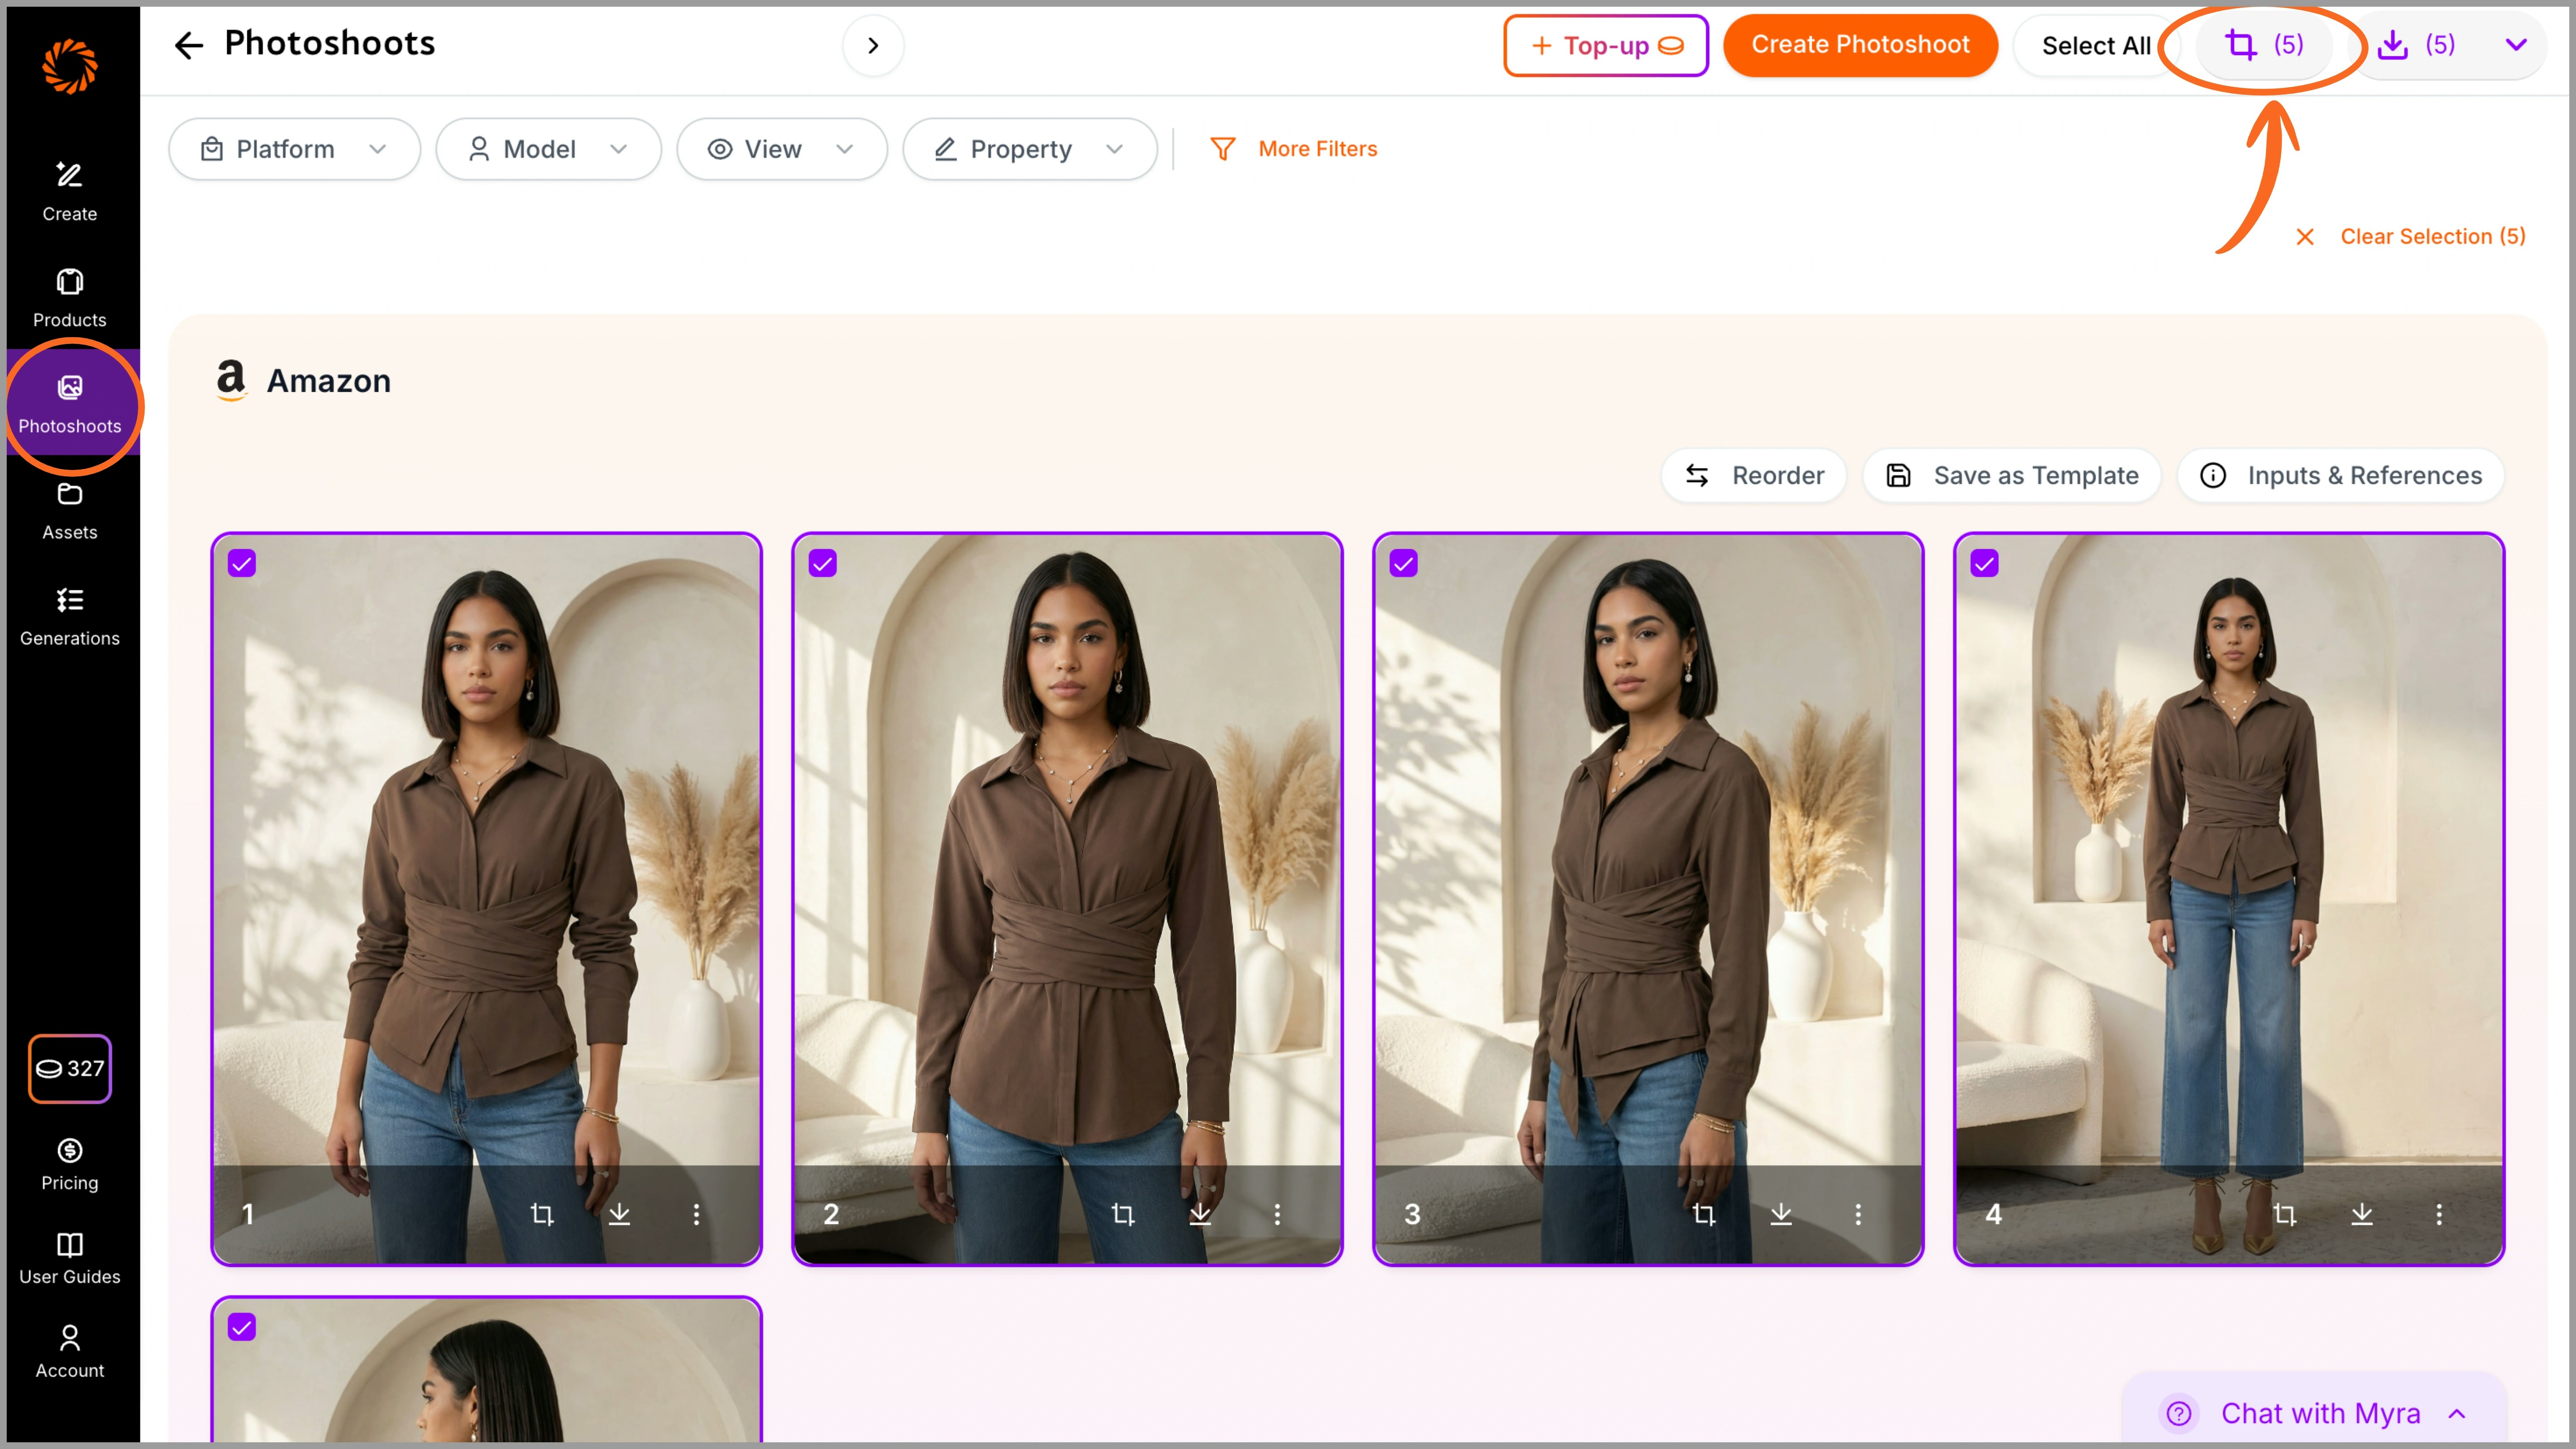
4.3 Reordering of Images
After your images are generated, you can rearrange them directly within the Photoshoot section. Simply drag and reposition the images to set your preferred sequence. For example, front view first, followed by side views, detail shots, and back view. This ensures your images are saved and downloaded in the correct order, eliminating the need for manual rearrangement later.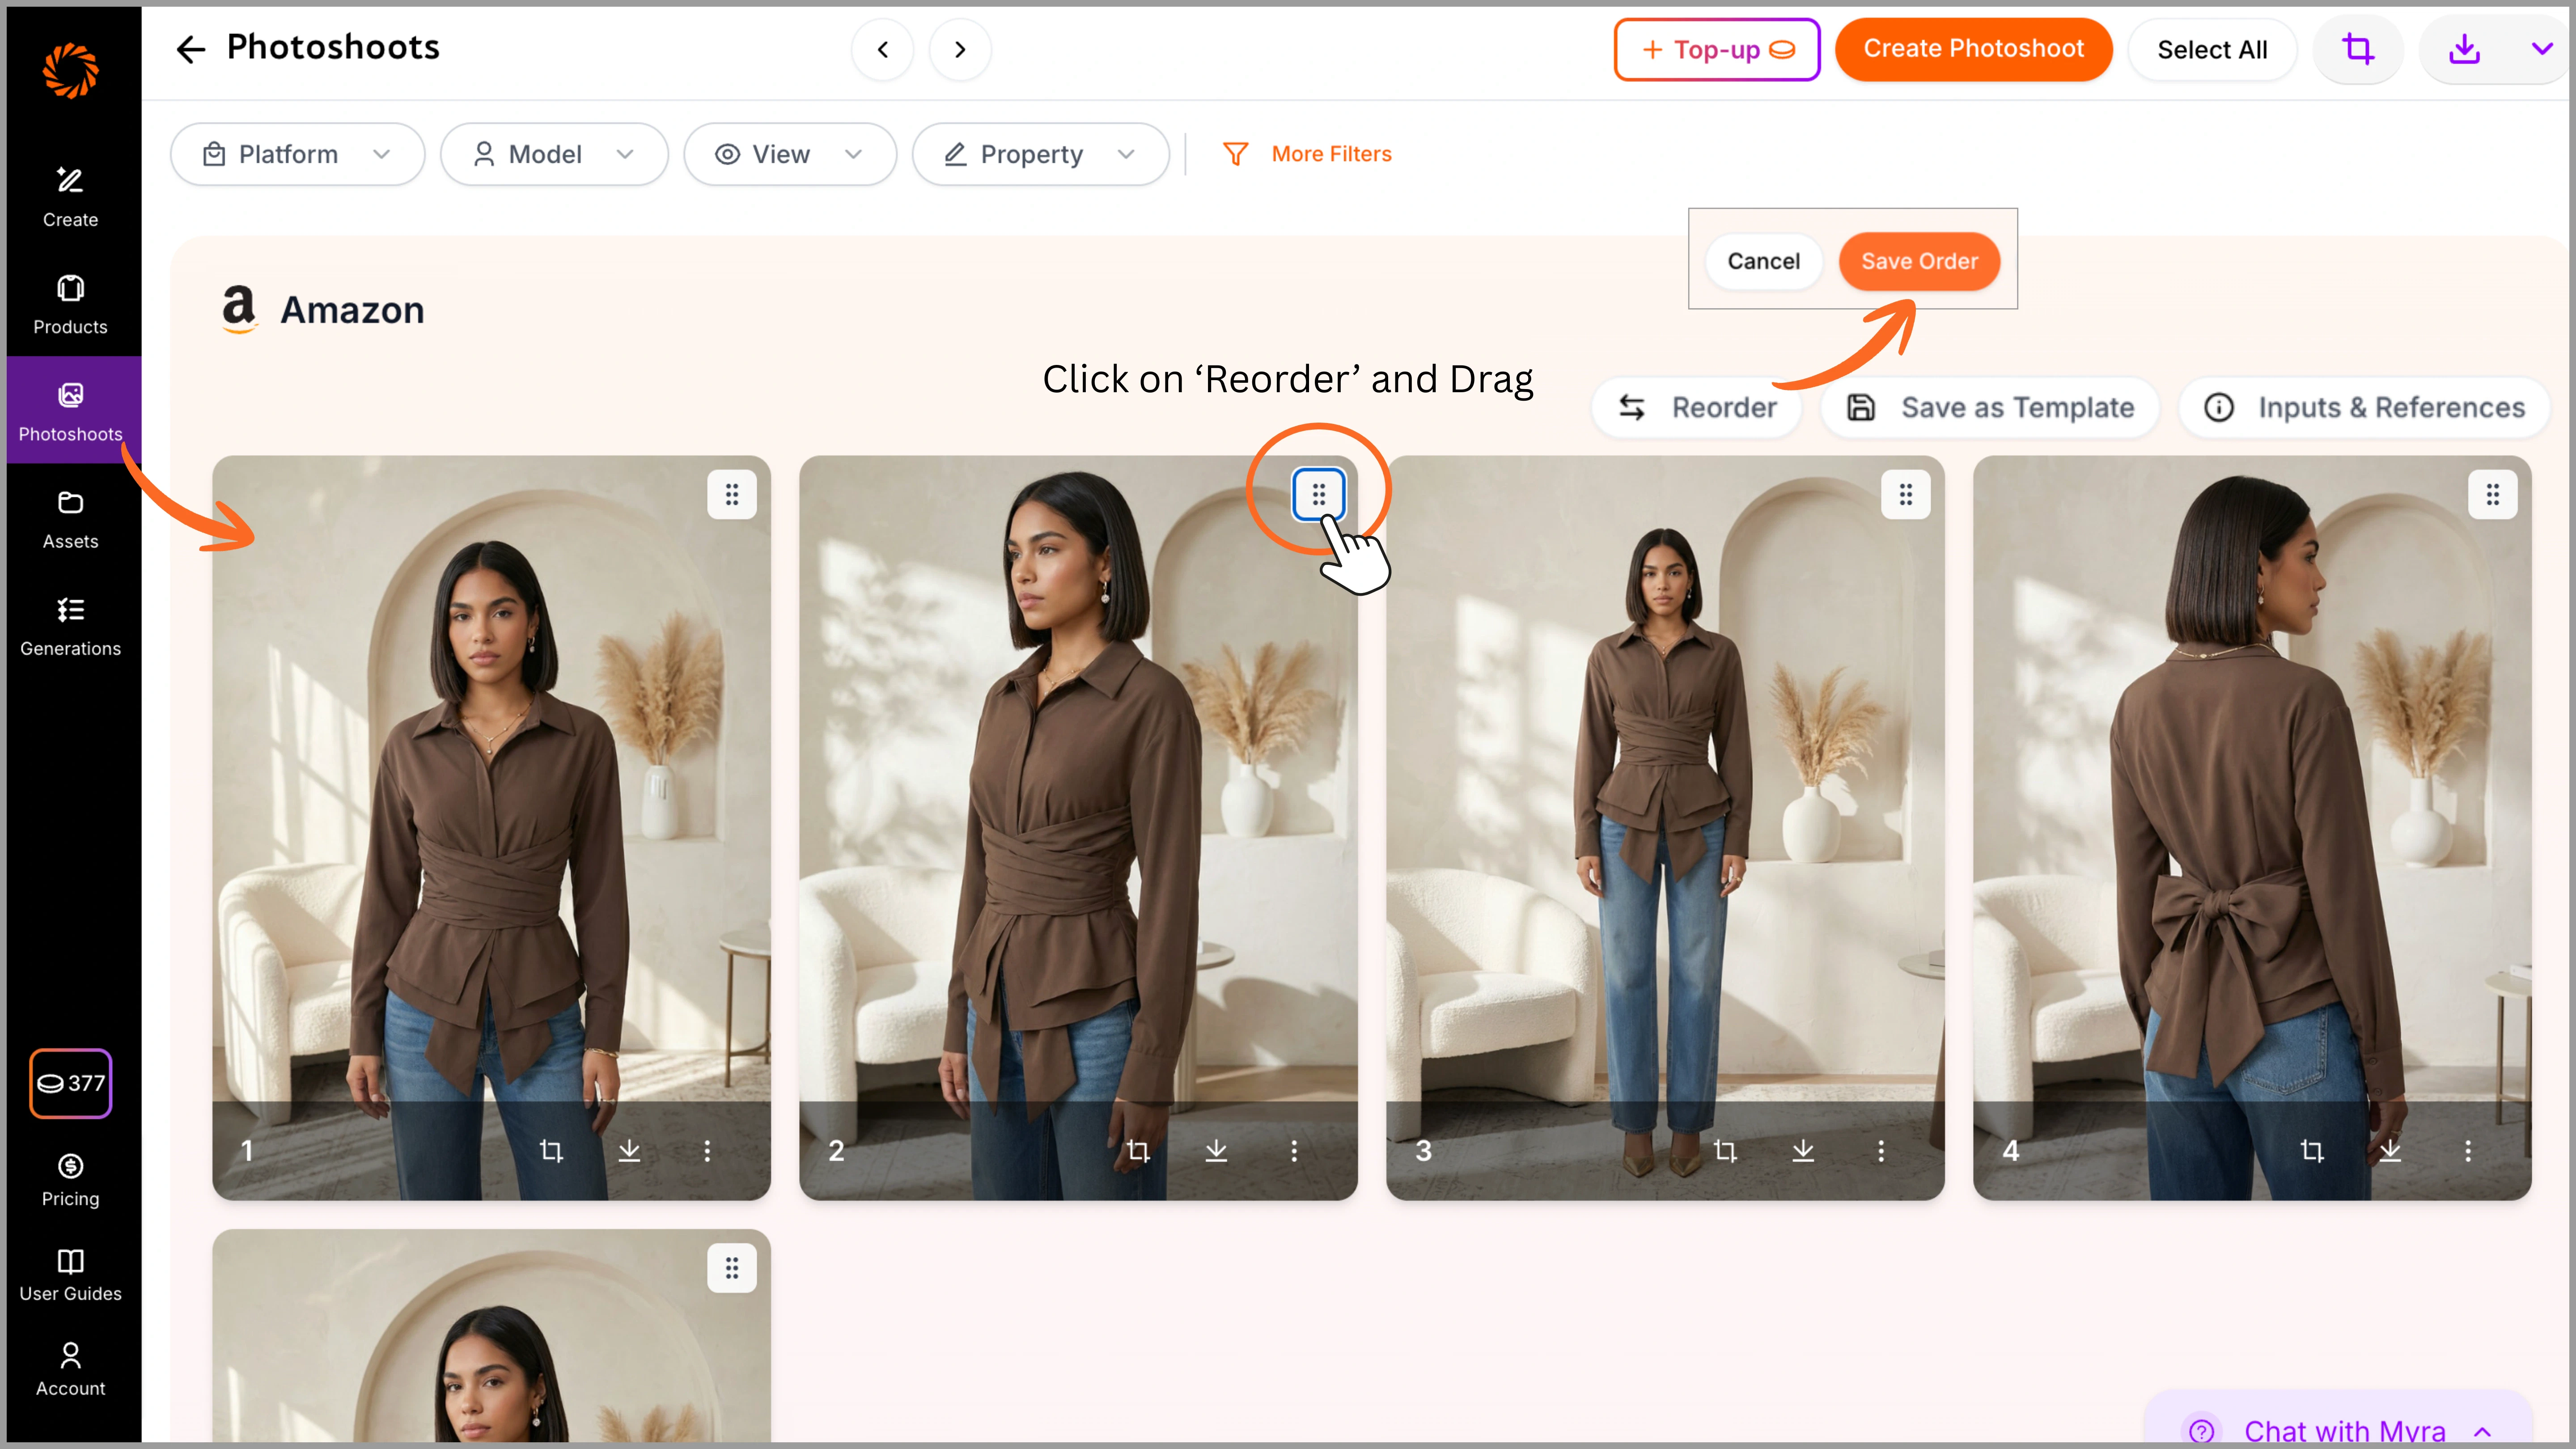
4.4 Naming and Foldering
You can name your folders or images before uploading them to Ayna, or upload them directly and rename them later from the ‘Product’ tab. The photoshoot name will reflect the same folder name, and when you download the images, they will be saved using that name for easy identification.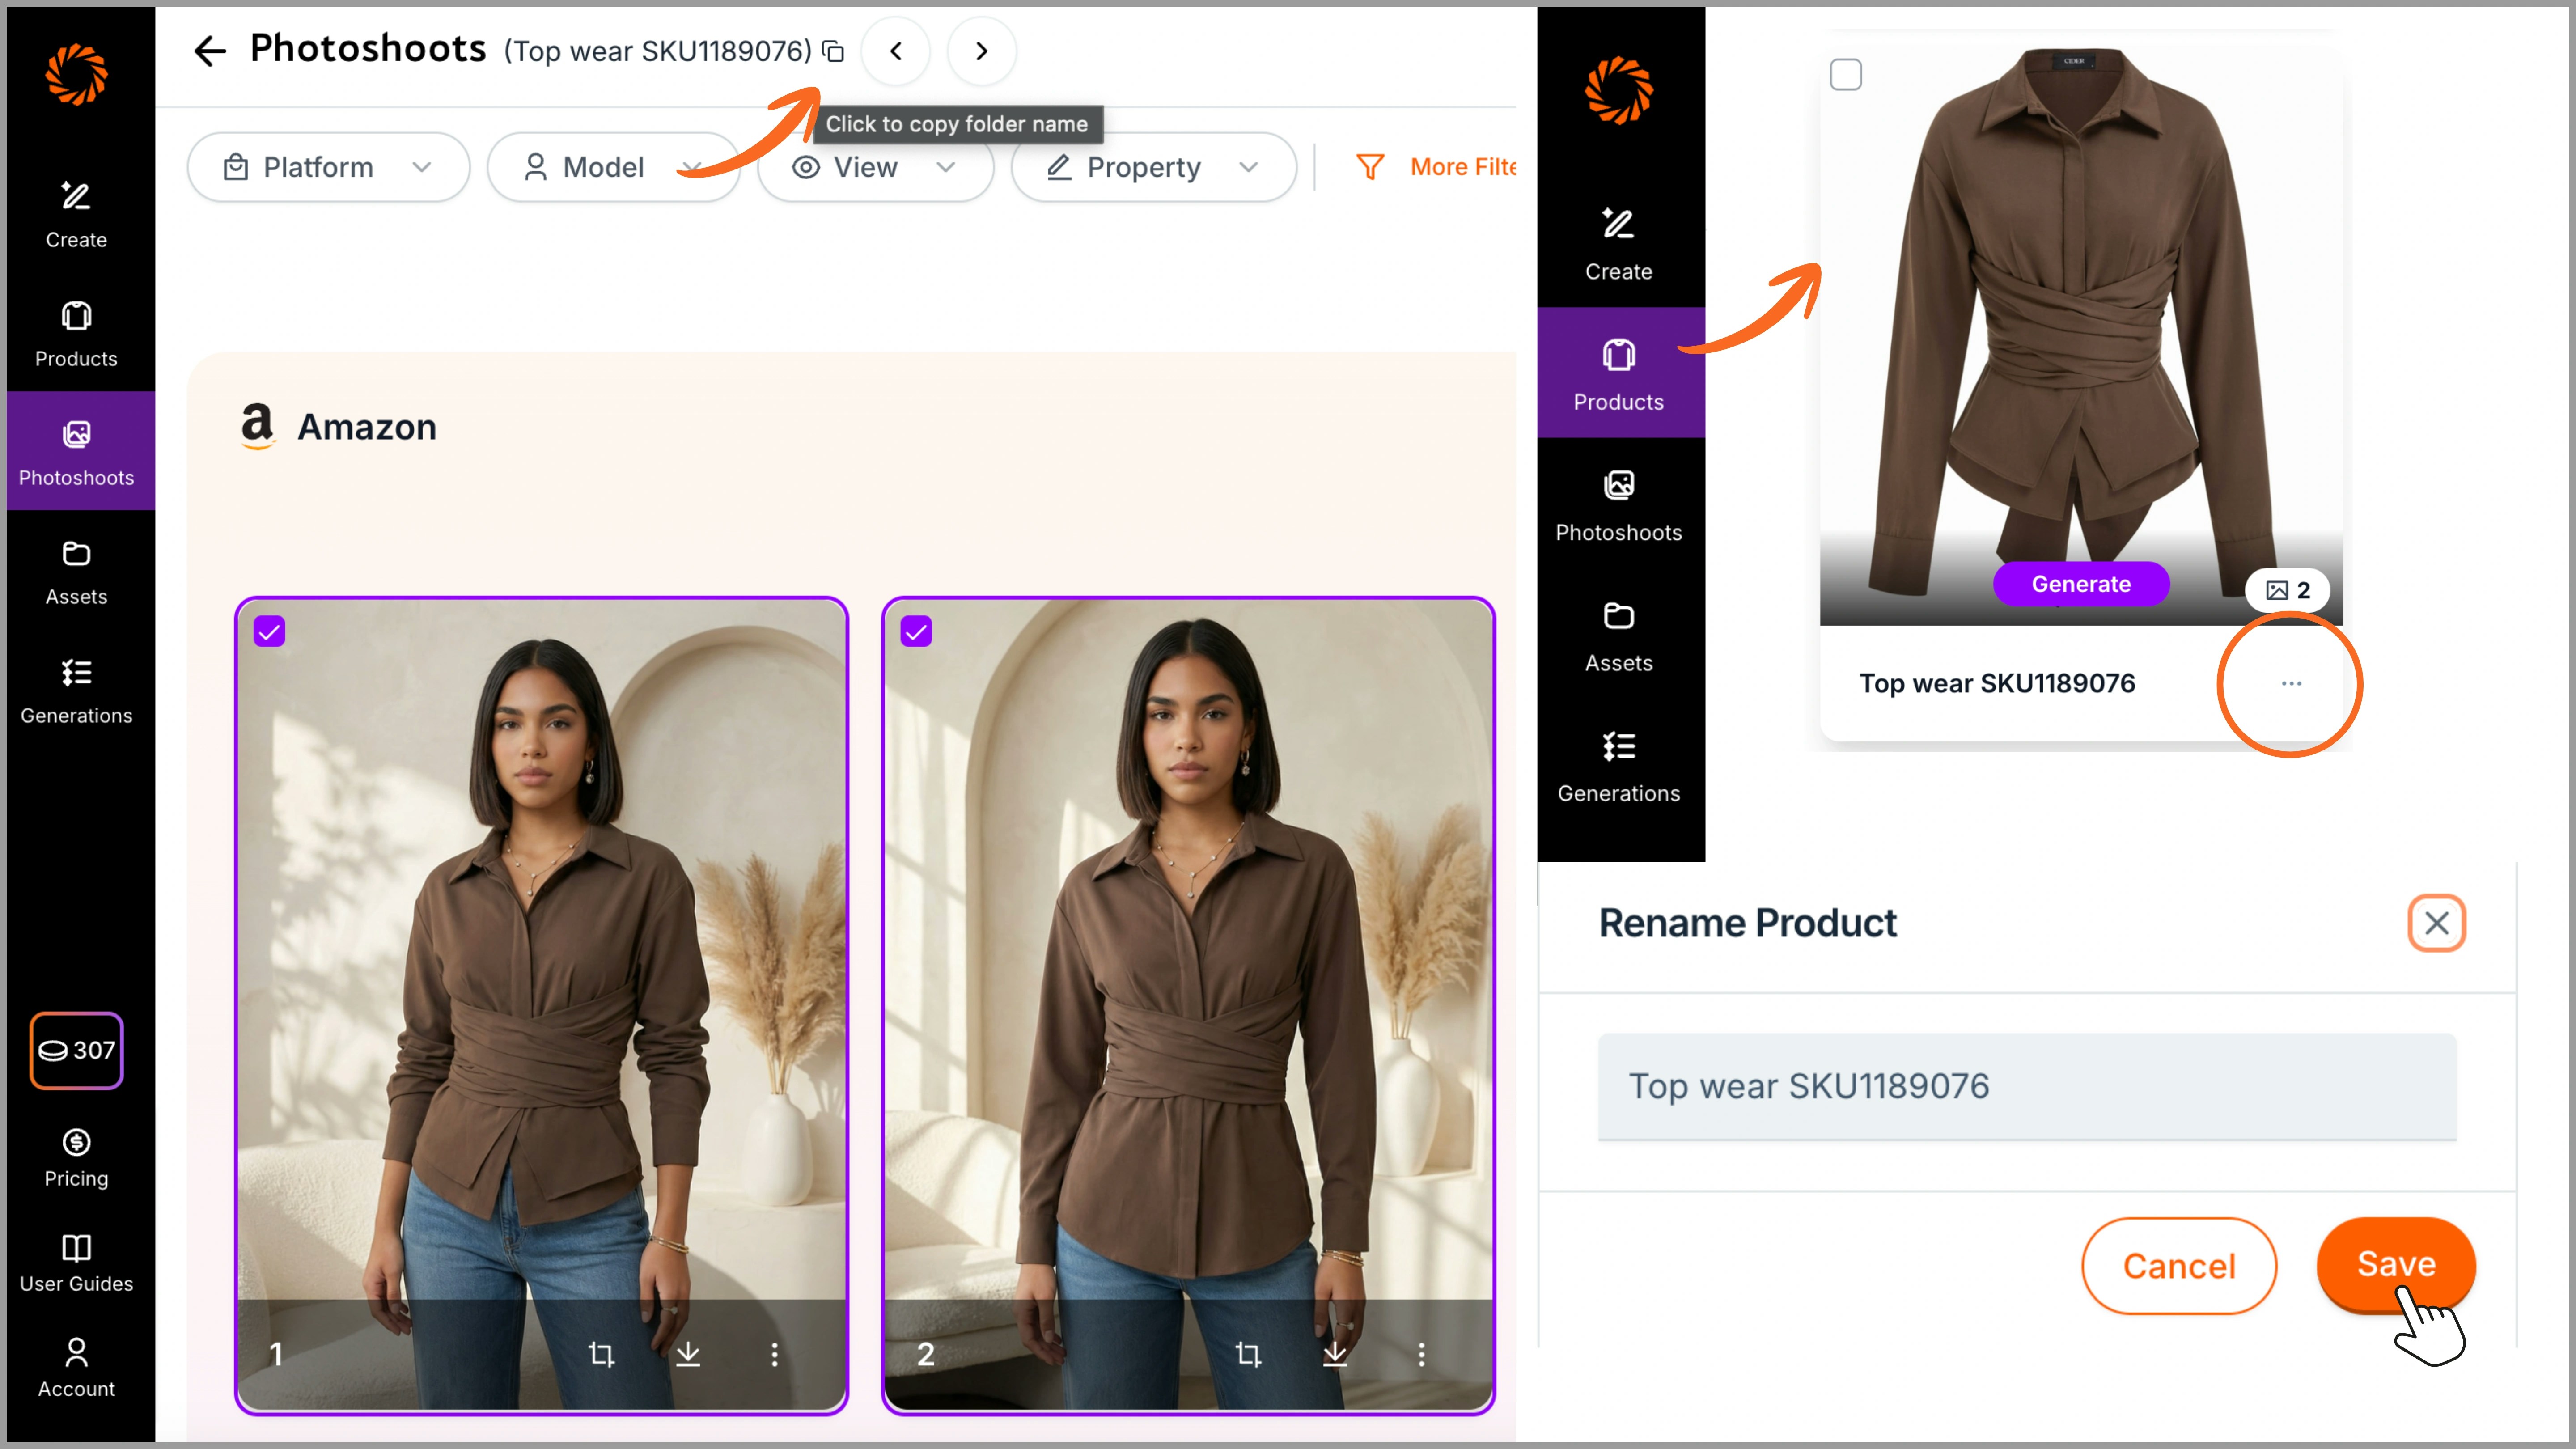
4.5 Downloading
To download your images, select the desired marketplace platform from the Platform option. All generated marketplace variations (such as Amazon, Myntra, etc.) will be displayed. Select your images, and download them in PNG or JPG format. The images will be saved in a folder with the same photoshoot name for easy organization.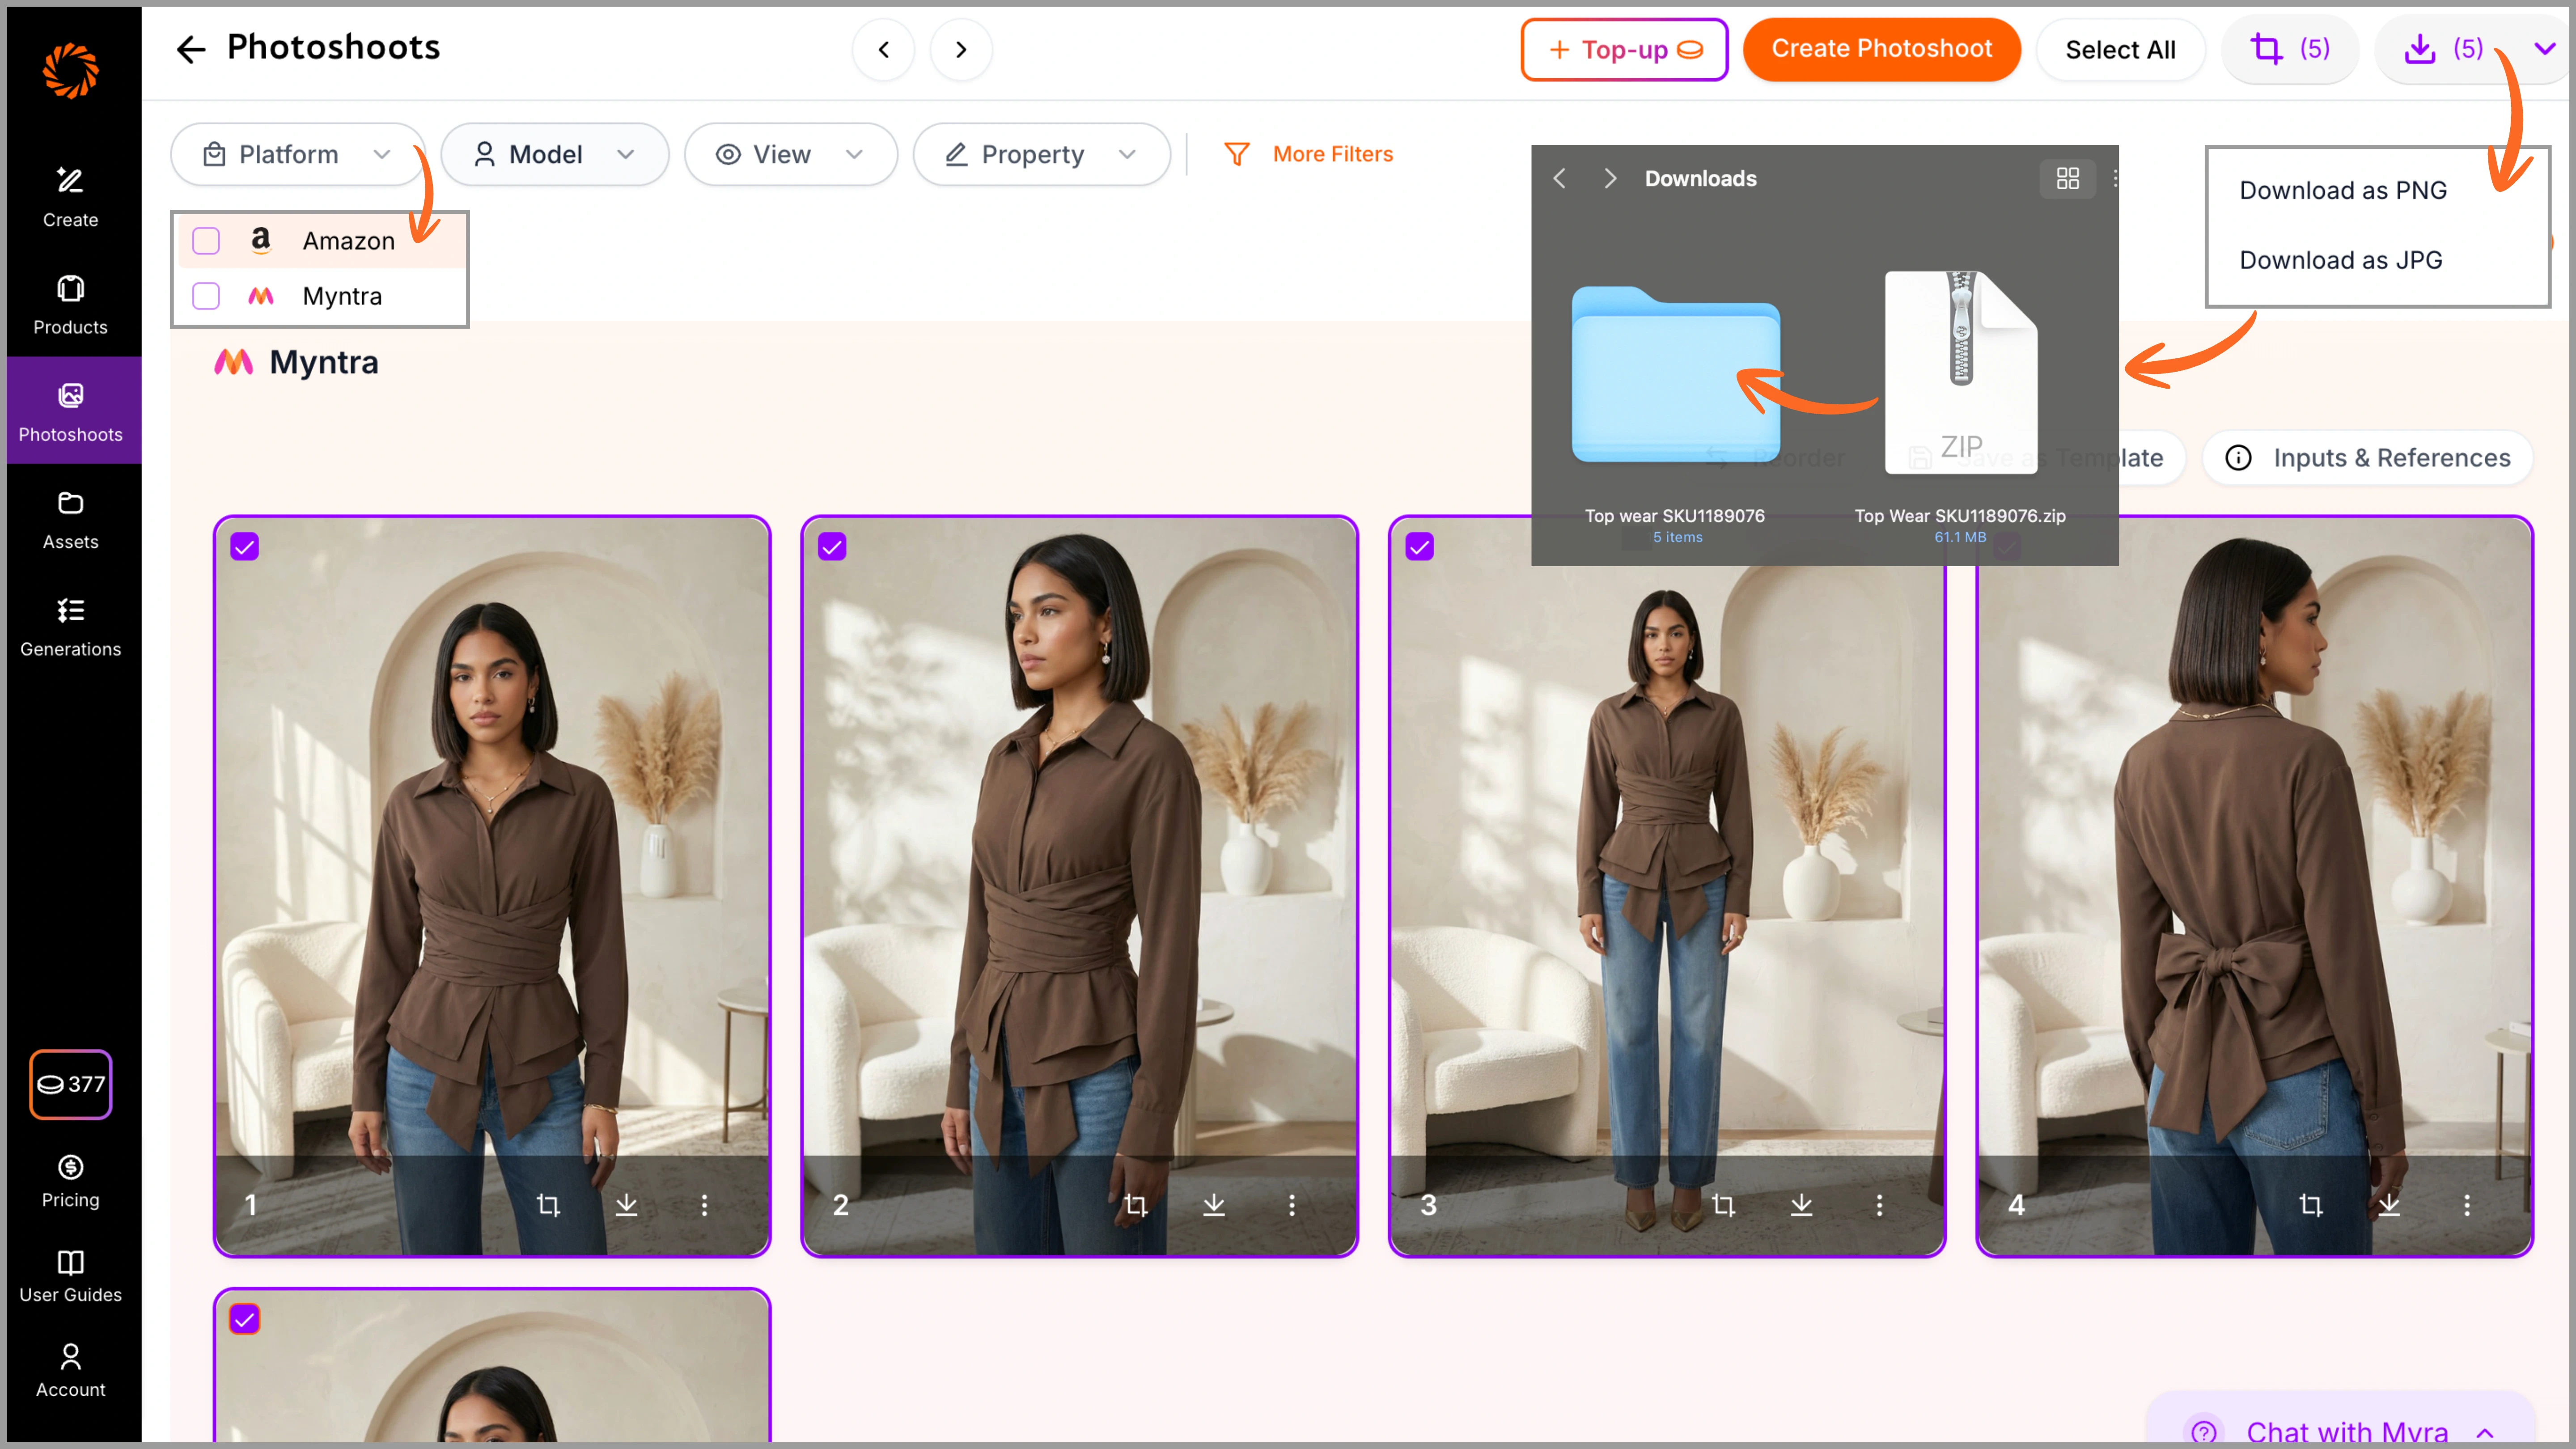
That’s it! Follow these guidelines to get the best output possible. If you have any doubts, feel free to contact us at support@getayna.com or book a demo with us.